Practicum overview
Welcome to the practicum section of the “Introduction to GitHub” workshop!
As a researcher and a programmer you wear several hats. You are a—
- Creator: you solve research problems, and provide these solutions to the public.
- Consumer: you use other people’s code to either reproduce or replicate their findings.
- Contributor: you contribute to the code of others by adding new features, fixing bugs, or improving their documentation.
- Project manager: you manage the development of a software project that includes your own code, and the code from others (your team, your collaborators, and open source contributors from the public).
For each role, Git & GitHub provides you with a specialized set of tools to help you better achieve your goals. In this practicum, you will learn how to use Git & GitHub to play the role of a Creator and a Consumer. If you scroll further down this document, we show you how to also play the roles of a Contributor and a Project manager.
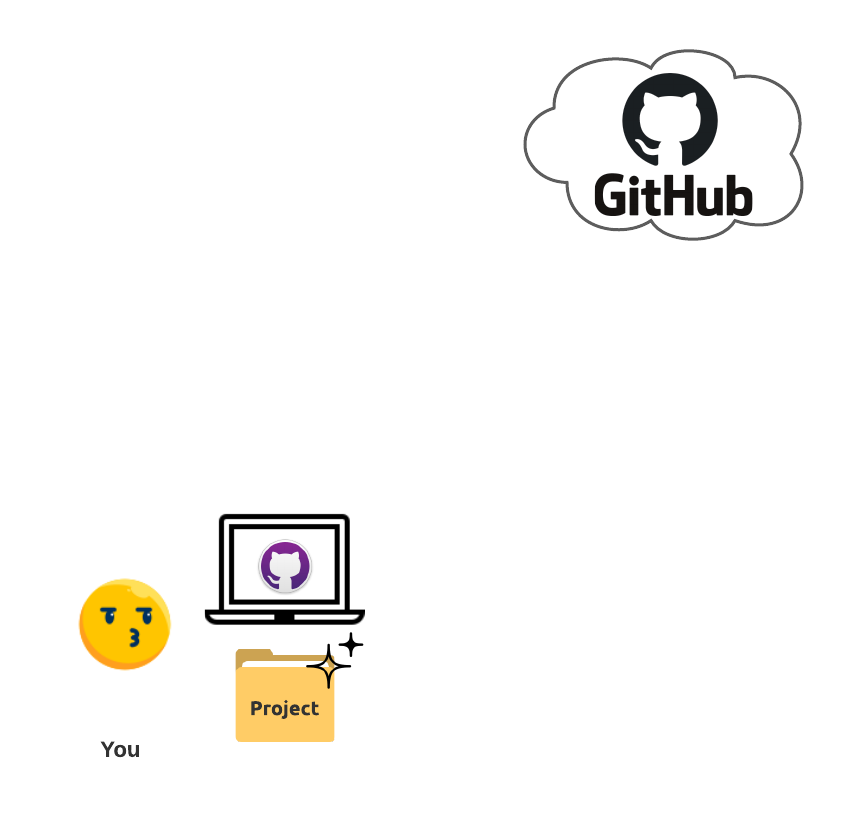
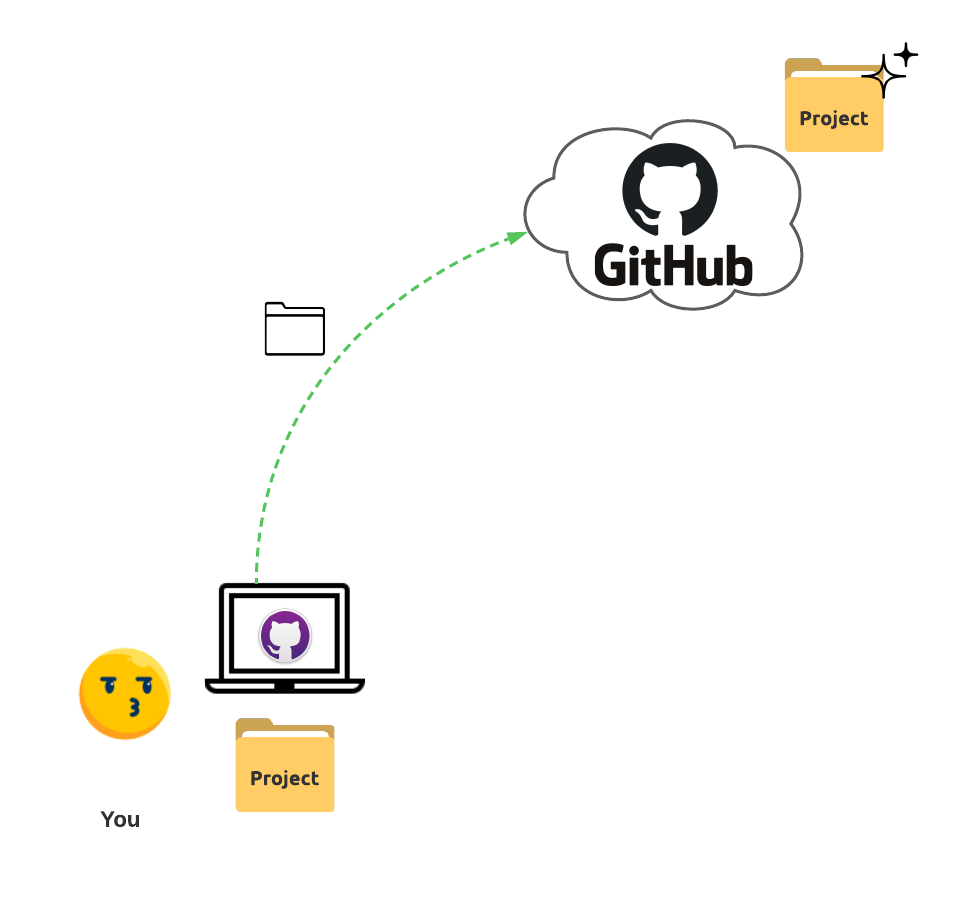
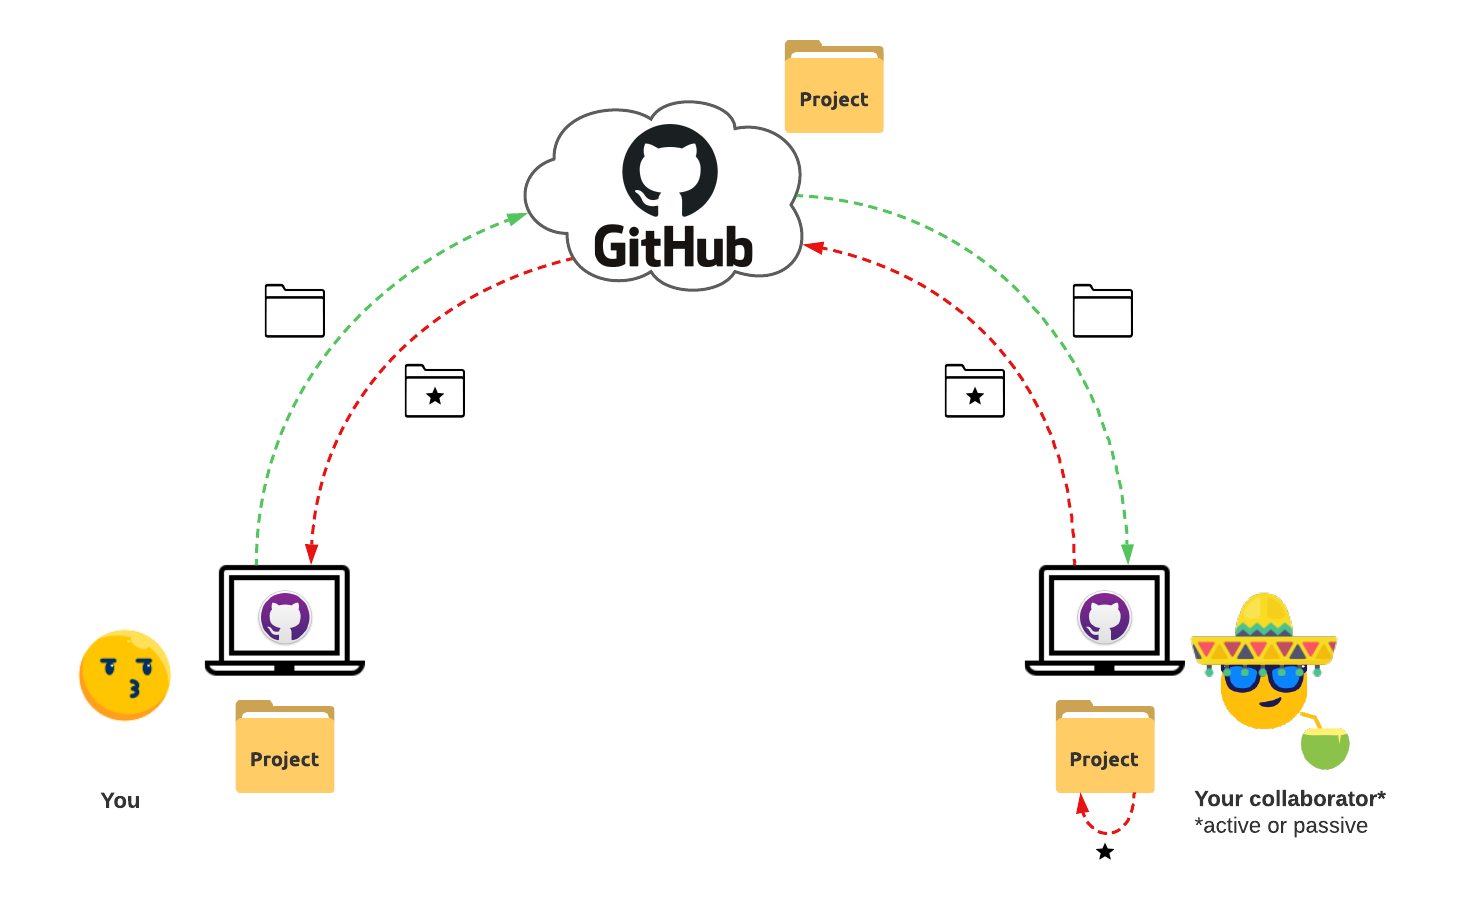
The figure below summarizes the task ahead.
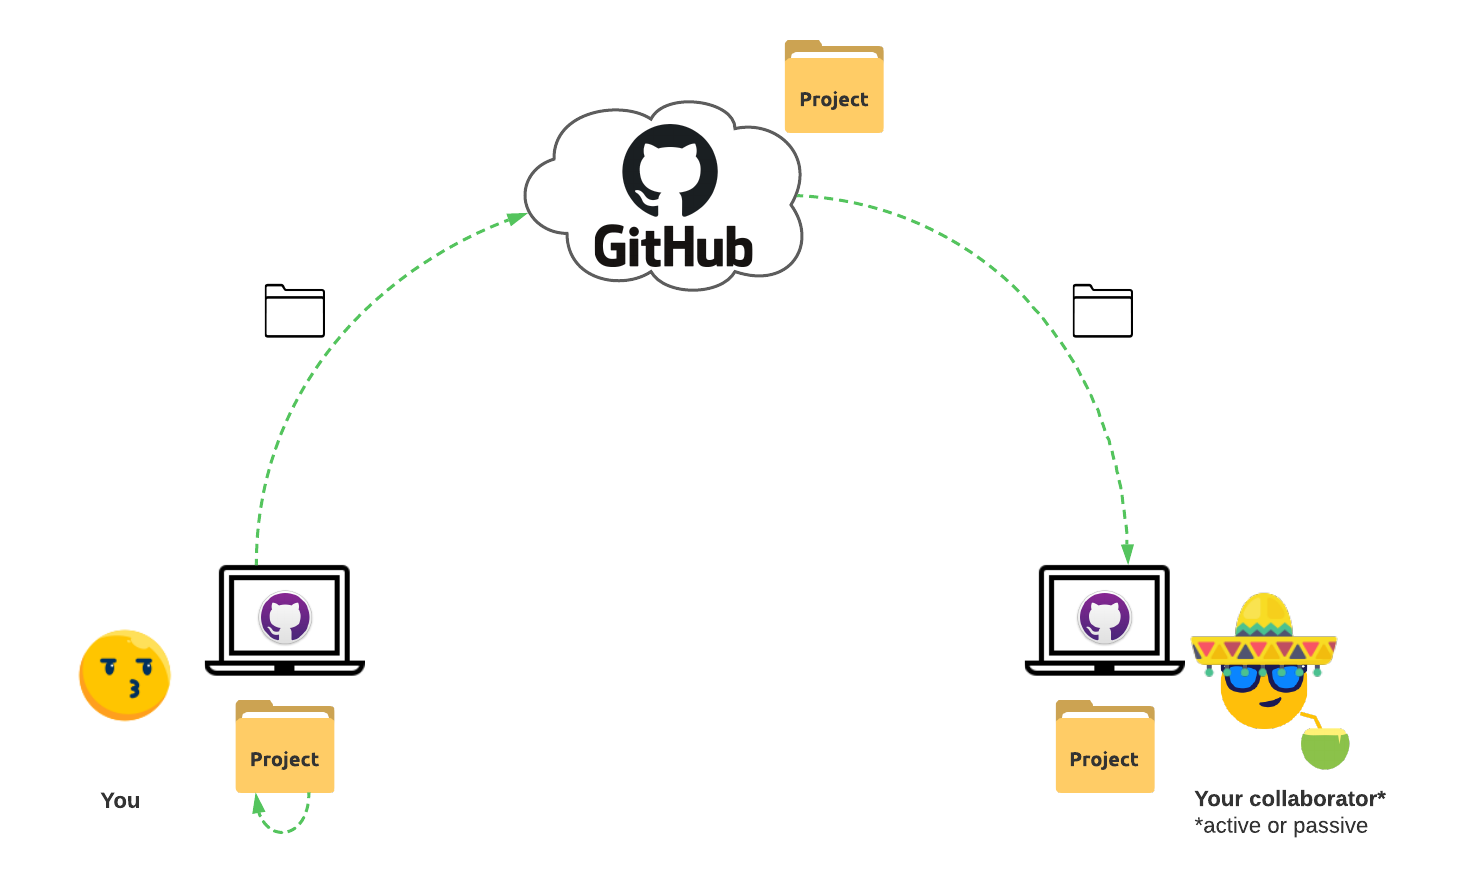
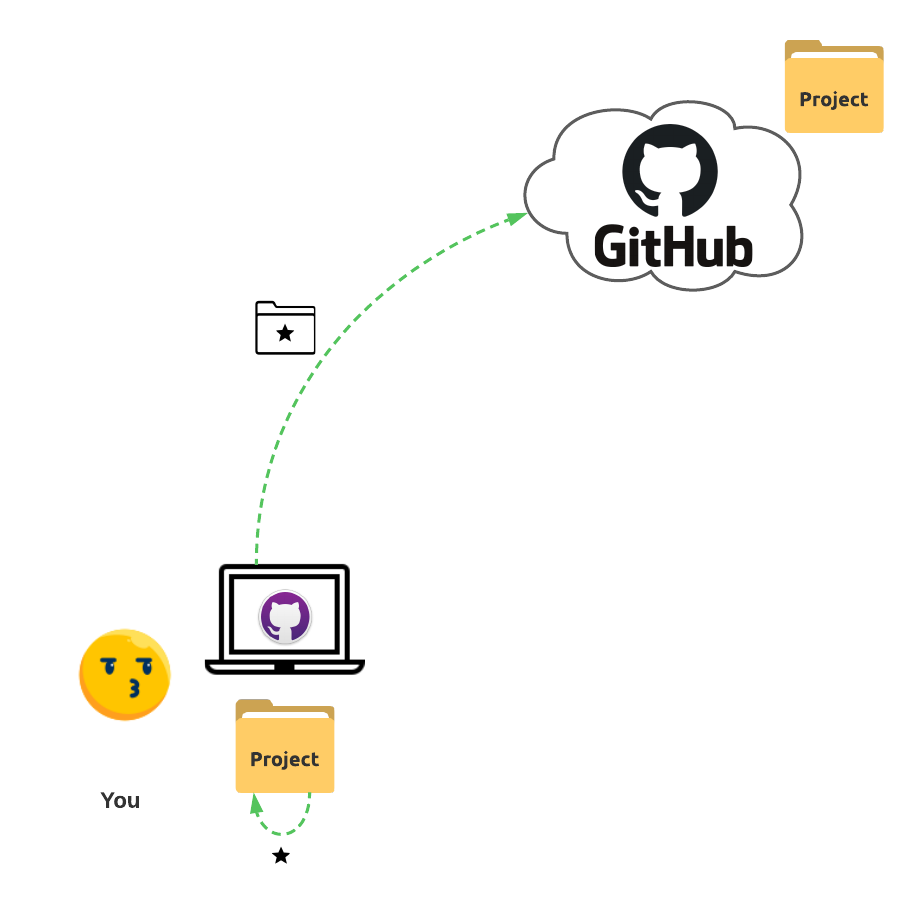
As a creator, you will create a local directory for a project in your computer. This can either be an empty directory for a new project or a directory of an existing project that you have already been working on. We will then create a copy of this project remotely on GitHub. This step will instantly make our work significantly FAIRer, and we shall see how. You will then continue to make changes to the project files locally as you always do but then also synchronize these changes to the remote copy of your project on GitHub.
As a consumer, you will clone (similar to a download but empowered with Git’s version control features) a remote copy of a project that you like to your computer. You will then run the cloned code locally in your computer.
As you walk through this practicum, please pay a special attention to how each of these steps help you achieve FAIRness.
Creator workflow
When playing the role of a creator, researchers solve a problem of scientific interest and provide the solution to the public. This solution is typically in form of a scientific publication along with a software package, and some data for demonstration and easy verification.
The following steps are the typical workflow of a creator—
- Create a local directory for the project.
- Create a remote copy of the project on GitHub.
- Make changes to the project files as you solve the various sub-problems that contribute towards solving the overall problem. While doing so, keep both the local and remote copies of your code in sync.
Let us now walk through each of these steps in detail.
Step 1: Create a local Git repository
Create a local directory
For this practicum, please create a new directory in your computer (i.e. a local directory). You can name it anything you like. For this example, let’s call it my-project. We recommend that you use the kebab-case for naming your project directories. This is because kebab-case is the most common naming convention for software packages in the world. They come from the Unix world, and are commonly used by the R, Python, and JavaScript programming communities to distribute software.
Note: outside of this workshop, in the real-world use case, you may already have some project directories in your computer that you are looking to make FAIRer. It could be a project that you are currently working on or a project that you worked on in the past. In this case, instead of creating a new directory, you can start with that directory. For this workshop, we will assume that you are starting with a new directory.
!! WARNING !!: never put anything sensitive in the directory that you plan to put on GitHub. This is not a good coding practice! Sensitive information includes research data that your data sharing policy forbids from sharing with the public, API keys, authentication tokens, and SSH keys. Anything that you cannot share with the public. When you are looking to move an existing project directory into GitHub in order to make it FAIRer, please remove all sensitive information from this directory before you proceed to the next step. Despite GitHub offering private repositories, coding repositories are not the place to put such information. For restricted research data, in accordance with the data sharing policy, please use Box.com and access it from your code via the boxr package. Despite you sharing this code with the public, only those users with permissions will be able to ingest the data in Box. If the data sharing policy forbids using Box, create a separate directory in your computer, away from your Git repositories, for your data. For API keys, please use environment variables. For authentication tokens and SSH keys, please use a password manager.
Initialize the local directory as a Git repository
Your empty project directory is not yet a Git repository i.e., the Git software in your computer is not currently tracking all the changes that will be made in this directory.
To ask the Git software to track changes in this directory, open GitHub Desktop. Select File > Add Local Repository.... Click Choose... and locate your project directory. Alternatively, you can simply drag-and-drop your project directory into the GitHub Desktop window. Don’t click anything yet and simply observe the message on GitHub Desktop. You will see a window that looks like this—
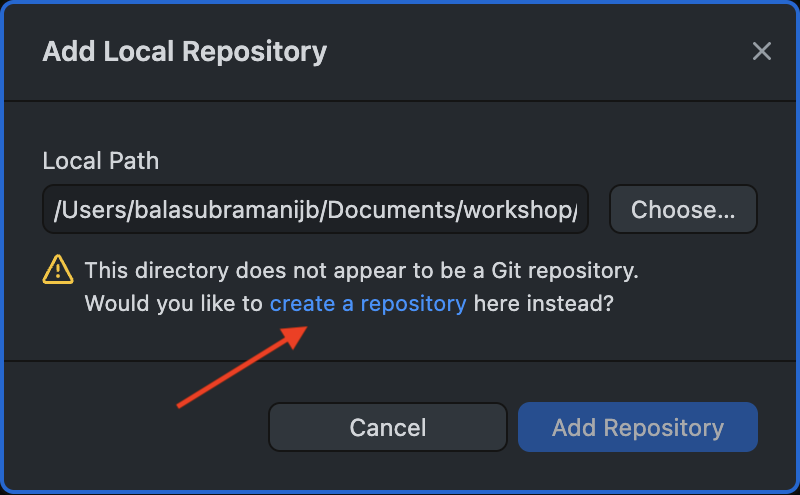
The pop-up says “This directory does not appear to be a Git repository, Would you like to create a repository here instead?”. If you dragged in a directory that was already a Git repository, you should not receive this message. Click the link create a repository. You should see a new pop-up window that looks like this—
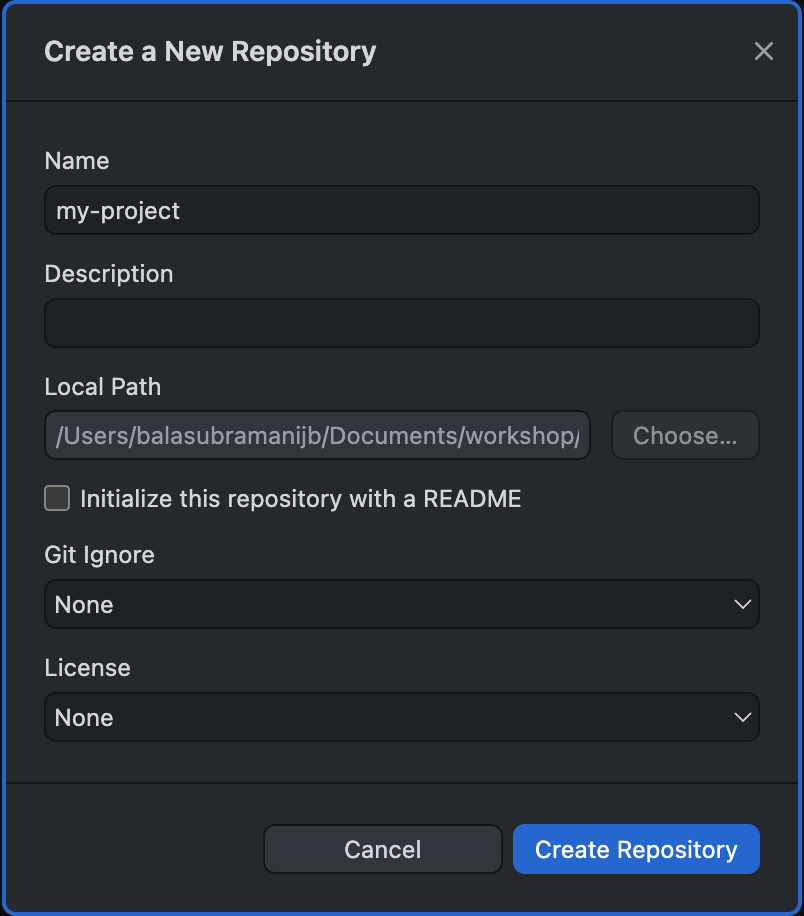
Fill the information as follows—
- Name: the name of your project. It should be pre-populated with the name of the directory you just created. For example,
my-project. - Description: a short description of your project. This is optional but recommended.
- Local Path: the path to your project directory. This should also be pre-populated with the path to your project directory. For example,
/path/to/my-project. - ☑ Initialize this repository with a README: keep this option checked. This will create a
README.mdfile in your project directory. This file is a standard file that is used to describe the project. This is the first file that the users of your code will see. This file should contain all information required to correctly run your code. You can read more about it here.- This step is our first encounter with GitHub’s adherence towards FAIR principles. The
README.mdfile is a type of metadata associated with code. GitHub offers to create this file automatically for you.
- This step is our first encounter with GitHub’s adherence towards FAIR principles. The
- Git Ignore: This file is a standard file that is used to tell Git which files to ignore. This is useful because you may have some files in your project directory that you do not want Git to track. For example, you may have some large files that you do not want to upload to GitHub. You can read more about it here.
- Click the drop-down box and select the main programming language that you plan to develop your source code in. For this workshop, we will select
R. This will automatically populate theGit Ignorefile with the standard set of files that you typically do not want to track in your Git repository. For example, it will ignore all files with the extension.RDataand.Rhistory. - !! WARNING !!: again, please do not use this file to ignore sensitive files. Sensitive files should not be in your Git repository in the first place. Please read the warning message in the previous subsection for more details. Git ignore is only for extraneous files that are not necessary for users to run your code.
- Click the drop-down box and select the main programming language that you plan to develop your source code in. For this workshop, we will select
- License: This is a standard file that is used to describe the license under which your code is released. This is important because it tells the users of your code how they can use your code. For example, you may want to release your code under the MIT license which allows the users to use your code for any purpose, including commercial purposes. You can read more about it here. To learn about other open source license options, click here.
- The choice here mainly depends upon the data sharing policy of your project. Please consult with your supervisor to determine the appropriate license for your project.
- Note: failure to specify a license defaults your project to a very restrictive license. Users are not free to do anything with your code without fear of litigation. This would discourage researchers and developers from using or improving your code. Such projects usually don’t gain any traction within the developer community and are often doomed from the beginning. So, please spend some time and specify a license.
- For this workshop, we will select the
MIT License. This will automatically populate theLICENSEfile with the standard text of the MIT license. Click the drop-down box and select the license that you plan to release your code under. TheMIT Licenseis a good permissive default license when you are free to choose your own license. - This step is our second encounter with GitHub’s adherence towards FAIR principles. Specifying a license improves the Findability (code metadata is co-located with the code), Accessibility (the
LICENSEfile is used to govern how others can use your code), and Interoperability (open source licenses do not create a licensing hurdle for your users and allows them to build upon your work) of your code.
The populated window should look like this—
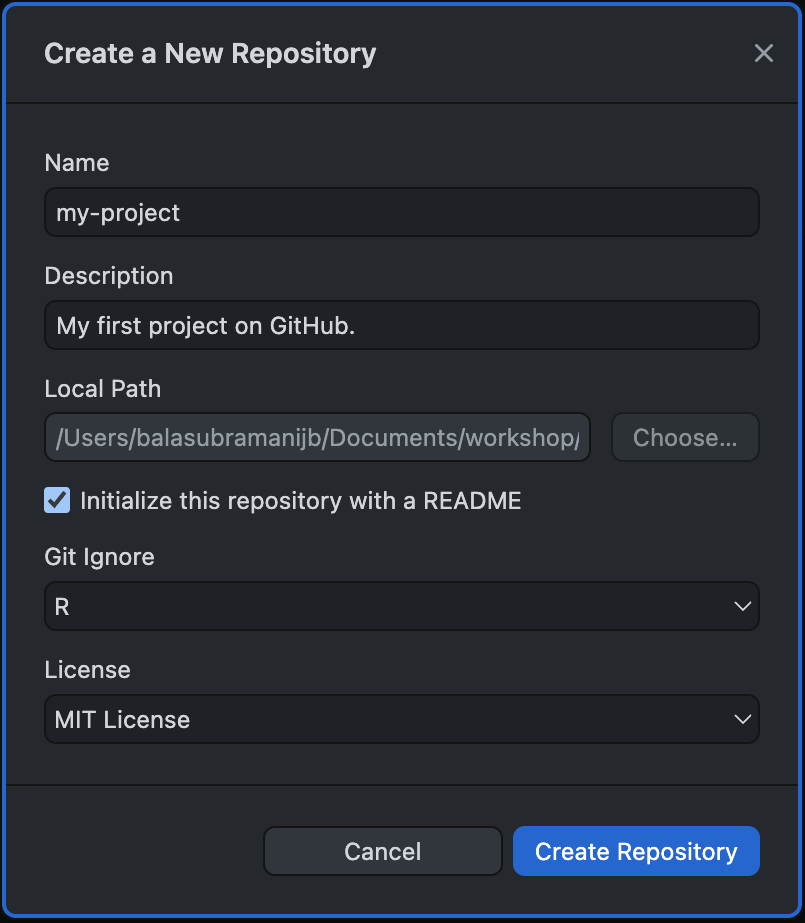
Click Create Repository. The GitHub Desktop window should now look like this—
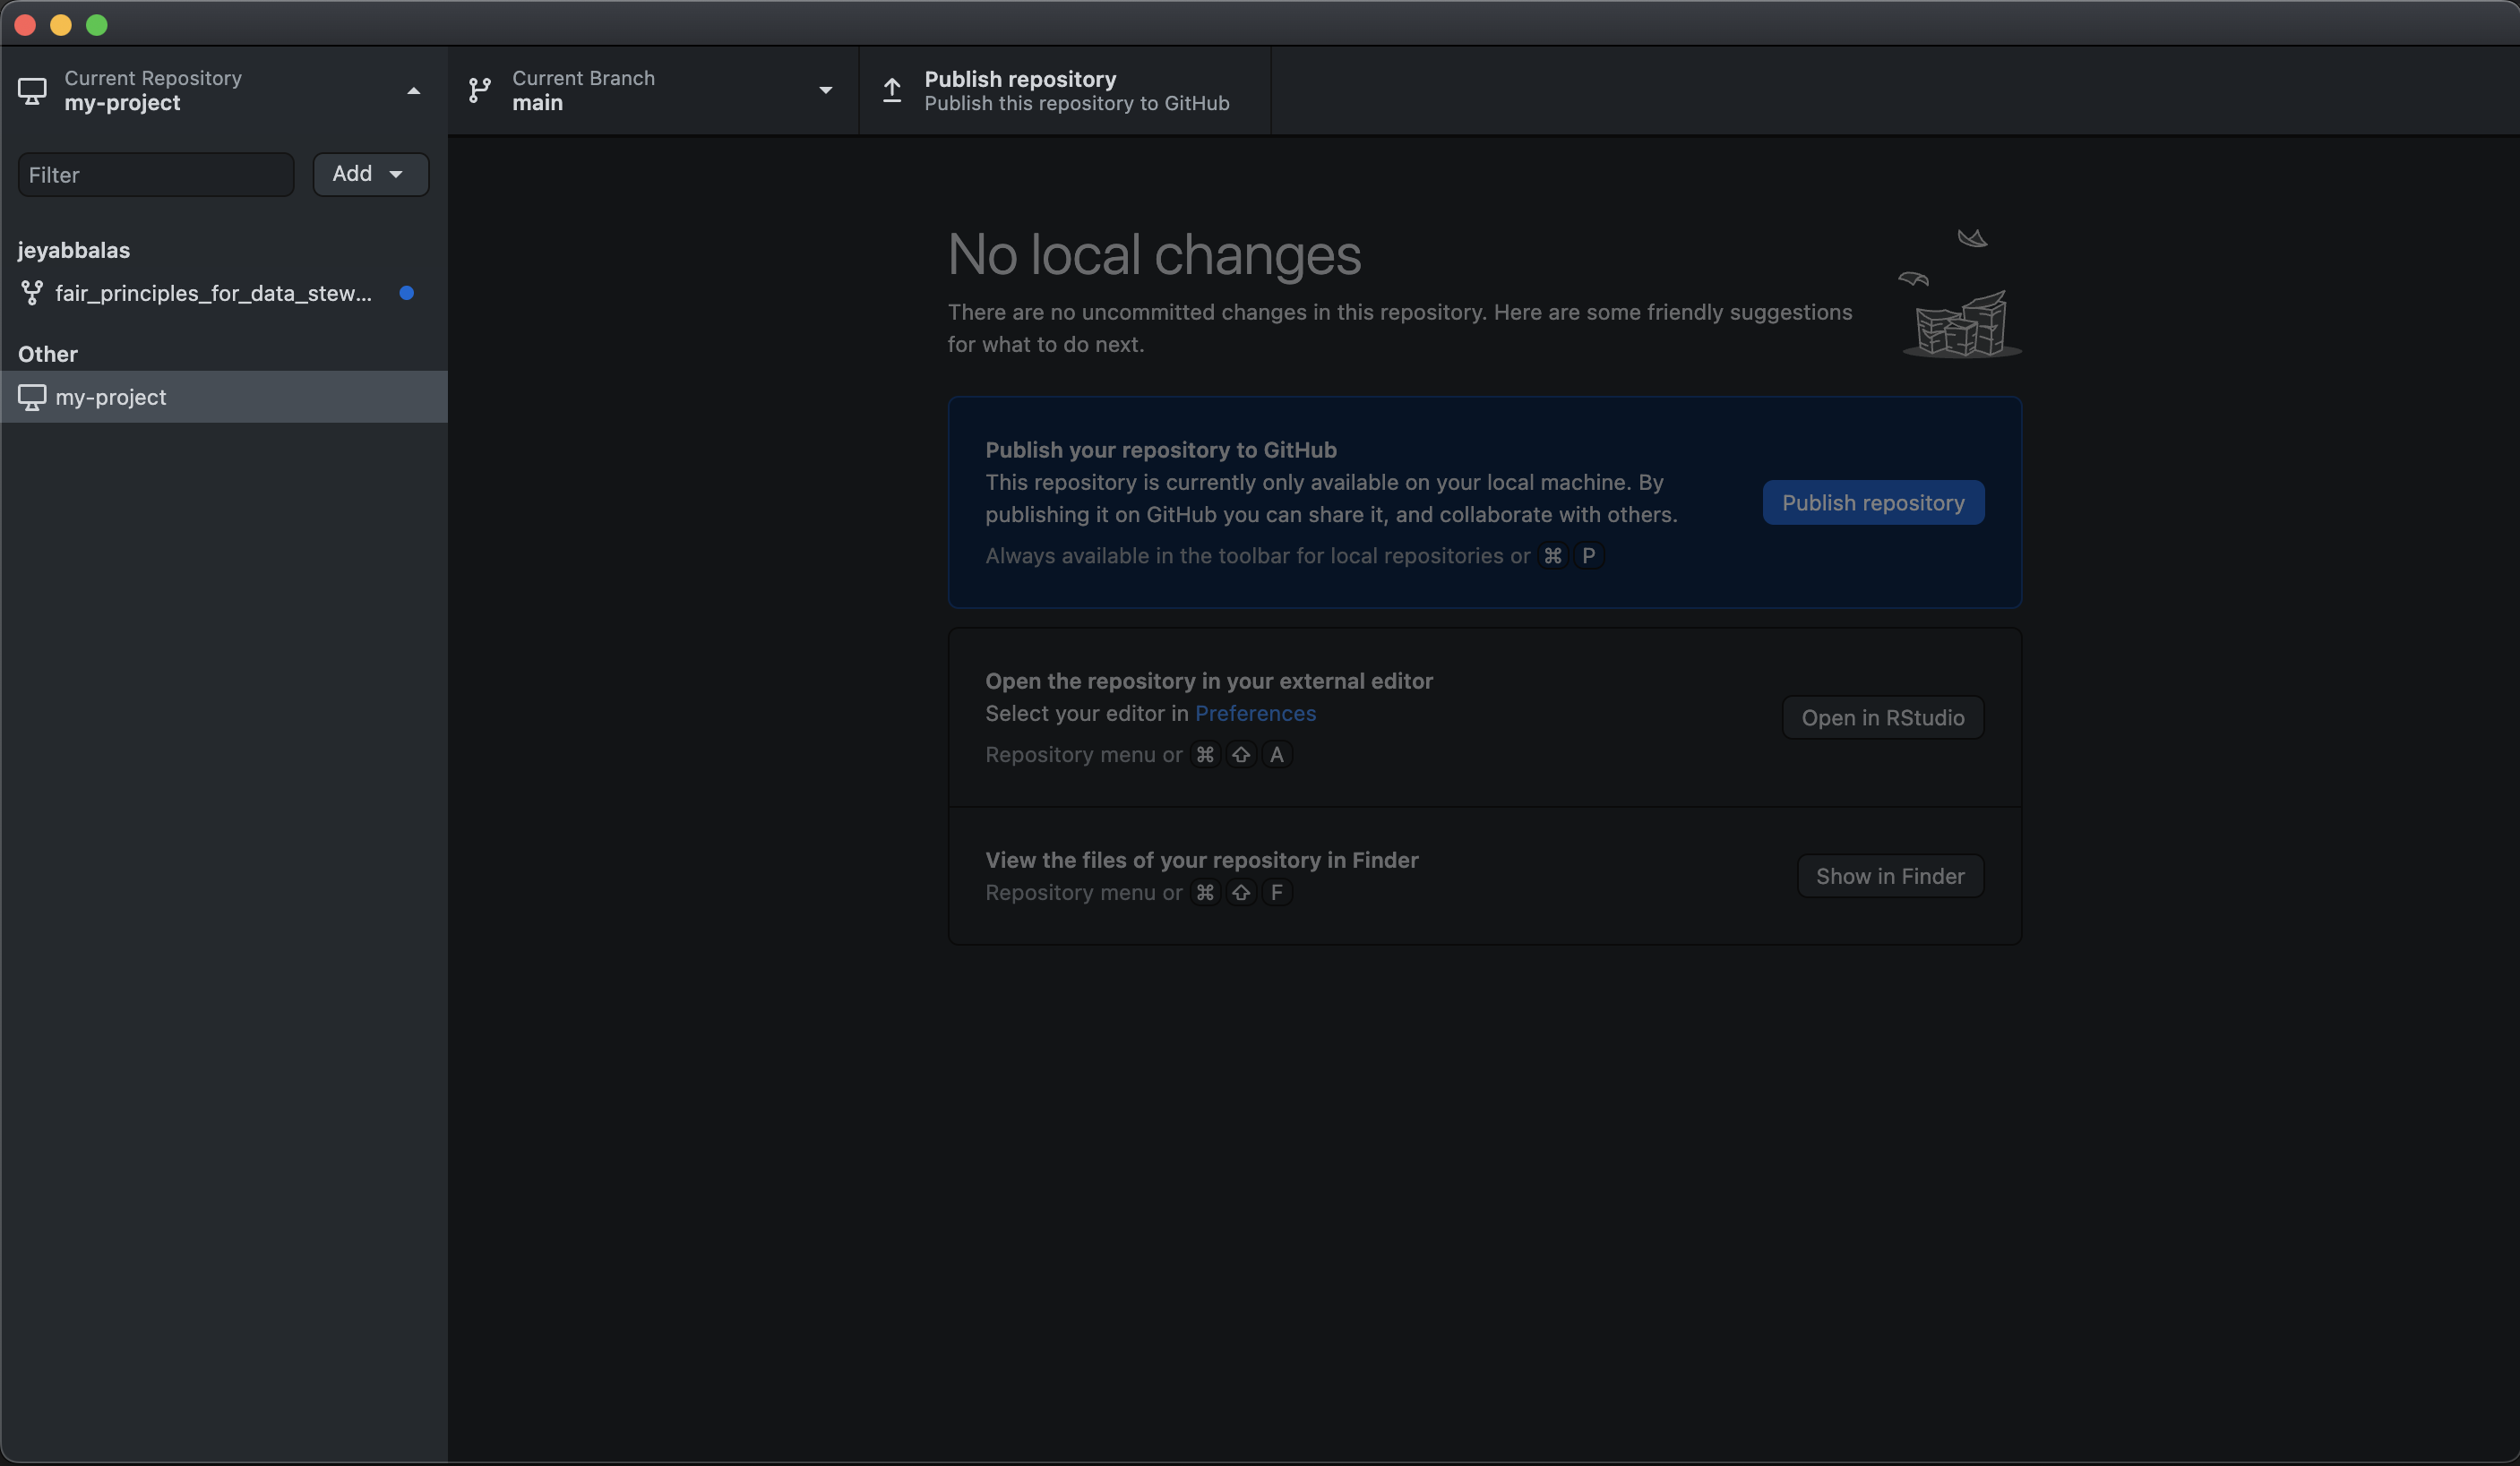
If you go to your project directory, you will see that two new files were created— README.md and LICENSE. A hidden file, .gitignore, is created that will keep a list of all the files to not track by Git. You can open these files in a text editor to see their contents.
You have now created a local git repository. This means that the Git software in your computer is now tracking all the changes that will be made in this directory.
Step 2: Create a remote copy of your local Git repository
In this step, we will upload a copy of your local Git repository to the GitHub servers. This will create a remote copy of your local Git repository. This remote copy will make your code locatable and accessible, from anywhere in the world, by those with appropriate permissions and an internet access. It can be used to share your code with the world.
To do this, click on the Publish Repository button in the top-right corner of the GitHub Desktop window. See the button circled in red.
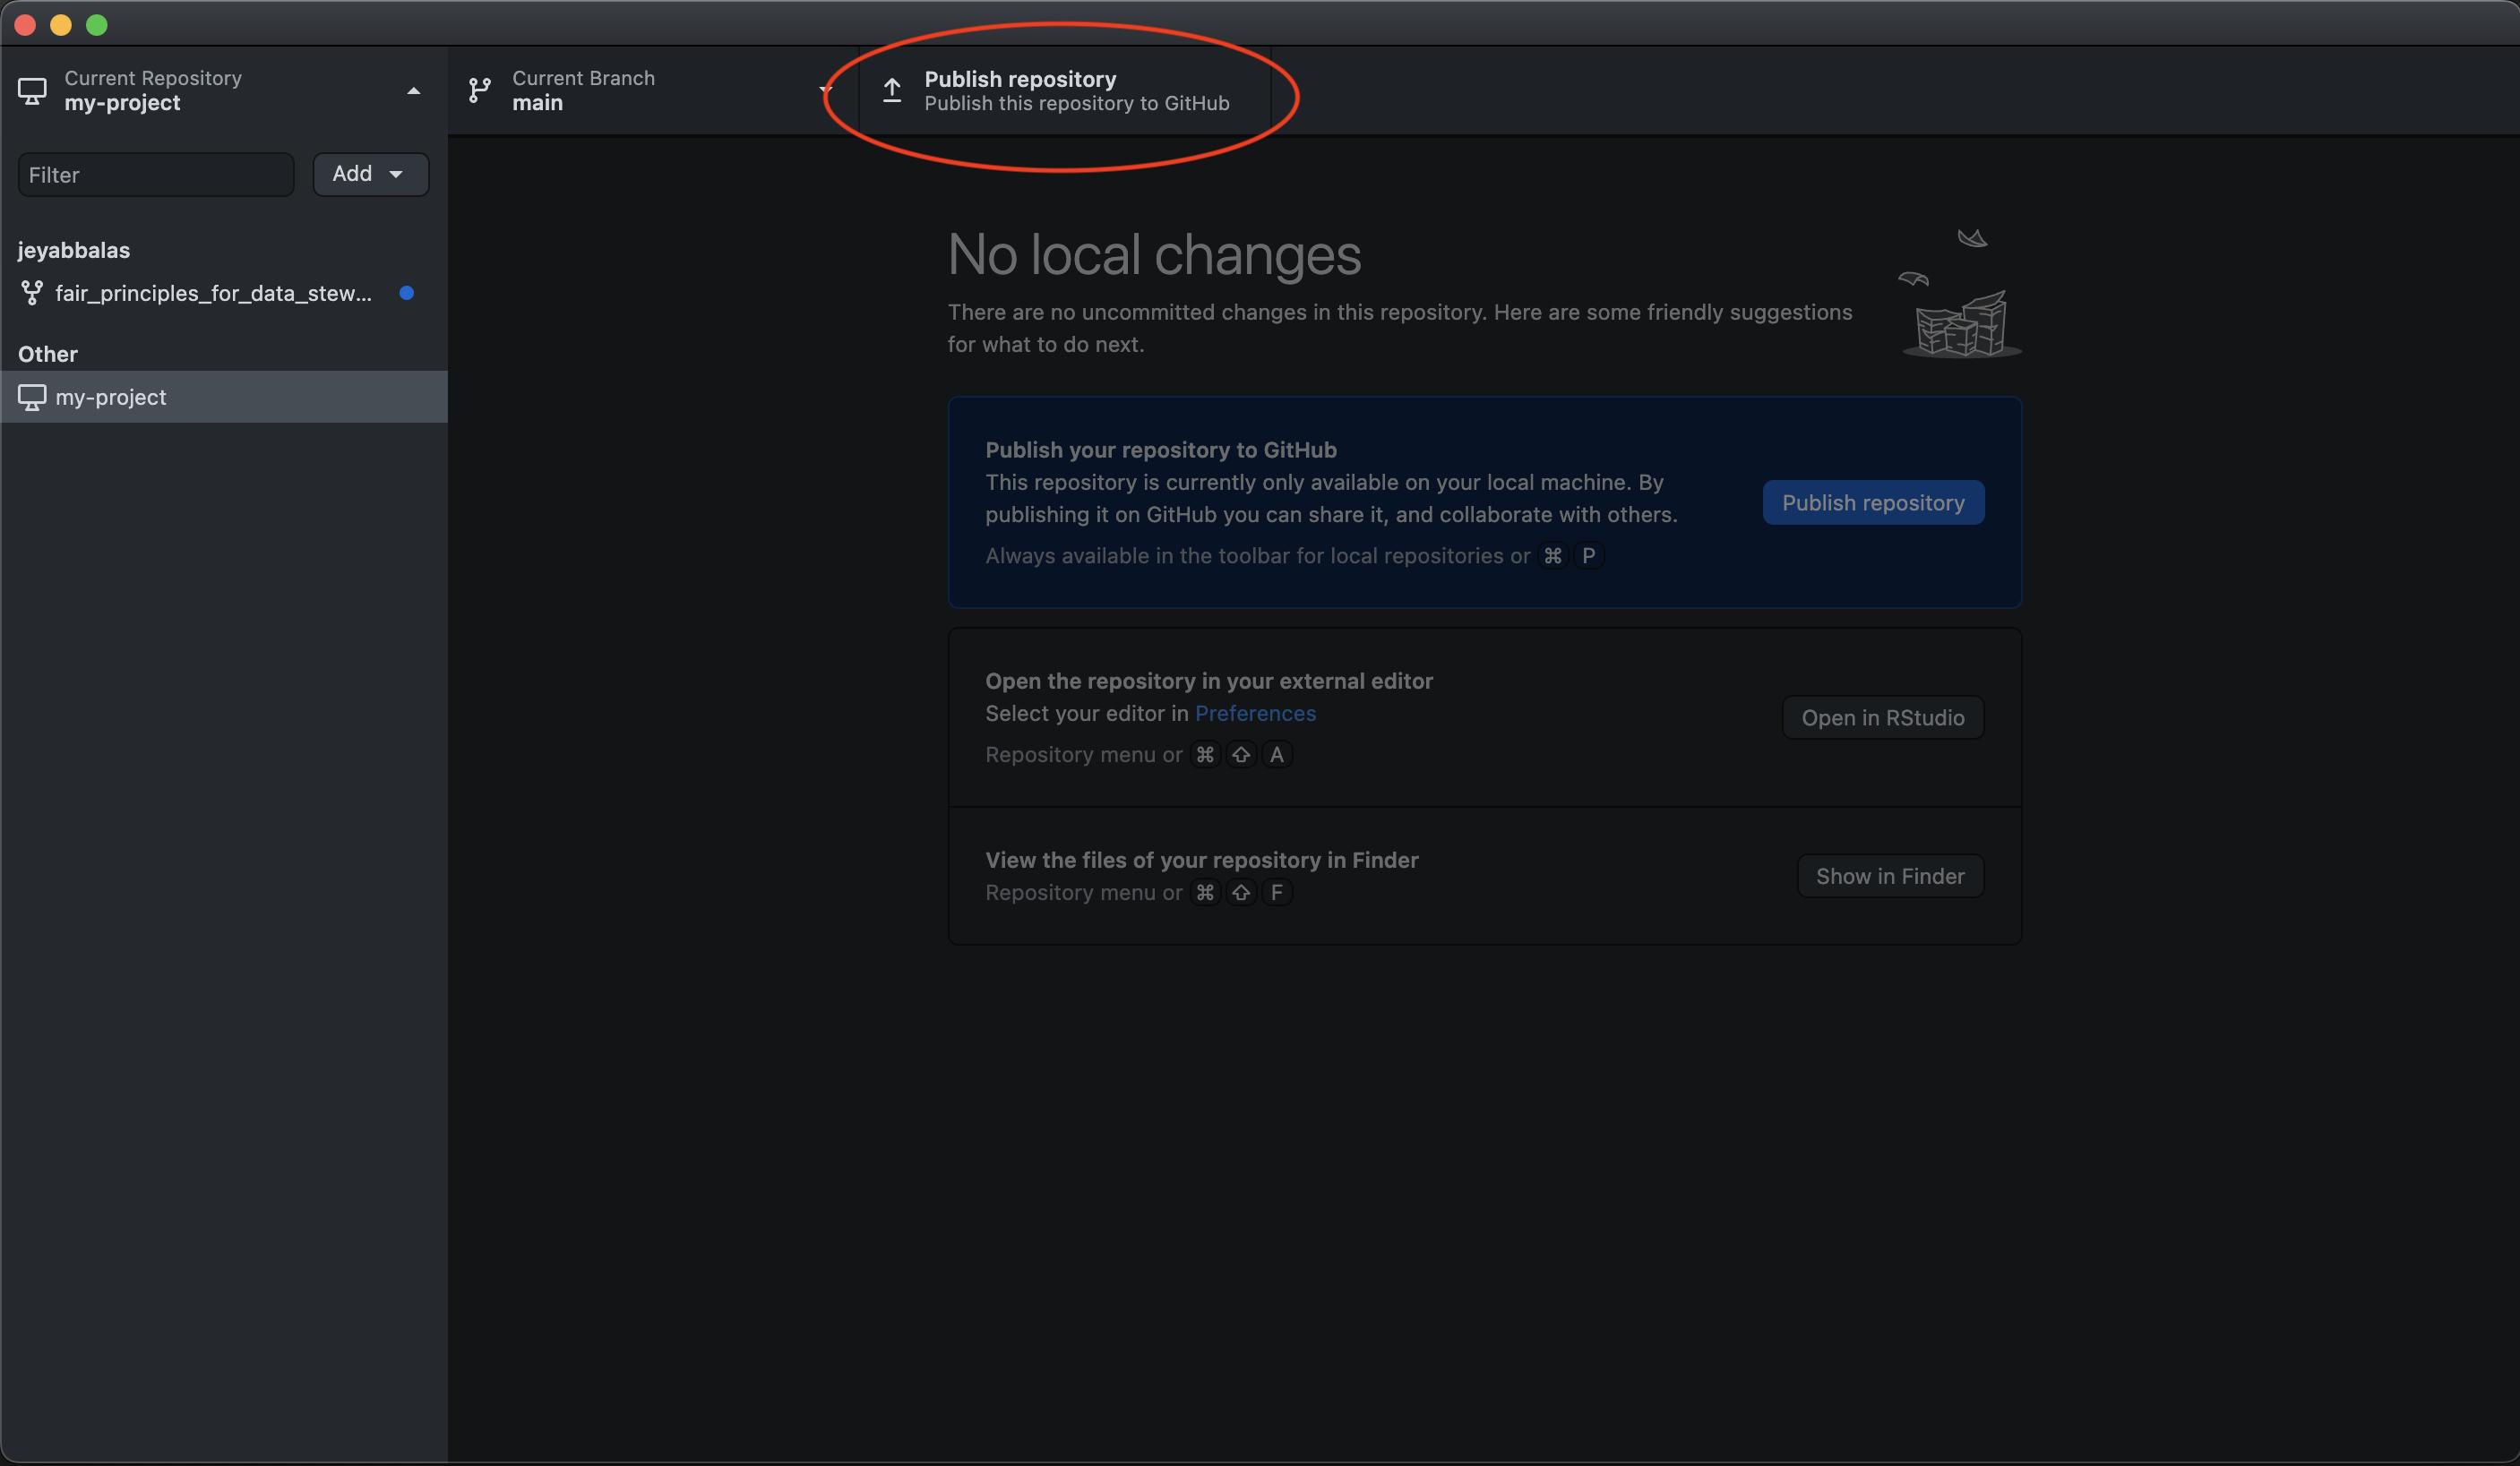
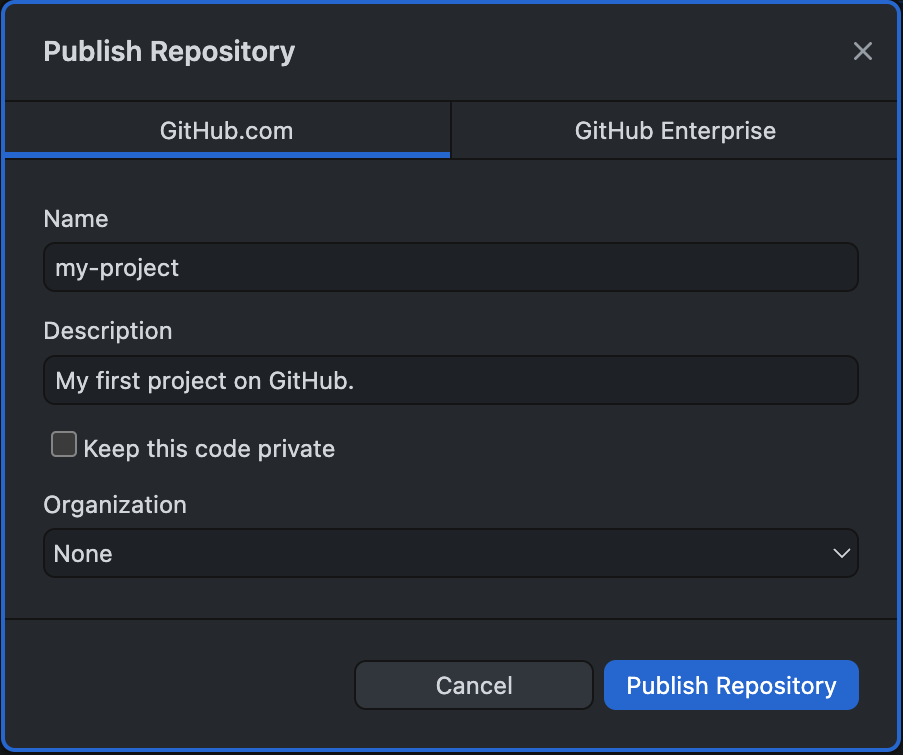
This will open a new pop-up window that looks like this—
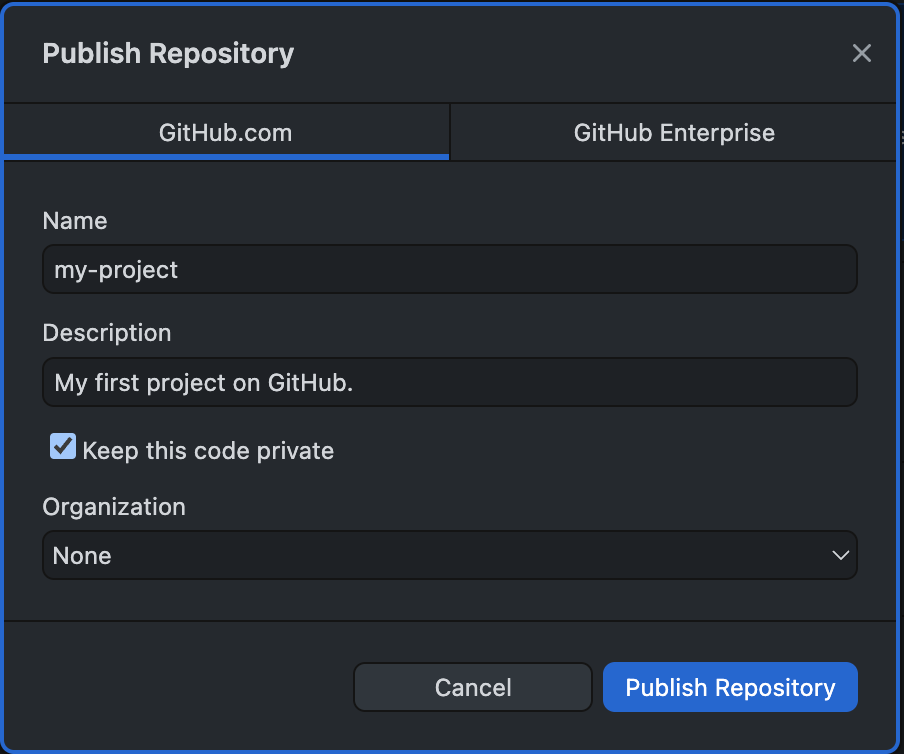
The window is pre-populated for the project Name and Description. Additionally, it gives us an option: ☑ Keep this code private. You can check the box to keep your repository Private. If you choose to do so, only you will have access to your code on GitHub. You can choose to add a few collaborators later. If you do that, only you and your collaborators will have access to the code. You can later choose to make the repository Public, when you are ready. For this workshop, let us remove the check mark from the box, implying that we want our code repository to be Public. You can select a GitHub Organization that you may be part of in case your project is a repository in that organization. Please review the lecture notes if you are unfamiliar with GitHub organizations. In the current example, our repository is a personal project and does not belong to an organization. So, we leave it set to None.
The pop-up window should now look like this—
Click Publish Repository. Notice how the Publish Repository button in the top-right corner of your window has now changed to Fetch origin.
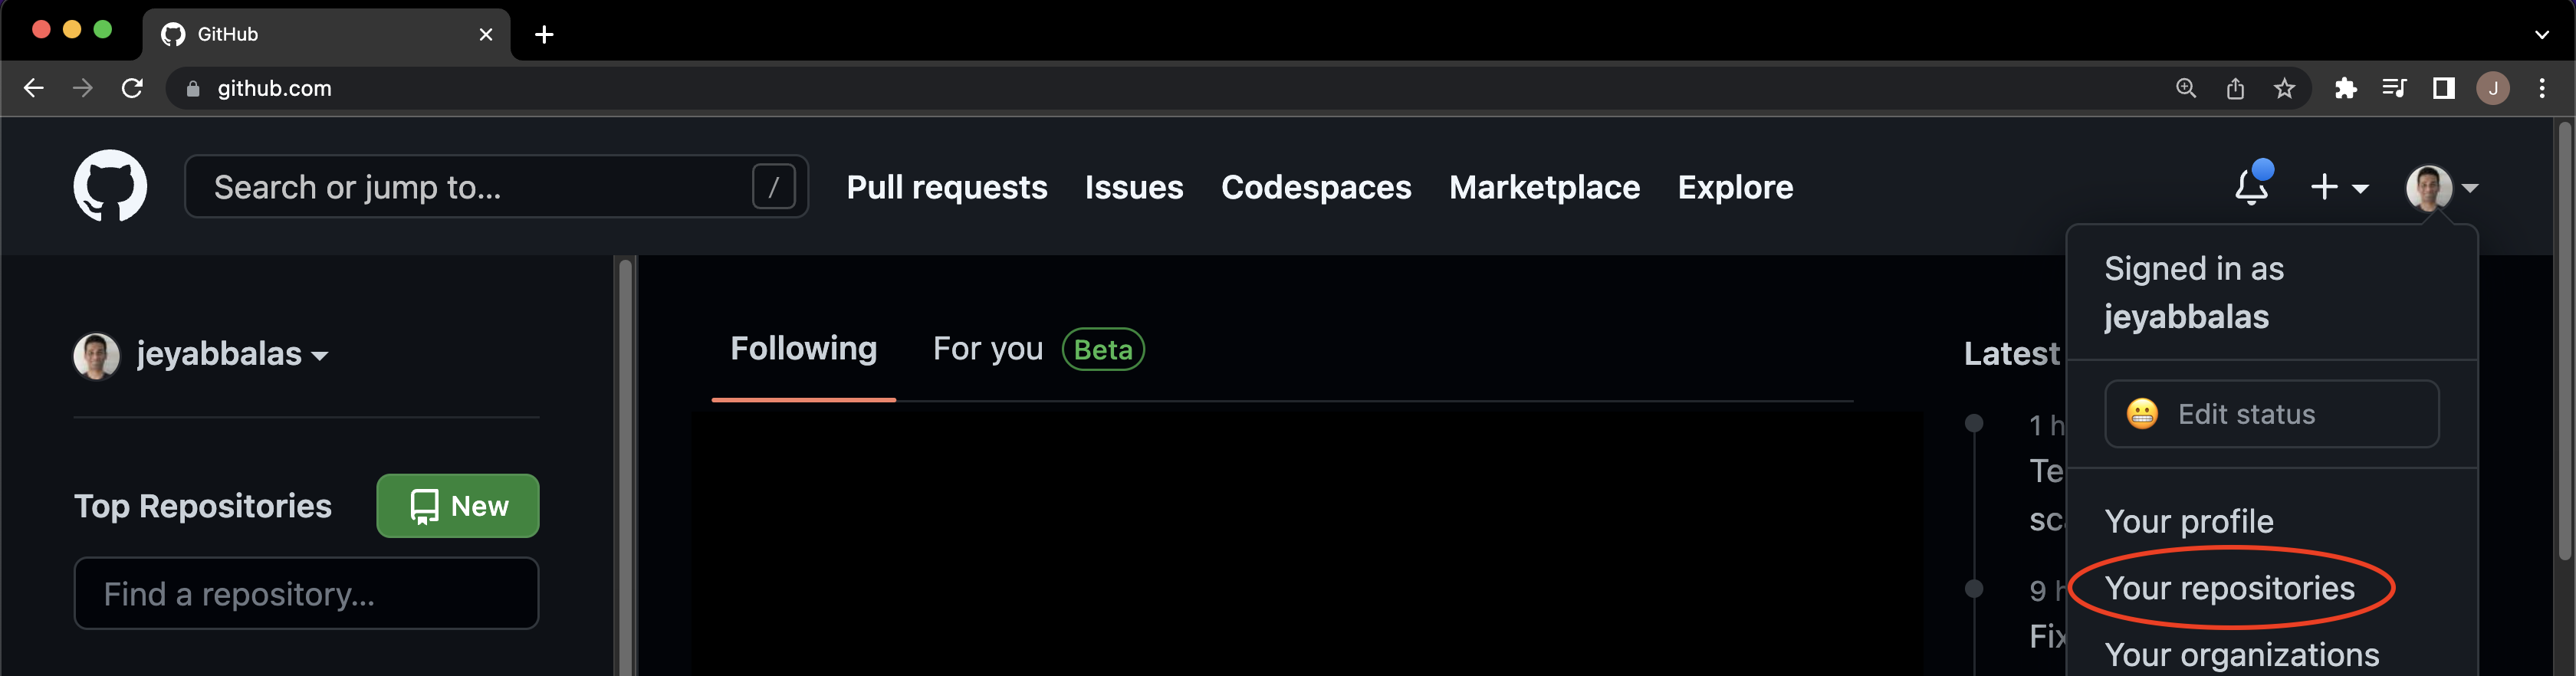
Please go to https://github.com/ on your web browser, log into your account, and verify if the remote repository has indeed been created. In the GitHub website, you can do so by clicking on your profile icon in the top-right corner of the website, then click on Your repositories. My GitHub page looks like this—
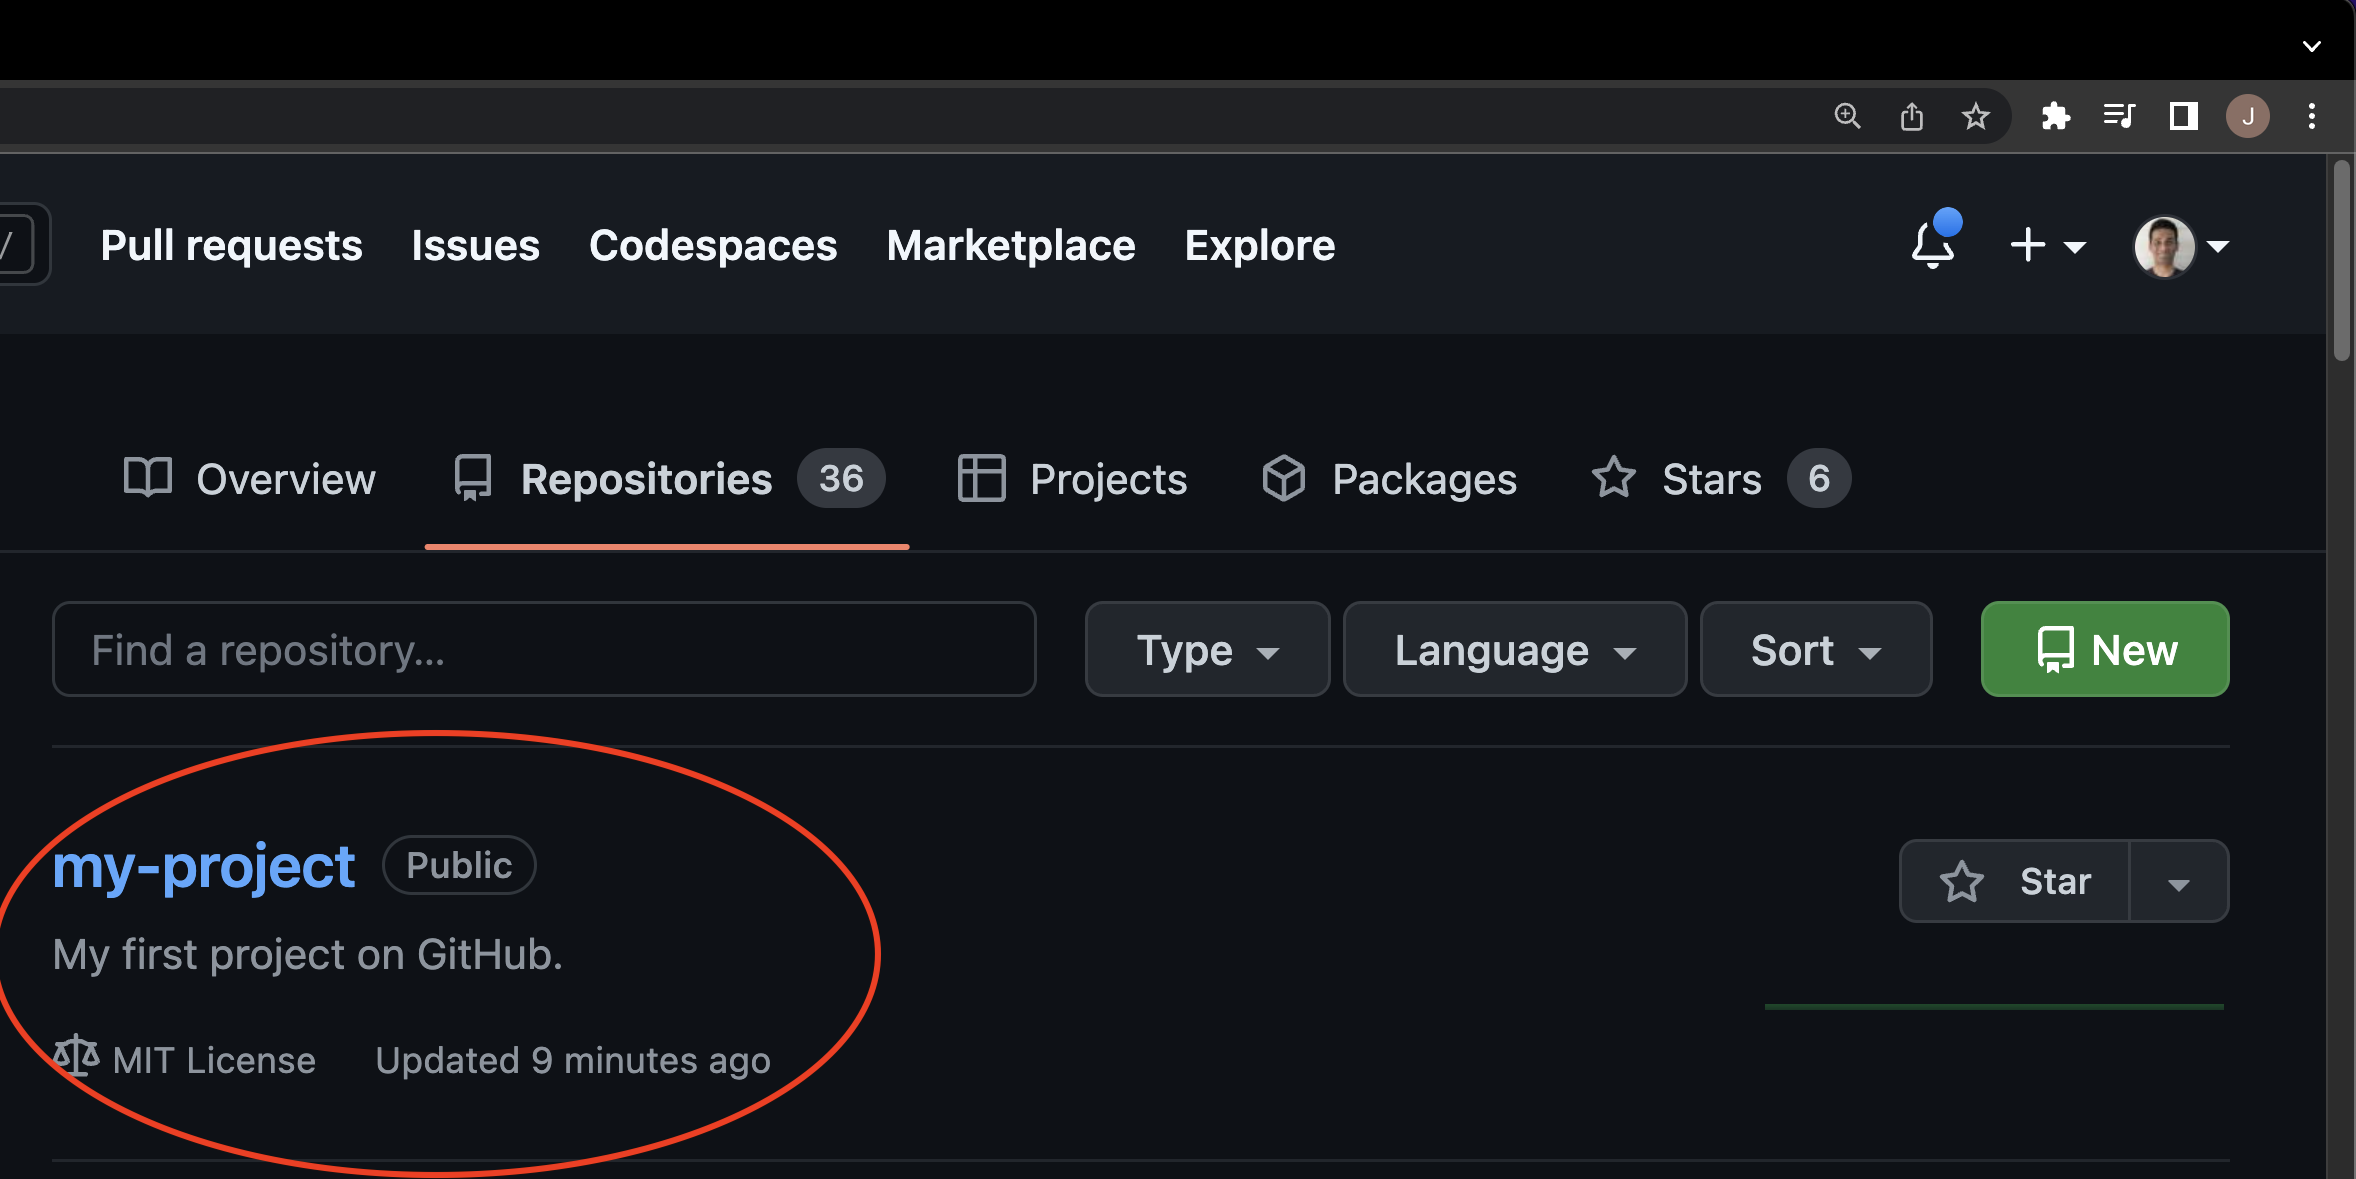
You should see a repository with the name that you specified in the previous step. Click on the repository to open it. You should see a page that looks like this—
Click the project and take a look at the project page designed by GitHub. You should see a page that looks like this—
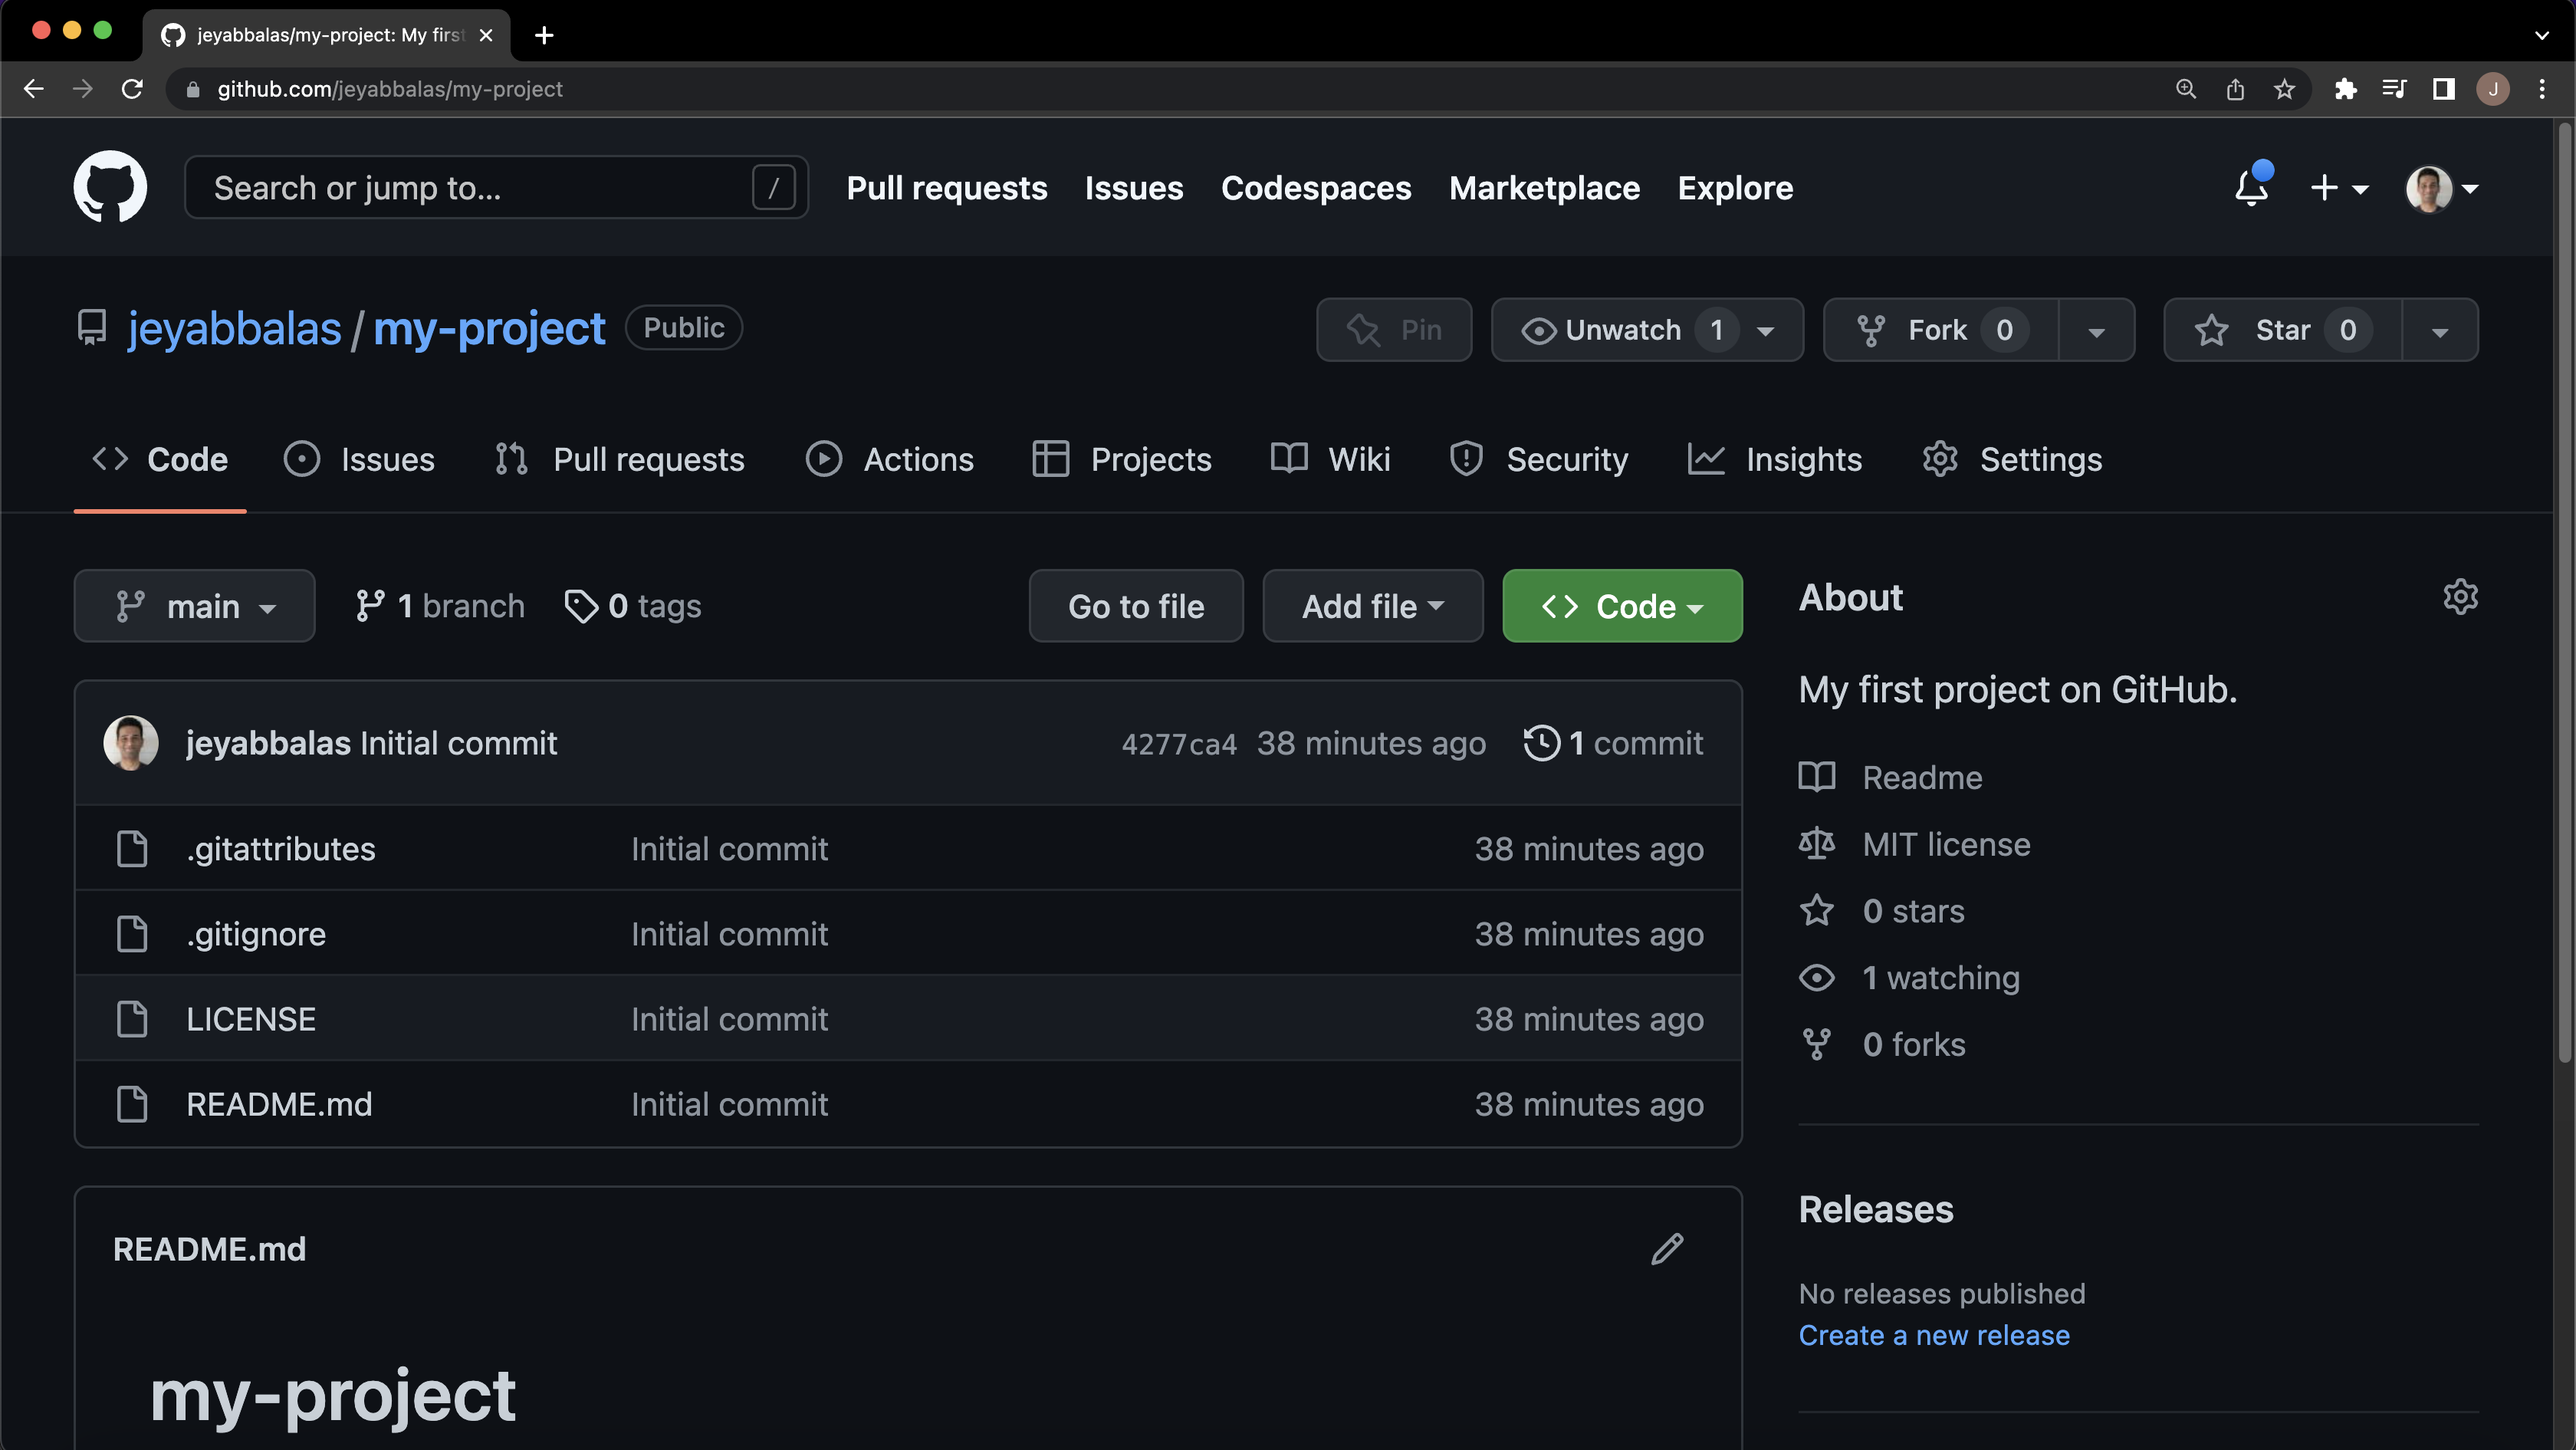
This is the remote copy of your local Git repository. Notice the URL assigned by GitHub to your page. It would be of the form: https://github.com/your-username/your-project-directory-name. This is a key idea with respect to Findability aspect of the FAIR principles. This persistent and unique URL assigned by GitHub to your project makes it locatable by anyone with permissions. You can now share this link with your collaborators and other users. They can use this link to clone your repository i.e., make their own local copies of your code to run it or possibly build upon it for collaborative software development.
Also, note in the bottom of the GitHub project page, you can see the README.md file is co-located with the source code from the same URL. This again improves the Findability of your code. All information that the users need to run your code would be contained in this README.md file.
You have now created a remote copy of your local git repository on GitHub.
Step 3: the Git workflow
Creating an R project
Open RStudio. Select File > Open Project. Navigate to the local project directory that we created in step 1. Select the project directory and click Open. This will open the project in RStudio. At this step, RStudio will create a project settings file with the extension .Rproj in the project directory.
In our example so far, RStudio automatically created the my-project.Rproj file in our project directory. This object creation represents a change that has occurred in our project directory. This change is reflected in the GitHub Desktop window. The Changes tab in the GitHub Desktop window should now look like this—
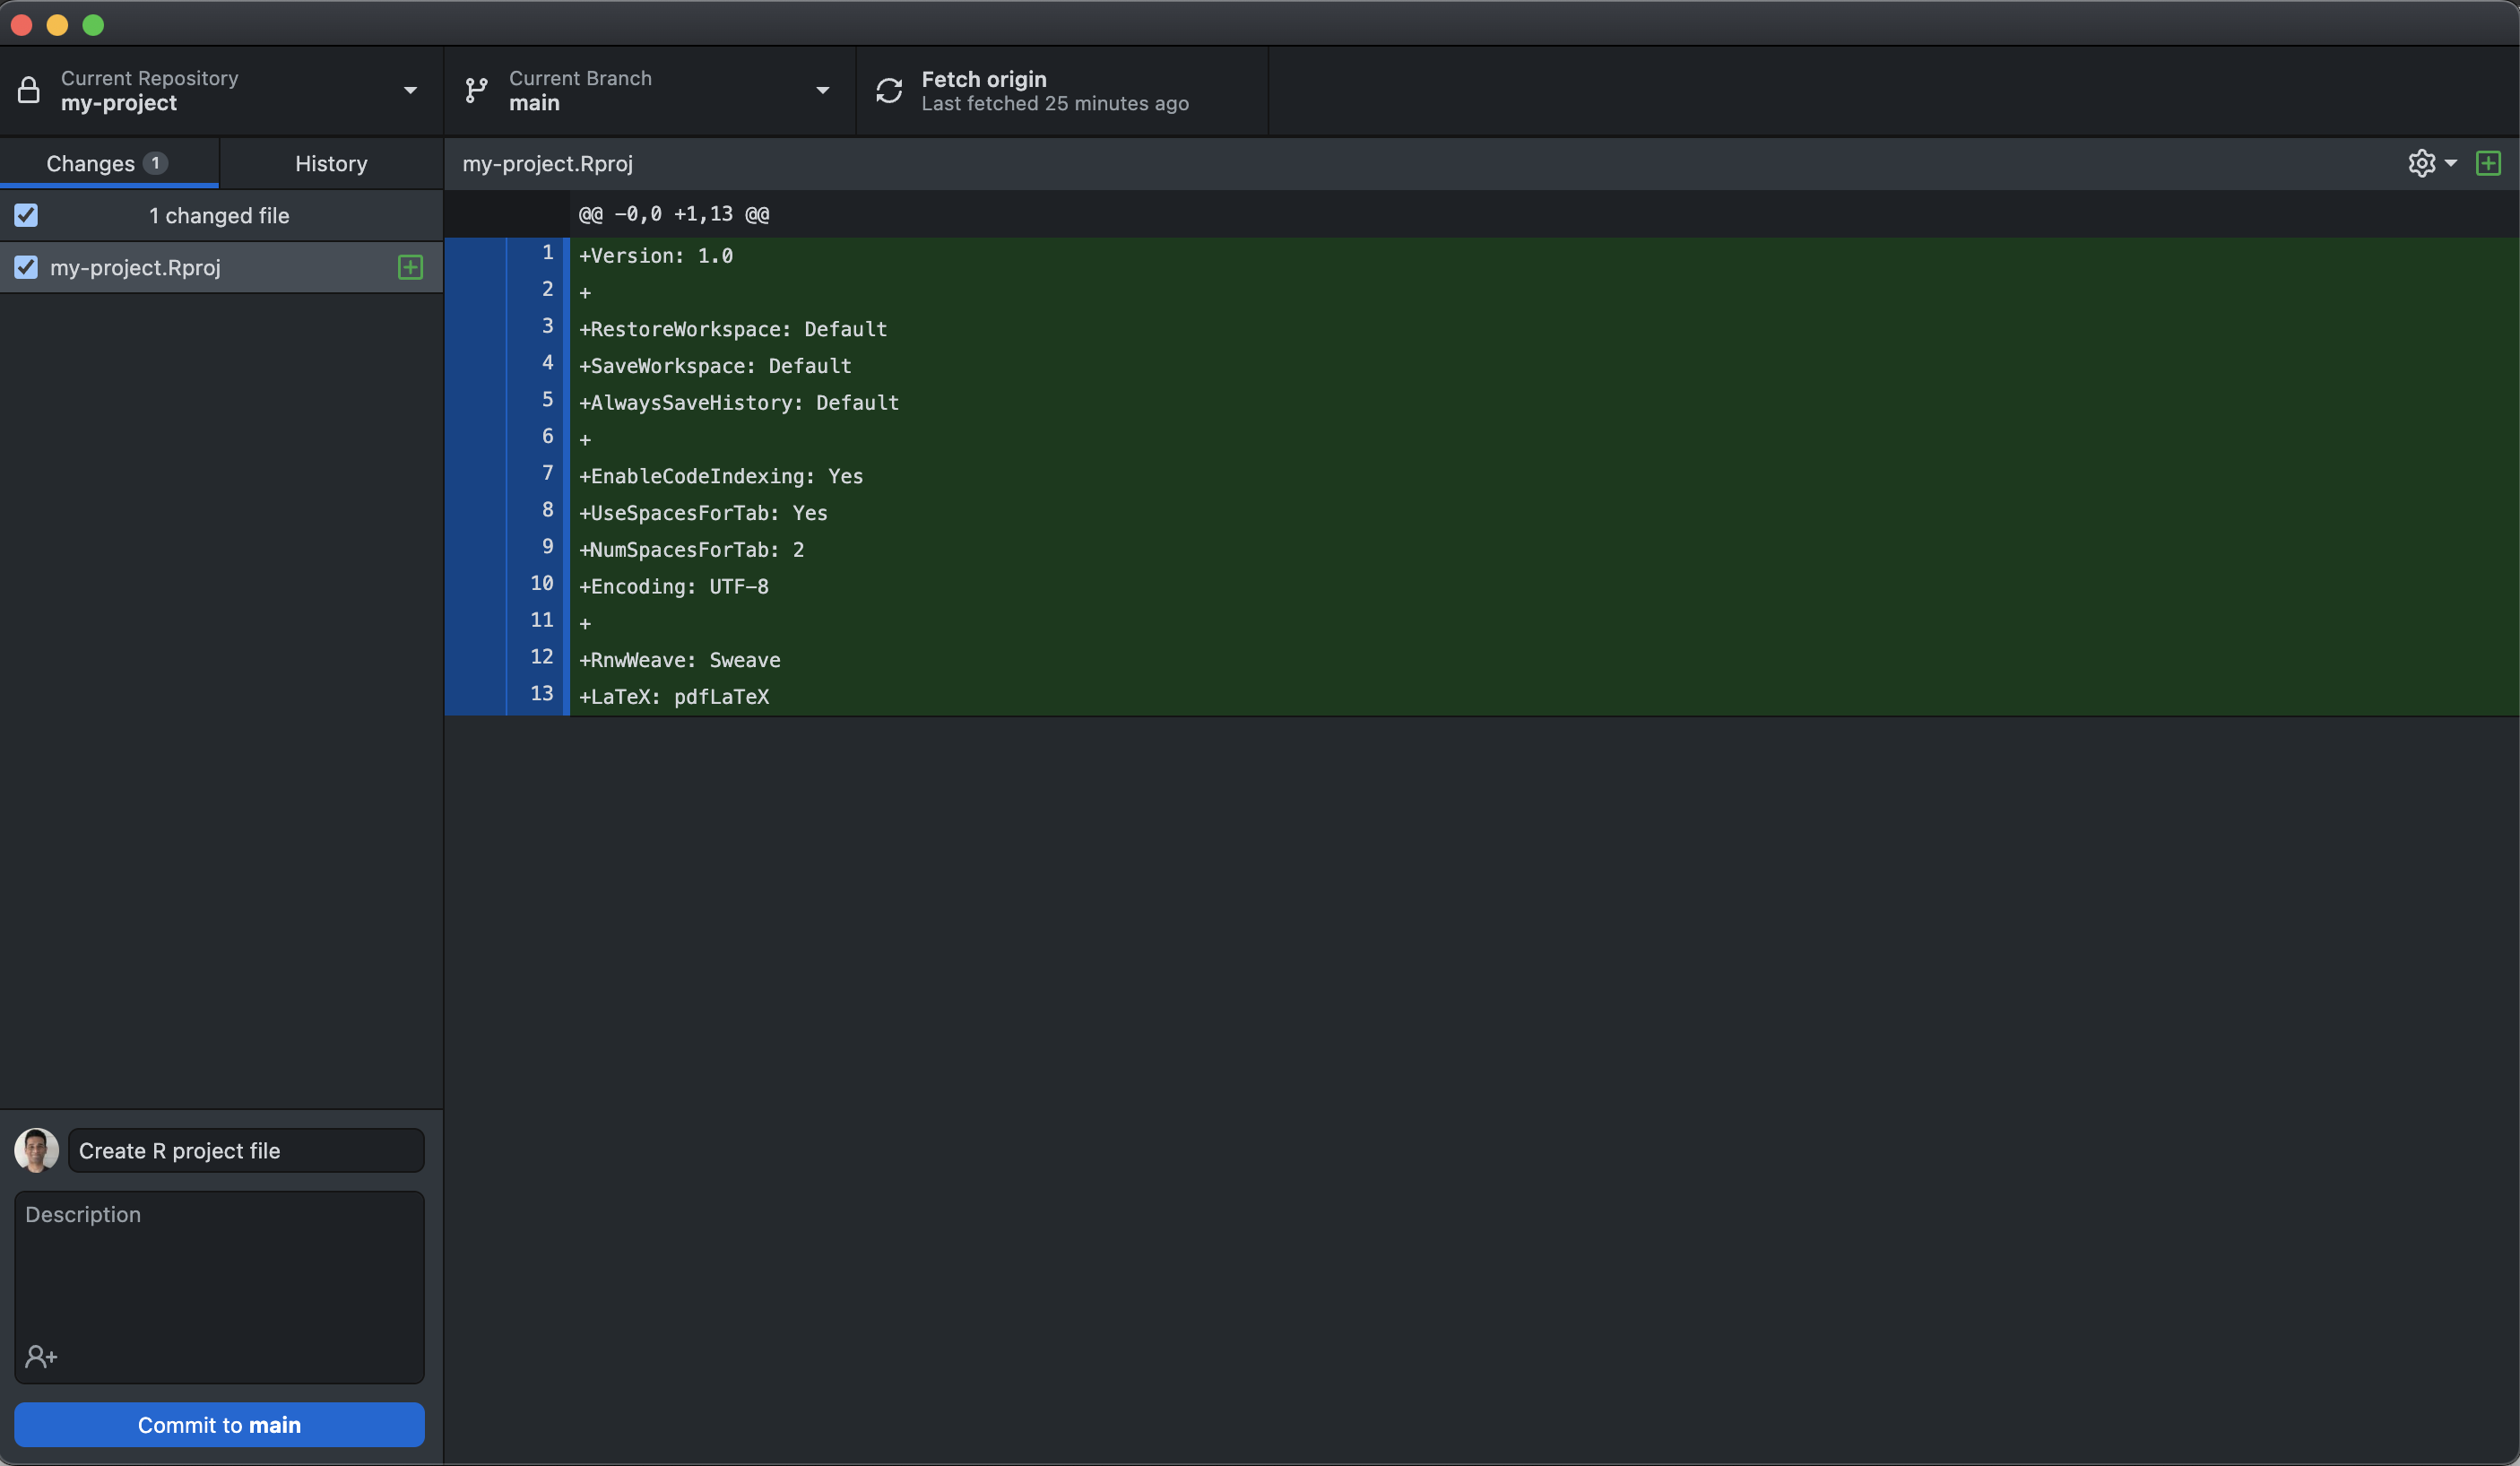
The green plus sign next to the R project file in the Changes tab indicates that the nature of the change is an addition of a new file to the project directory. Let us ask GitHub Desktop to track this change. In the bottom-left corner of the GitHub Desktop window, you will see a Commit box. Type in a short message that describes the change that has occurred. In our example, we will type in “Create R project file”. This message is called a commit message. It is a short message that describes the change. It is used to keep track of the changes that you have made in your project directory. Click on the Commit to main button. This will commit the change to the local Git repository i.e., the local Git software will take a snapshot of this change. This is similar to saving a text file after making some edits. The GitHub Desktop window should now look like this—
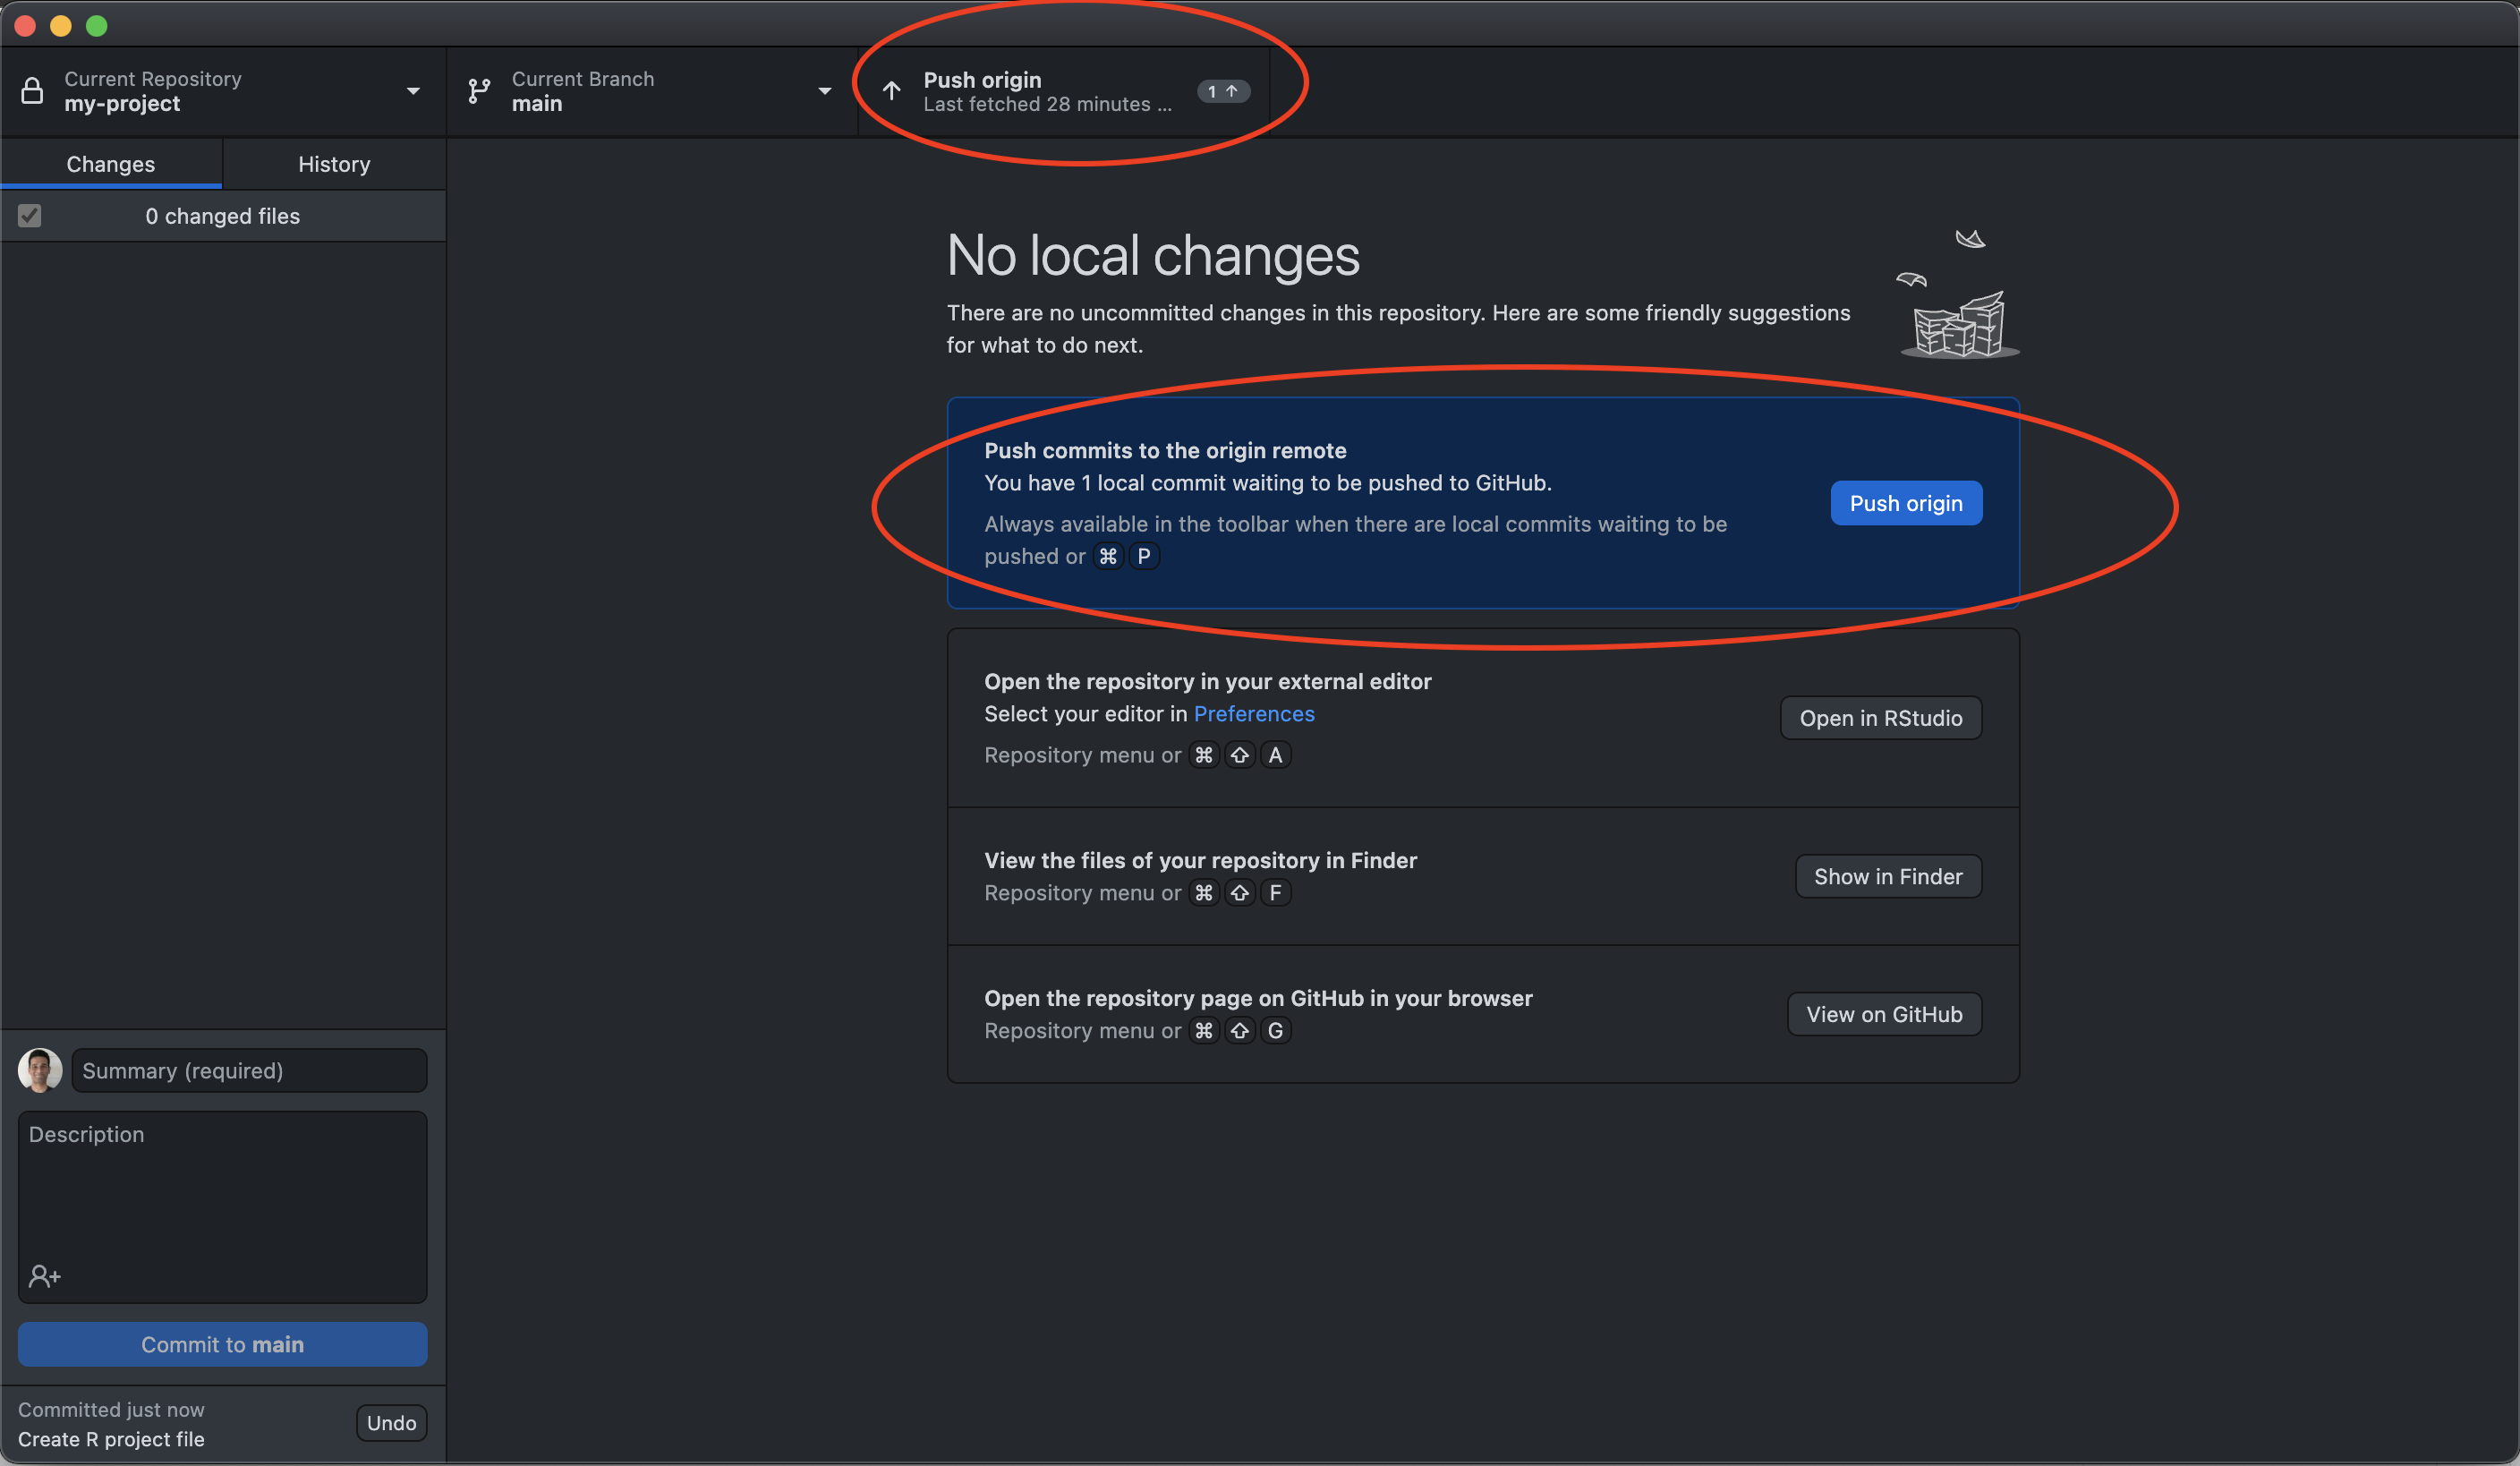
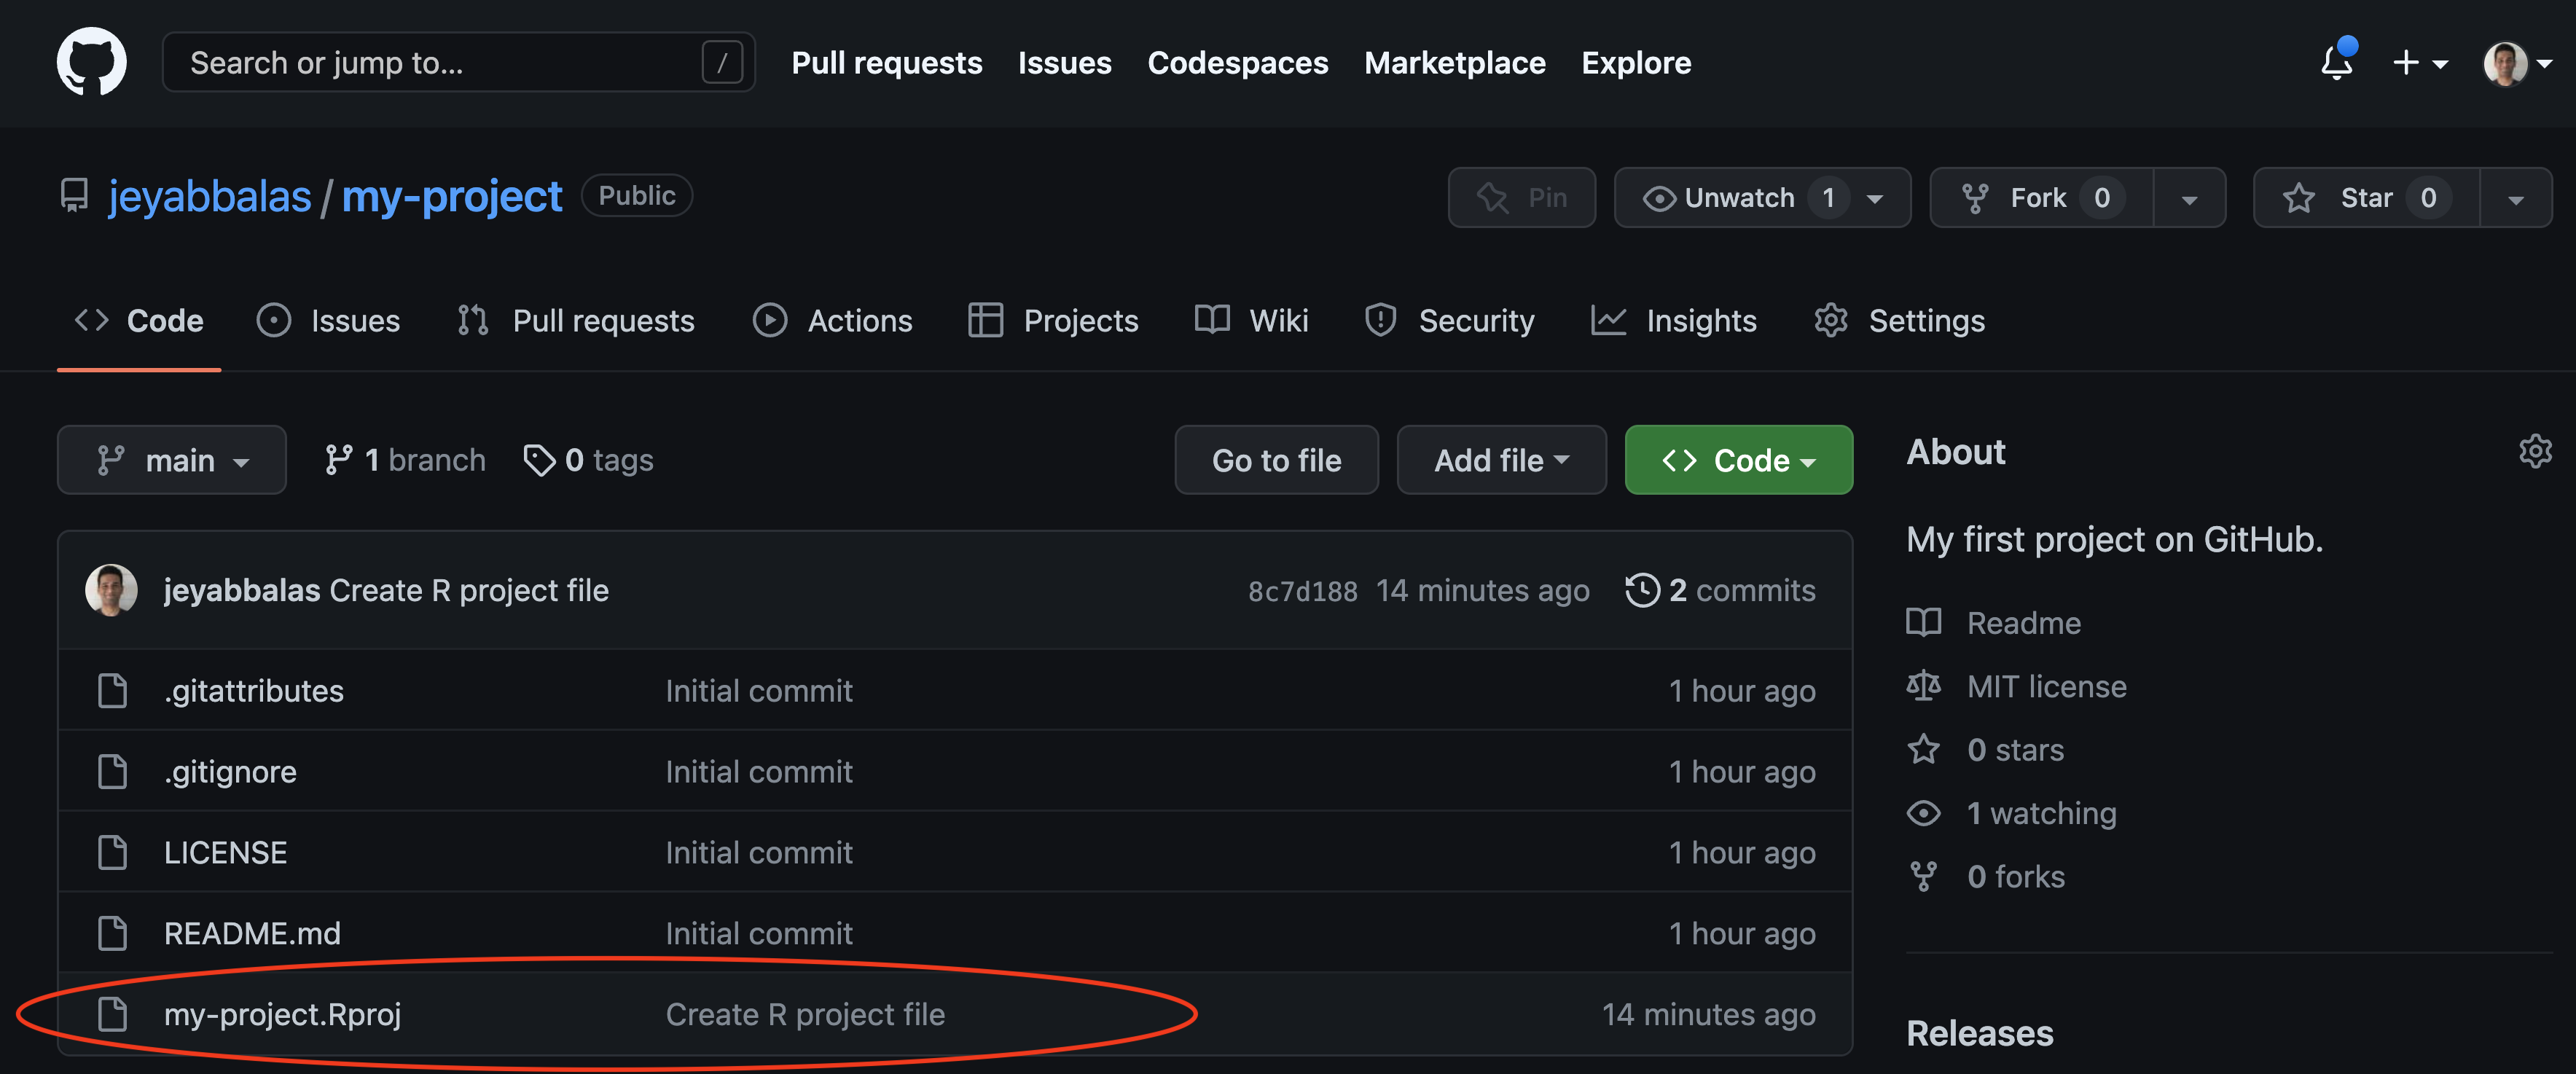
Notice how the Fetch origin button on the top menu has now changed to Push origin. Click on the Push origin button. This will push the changes to the remote copy of the local Git repository on GitHub. This means that it will synchronize the changes to the remote copy of your project. Once your click the Push origin, the button will revert back to Fetch origin. Go to the GitHub website to verify if the changes have been pushed to the remote copy of your project. You should see a page that looks like this—
Git workflow: congratulations, you have just performed a git workflow! This sequence of steps is by far the most common workflow that you will use when you are working on a project with Git & GitHub. You will make changes to your project directory (editing), commit the changes to the local Git repository (ask the local Git software to remember the changes), and then push the changes to the remote copy of your local Git repository (ask GitHub to synchronize the changes with your local Git software). This is the workflow that you will use to keep track of your changes and to share your up-to-date code with your collaborators.
Editing the license file
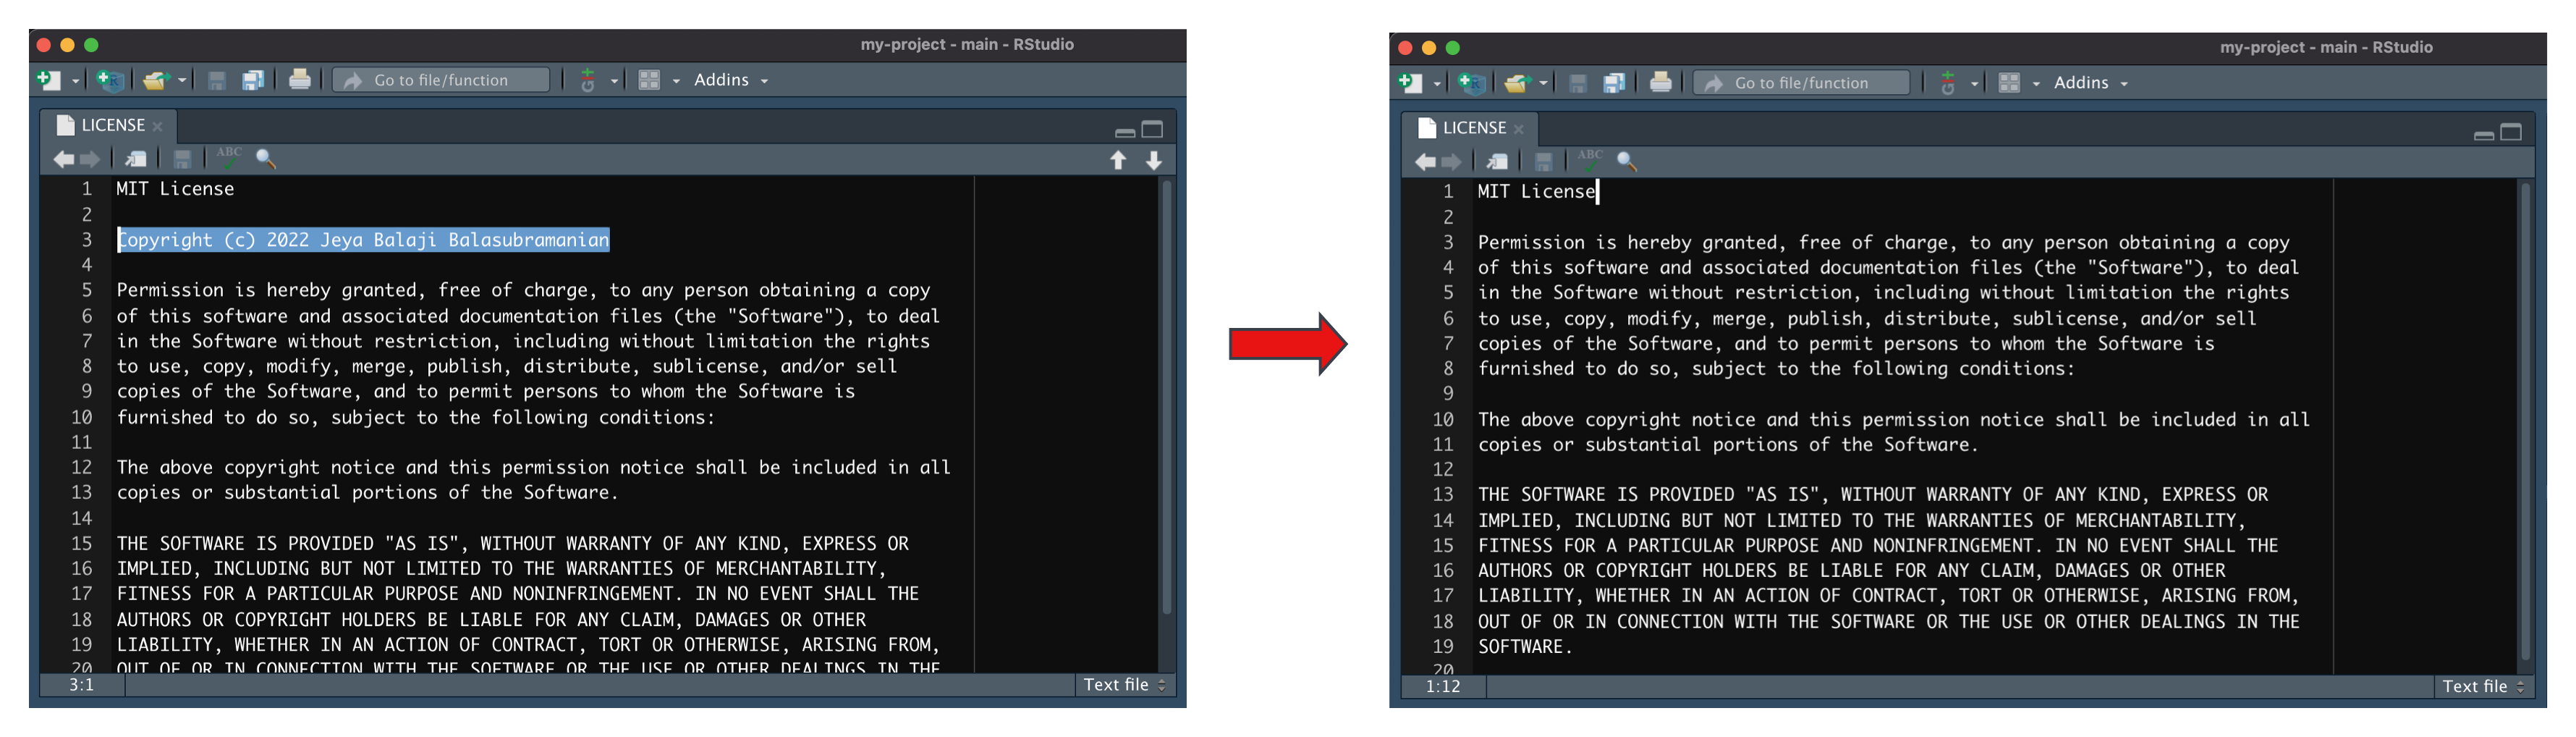
When we set up the Git repository, we used a good, permissive default license called the MIT License. GitHub Desktop automatically populated the LICENSE file with the standard text of the MIT license. The National Cancer Institute advices that pieces of software developed within DCEG by a federal employee should not be copyrighted. This is because the federal government owns the copyright of the work produced by its employees. So, if you are developing a software as a federal employee, please modify the text in your LICENSE file to reflect this i.e., please delete the line that says “Copyright (c) 2022 Your Name”.
To edit this file, go to RStudio. In the bottom-right corner of the RStudio window, you will see a Files tab. Click on the Files tab. This will open the Files pane. In the Files pane, you will see the LICENSE file. Click on the LICENSE file to open it. This will open the LICENSE file in the Editor pane. In the Editor pane, you will see the text of the LICENSE file. Delete the line that says “Copyright (c) 2022 Your Name”. The Editor pane should now look like this—
We have just made our second significant change to our project directory. Follow the steps in the Git workflow as before. Observe the change in the Changes tab in the GitHub Desktop window. The yellow dot symbol next to the LICENSE file in the Changes tab indicates that the nature of the change is the modification of an existing file in the project directory.
Let us ask the local Git software to remember the change by using commit. In the bottom-left corner of the GitHub Desktop window, type in a short message that describes the change that has occurred. In our example, we will type in “Update license”. Click on the Commit to main button. This will commit the change to the local Git repository.
Let us synchronize the new change with the remote repository. Click on the Push origin button. This will push the changes to the remote copy of the local Git repository on GitHub.
You have just completed the Git workflow for the second time. Go to the GitHub website to verify if the changes have been pushed to the remote copy of your project.
Working as usual
Now that you have gotten the hang of things, let us work as usual.
Create a new file within your project directory. This will be an R script. You can name it anything you like, for example, exploratory_data_analysis.R. Copy the code below and paste it in the R script that you just created. Save the file.
###########################
# SETUP
###########################
# Install "boxr", if you don't have it installed already. Load the boxr package.
#
# boxr library establishes a communication ( allows you to read/write files that
# you have access to) from your local (e.g., in your laptop) RStudio and your
# remotely located (on the cloud) Box.com storage space.

install.packages("boxr")
library(boxr)

####################################
# AUTHENTICATION
####################################
# Authentication is the process of providing permission to your RStudio tool to
# access your Box.com account, on your behalf.
# If you are not already logged into Box after running this code, you may be
# asked to log into Box. Identify Box as your hard disk in the cloud.

box_auth(client_id = "627lww8un9twnoa8f9rjvldf7kb56q1m",
         client_secret = "gSKdYKLd65aQpZGrq9x4QVUNnn5C8qqm")

   # Set the working directory to the "DCEG GitHub_RStudio_FAIR Workshop"
   # Box folder using the folder ID
box_setwd(dir_id = )

####################################
# READ IN FILES
####################################
# box_read reads the file into local memory - see the console after running the
# code for the temporary file path. After closing your RStudio session the
# file/data is deleted from the temporary local memory.

      # NOTE: The file ID is needed to read in the bc_data.csv file

bc_data = box_read(file_id = )

###################################
#### EXPLORATORY DATA ANALYSIS ####
###################################

# Work as always

plot_variable = "BMI" # change here
n_bins = 50

hist(bc_data[bc_data[["status"]]==1, plot_variable],
     breaks=n_bins, prob=TRUE,
     col=rgb(1, 0, 0, 0.5),
     main=paste0("Distribution of ", plot_variable),
     xlab=plot_variable)
lines(density(bc_data[bc_data[["status"]]==1, plot_variable]),
      col="red", lwd=2)

hist(bc_data[bc_data[["status"]]==0, plot_variable],
     breaks=n_bins, prob=TRUE,
     col=rgb(0, 0, 1, 0.5),
     add=TRUE)
lines(density(bc_data[bc_data[["status"]]==0, plot_variable]),
      col="blue", lwd=2)

legend("topright",
       title="status",
       legend=c("Case","Control"),
       col=c(rgb(1,0,0,0.5),
             rgb(0,0,1,0.5)),
       pt.cex=1,
       cex=0.3,
       pch=15 )
Execute the commands in the script. Let us take a closer look at what each line of code does.
FAIR data
In the initial few lines, we get to review some concepts from the first workshop.
The code below installs the boxr package if you don’t have it installed already. It then loads the boxr package. Recollect from the first workshop. We use boxr to communicate with Box. This is similar to GitHub Desktop, which is communicating with GitHub on our behalf.
install.packages("boxr")
library(boxr)
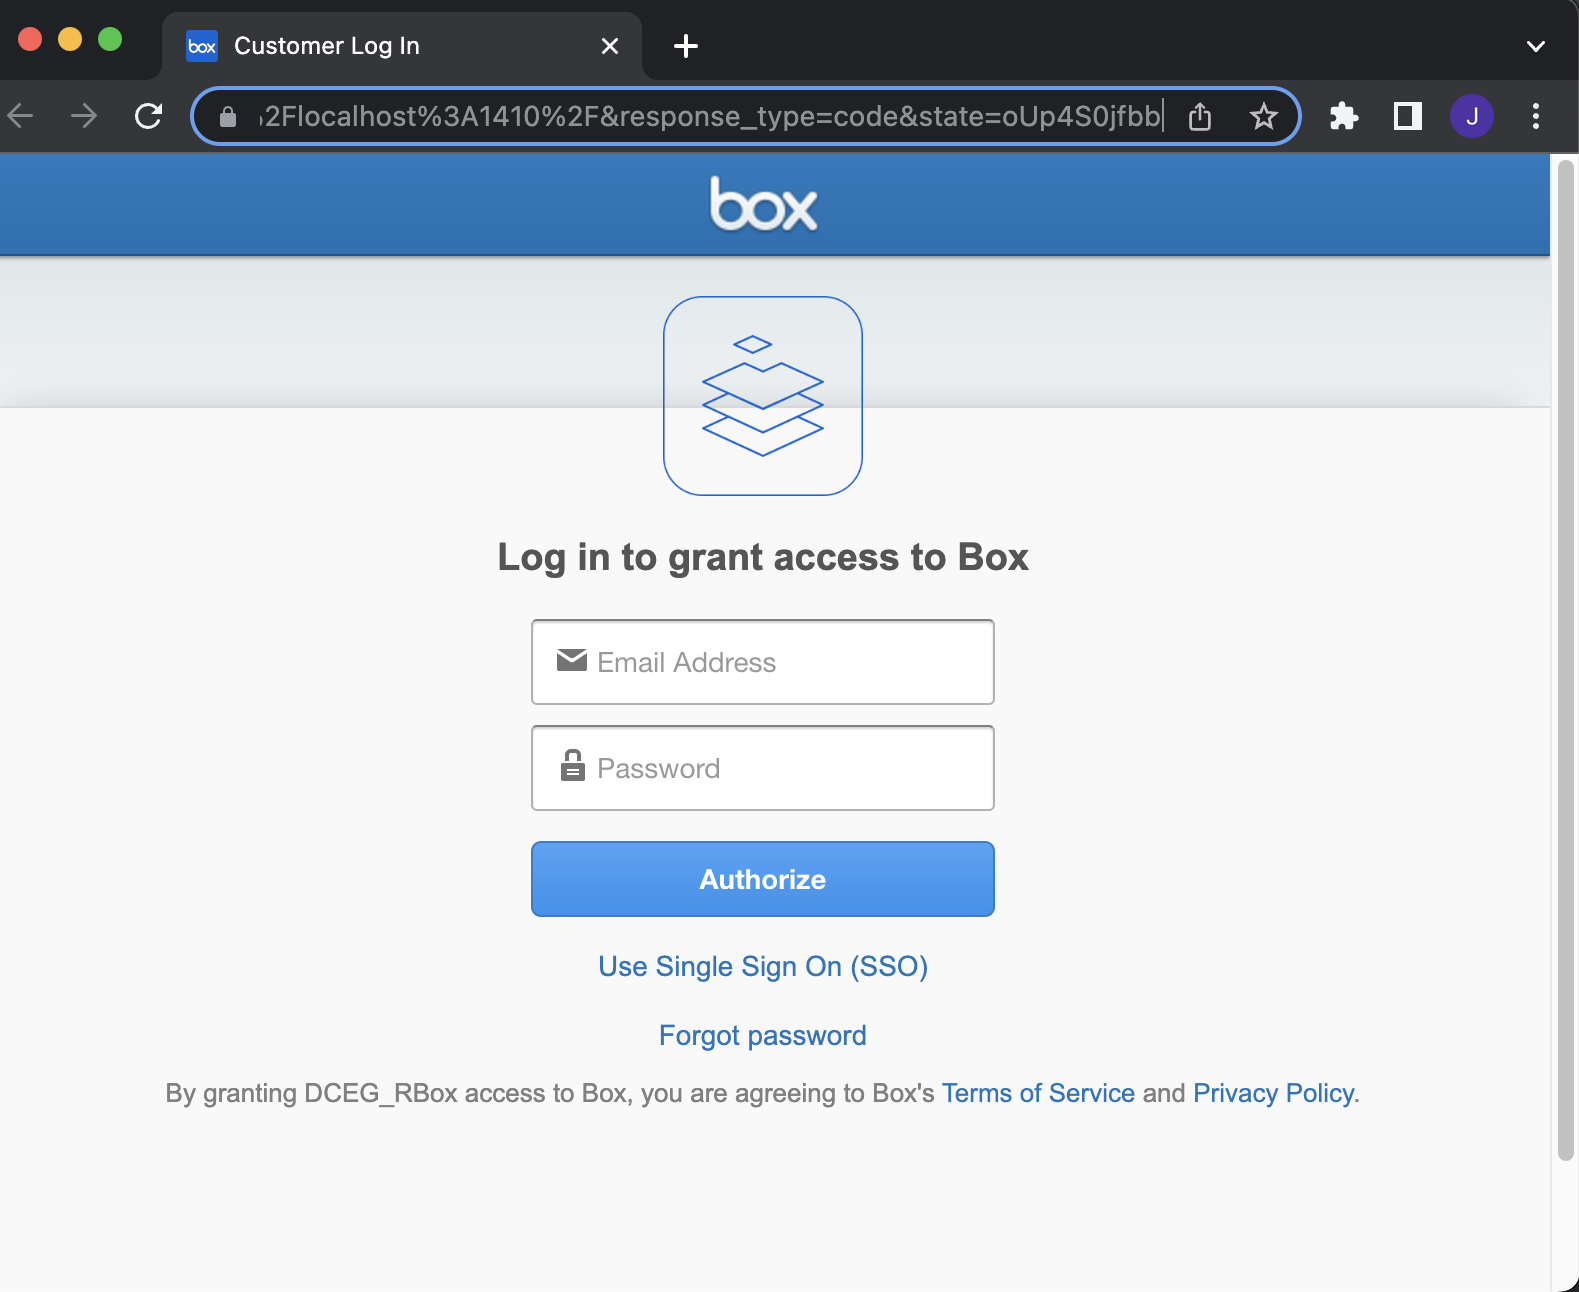
The code below authenticates your RStudio with your Box account. If you are not already logged into Box after running this code, you may be asked to log into Box via your browser. Identify Box as your “hard disk in the cloud”.
box_auth(client_id = "627lww8un9twnoa8f9rjvldf7kb56q1m",
         client_secret = "gSKdYKLd65aQpZGrq9x4QVUNnn5C8qqm")
The sign-in page for Box will look like this—
Once you sign in, you will be redirected to a page that looks like this—
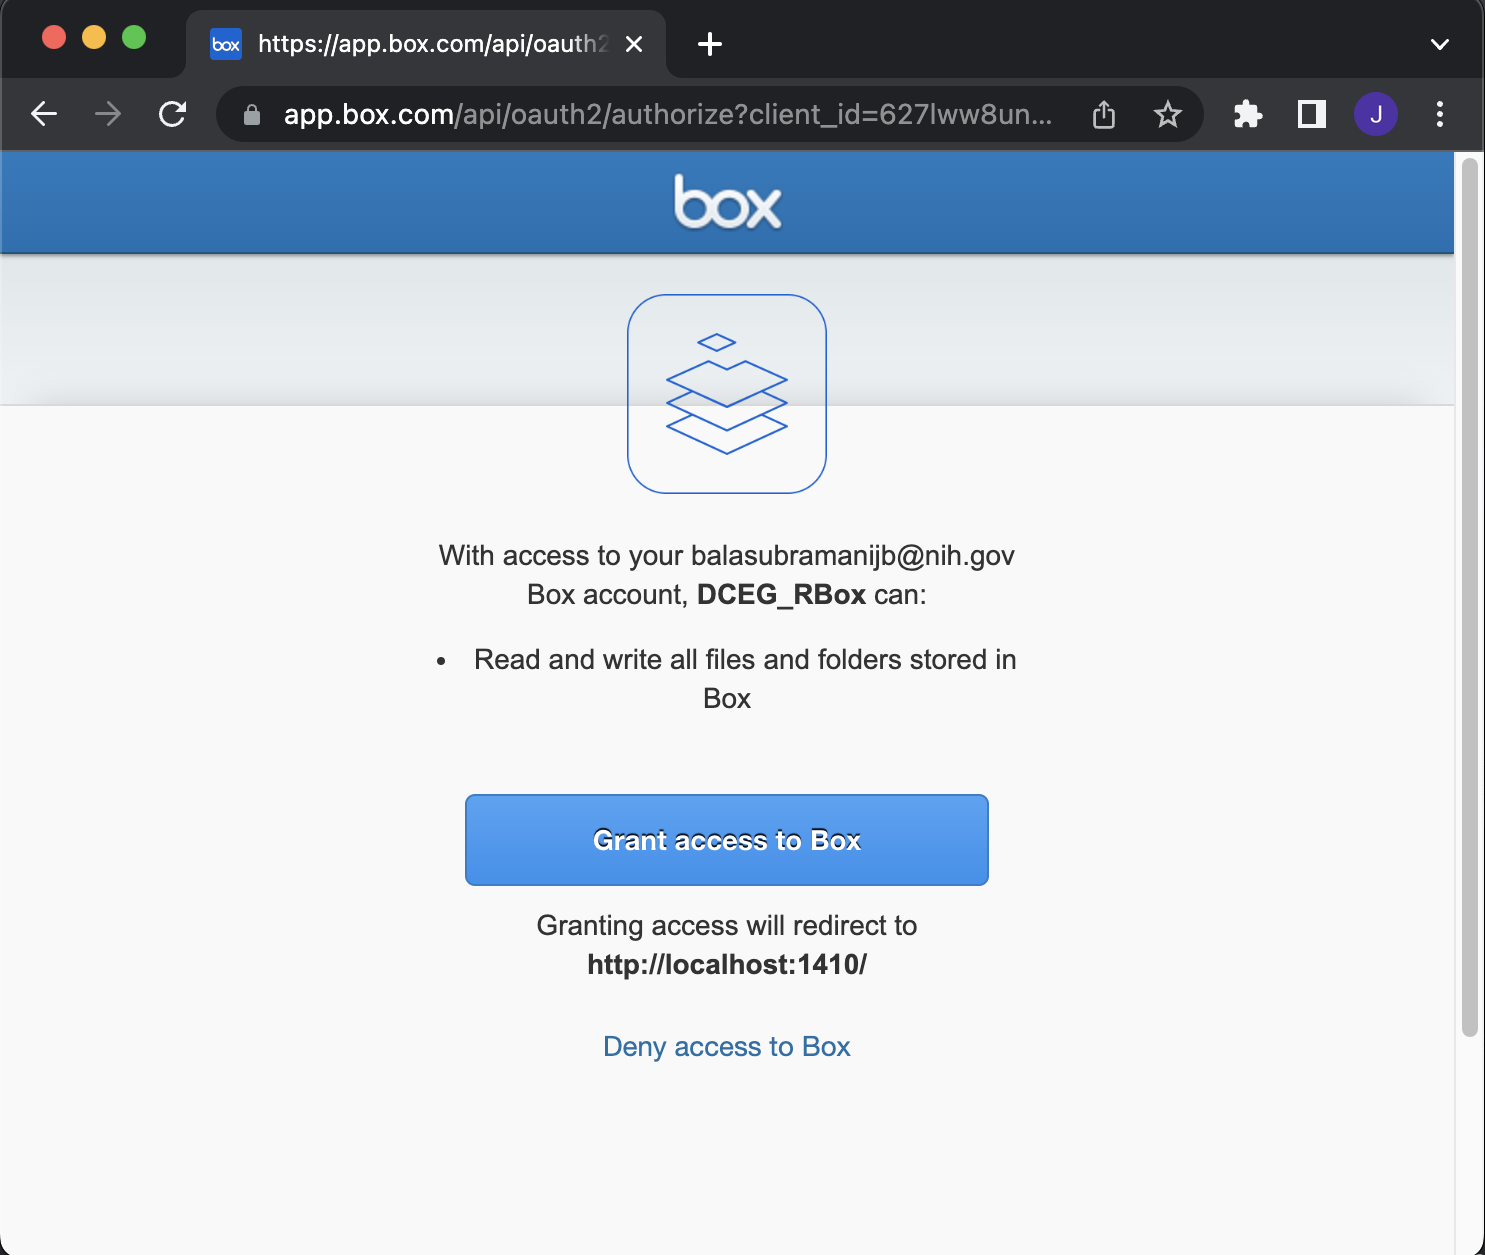
Please click on the Grant access to Box button. This will grant RStudio access to your Box account.
There are a few things to note about client_id and client_secret—
- The terms
client_idandclient_secretmay cause you some anxiety. Secrets are not supposed to be shared. Don’t worry, you are free to shareclient_idandclient_secretwith anyone. They are not secrets. They are just identifiers that are used to locate Box.com web servers on the internet. Think of them as the address to the gate-keepers of Box. Only those with a Box account are let in. That is why you were asked to log-in. Those without an account are turned away. - If you share the
client_idandclient_secretwith someone, they won’t magically gain access to your data. They will only have access to the data that they are given access to via Box’s website. - The
client_idandclient_secretremains the same for any project that involves data in Box. Again, it is merely the address to the gate-keepers of Box. It is not the address to your data. So, feel free to re-use this code snippet for other projects that involves data in Box.
The code below sets the working directory to the DCEG GitHub_RStudio_FAIR Workshop Box folder using the folder ID. This is similar to the setwd() function in RStudio, except the command below does this on the remote Box file system.
box_setwd(dir_id = )
Please pass the directory ID of the DCEG GitHub_RStudio_FAIR Workshop folder to the dir_id argument. You can find the directory ID by looking at the URL of the folder on Box’s website. See below—
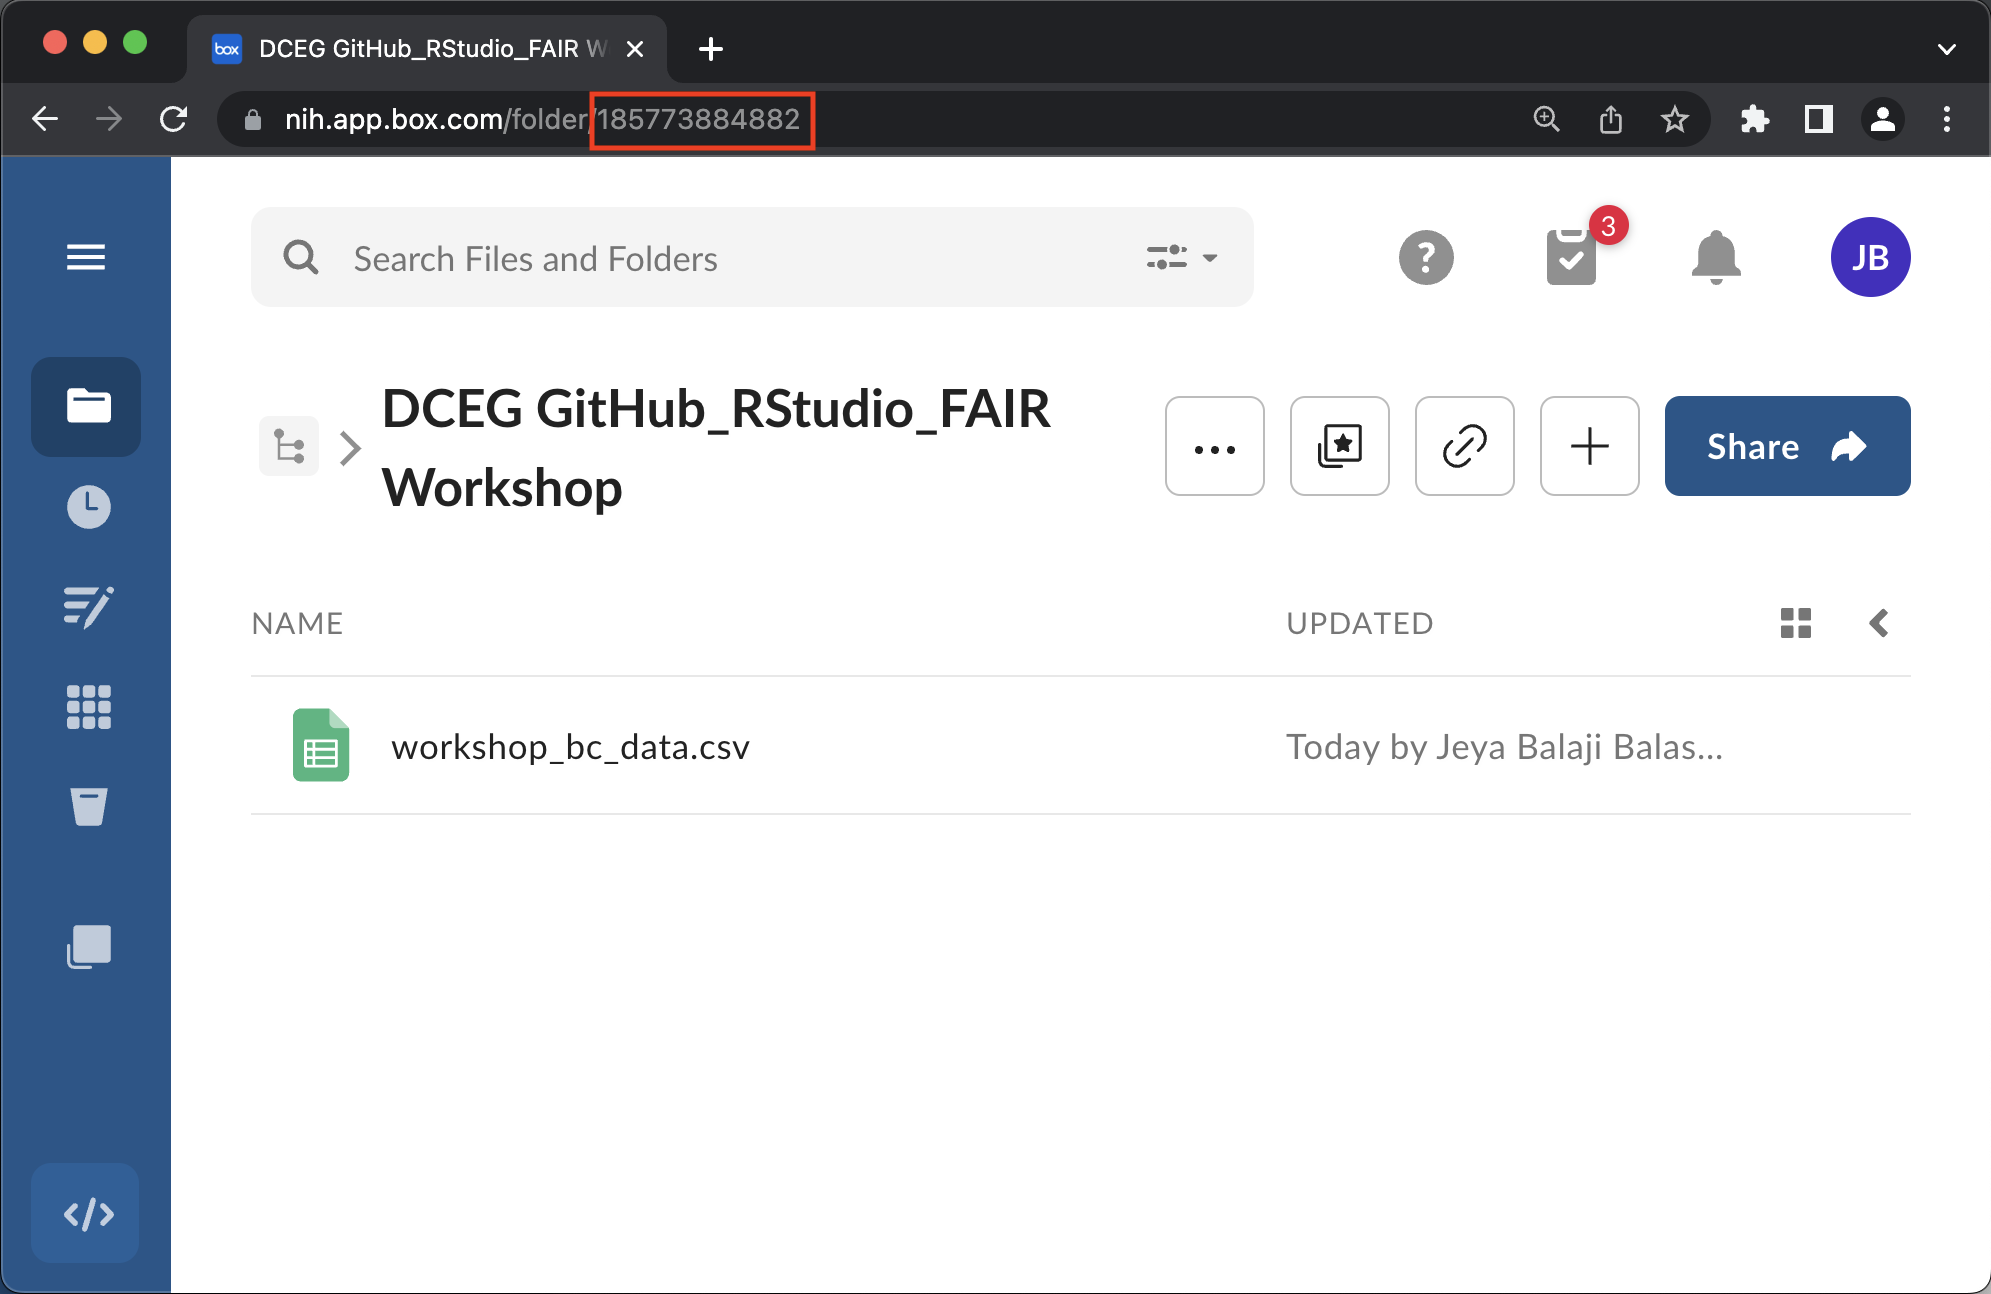
Let’s plug the folder ID in—
box_setwd(dir_id = 185773884882)
If this step is successful, you will see the following message in the console—
box.com working directory changed to 'DCEG GitHub_RStudio_FAIR Workshop'

      id: 185773884882
    tree: All Files/DCEG Box GitHub Workshop - Spring 2021/Github_FAIR Workshop/DCEG GitHub_RStudio_FAIR Workshop
   owner: garciacm@nih.gov
contents: 1 files, 0 folders
The code below reads a file in Box into local memory. The box_read() function is similar to the read.csv() function in RStudio. The difference is that box_read() reads the file from the remote Box file system.
bc_data = box_read(file_id = )
The file_id argument is the file ID of the bc_data.csv file. You can find the file ID by looking at the URL of the file on Box’s website. See below—
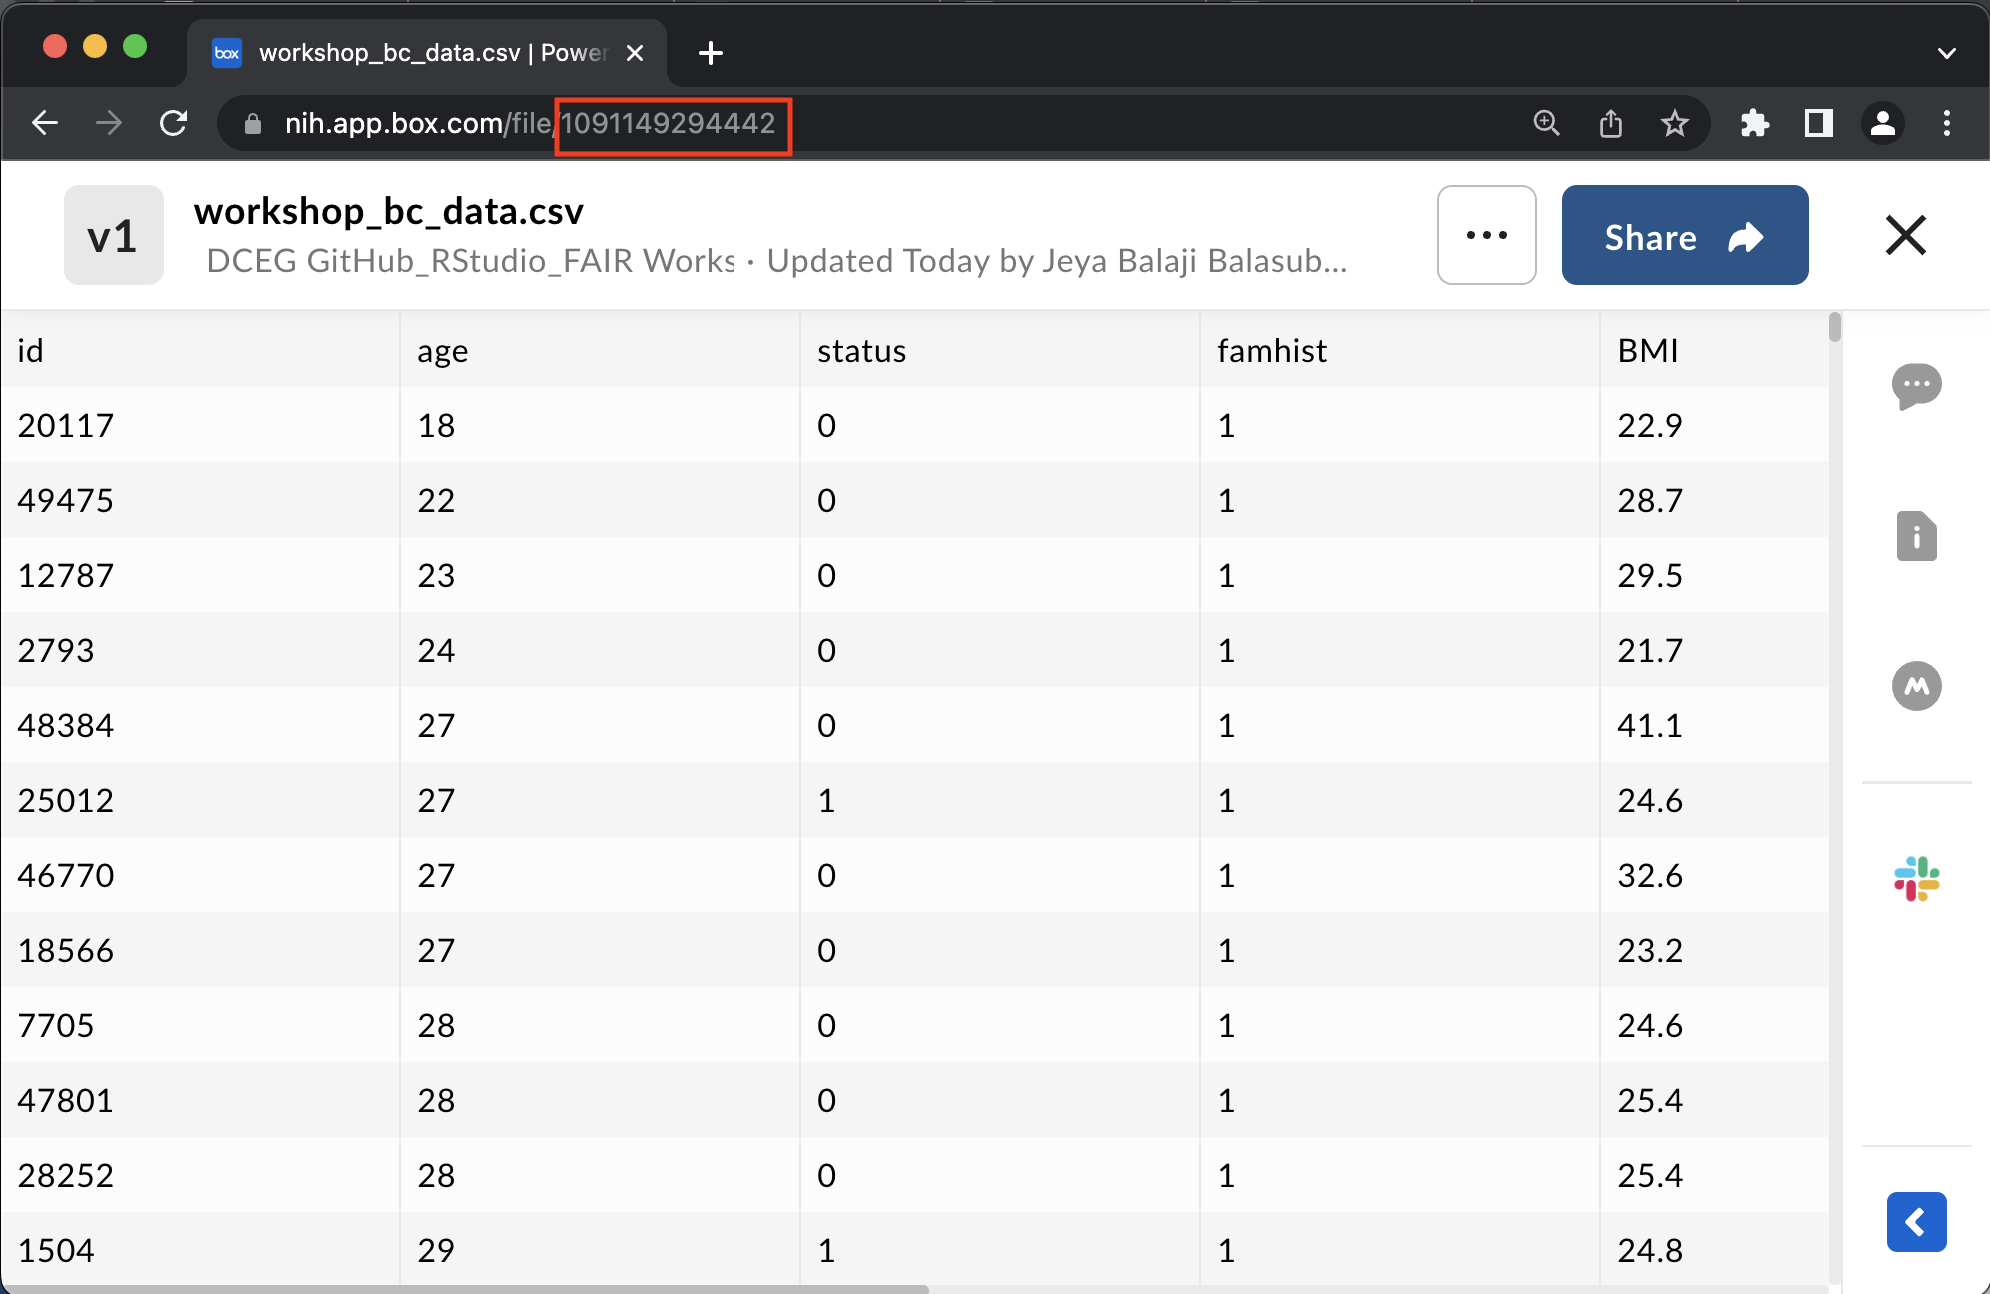
Let’s plug the file ID in—
bc_data = box_read(file_id = 1091149294442)
If this step is successful, you will see the following message in the console—
Remote file '/var/folders/8l/pbcwnq316rz5v5pnyv_sydmn2fsdlk/T//Rtmp6BcKgg/bc_data.csv' read into memory as an object of class data.frame
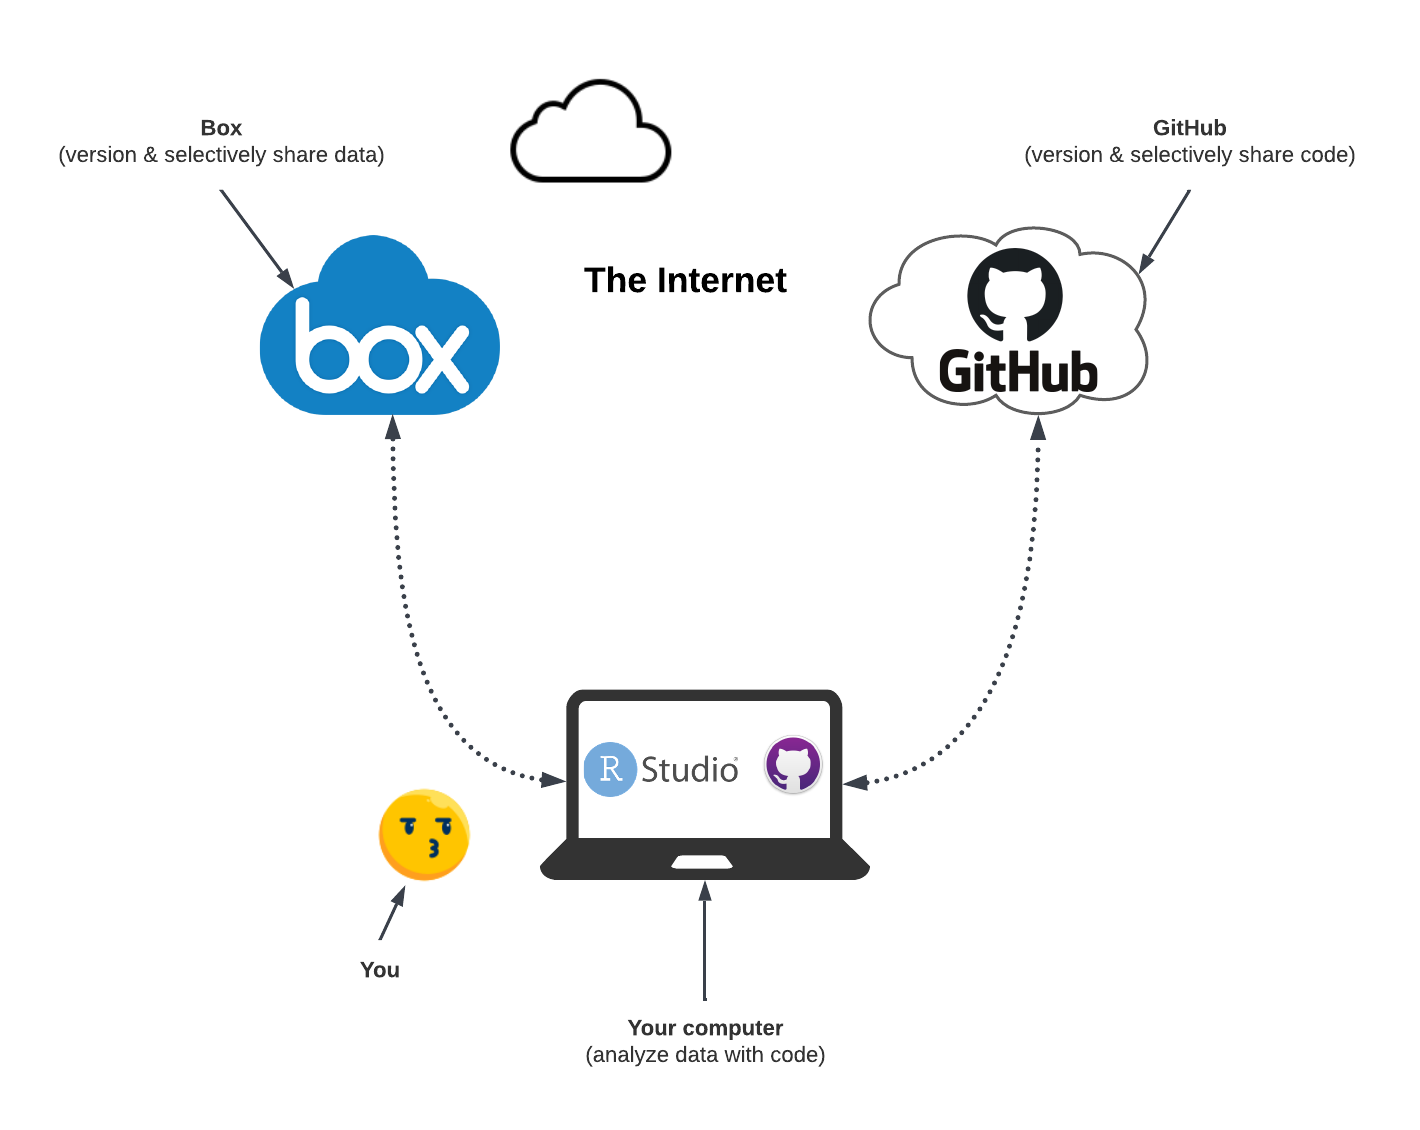
That’s it! You have now set up your very own, minimalistic data commons. See architecture below—
FAIR data analysis
With both FAIR data (from boxr and Box) and FAIR code (from GitHub Desktop and GitHub), we are ready to do some FAIR data analysis.
Please run the rest of the code.
plot_variable = "BMI" # change here
n_bins = 50

hist(bc_data[bc_data[["status"]]==1, plot_variable],
     breaks=n_bins, prob=TRUE,
     col=rgb(1, 0, 0, 0.5),
     main=paste0("Distribution of ", plot_variable),
     xlab=plot_variable)
lines(density(bc_data[bc_data[["status"]]==1, plot_variable]),
      col="red", lwd=2)

hist(bc_data[bc_data[["status"]]==0, plot_variable],
     breaks=n_bins, prob=TRUE,
     col=rgb(0, 0, 1, 0.5),
     add=TRUE)
lines(density(bc_data[bc_data[["status"]]==0, plot_variable]),
      col="blue", lwd=2)

legend("topright",
       title="status",
       legend=c("Case","Control"),
       col=c(rgb(1,0,0,0.5),
             rgb(0,0,1,0.5)),
       pt.cex=1,
       cex=0.3,
       pch=15 )
It should generate a histogram of the BMI variable in the bc_data data frame, conditioned on the breast cancer status variable. Save the figure in your project directory. You can name the plot anything you like. I am calling it differential_distribution.png.
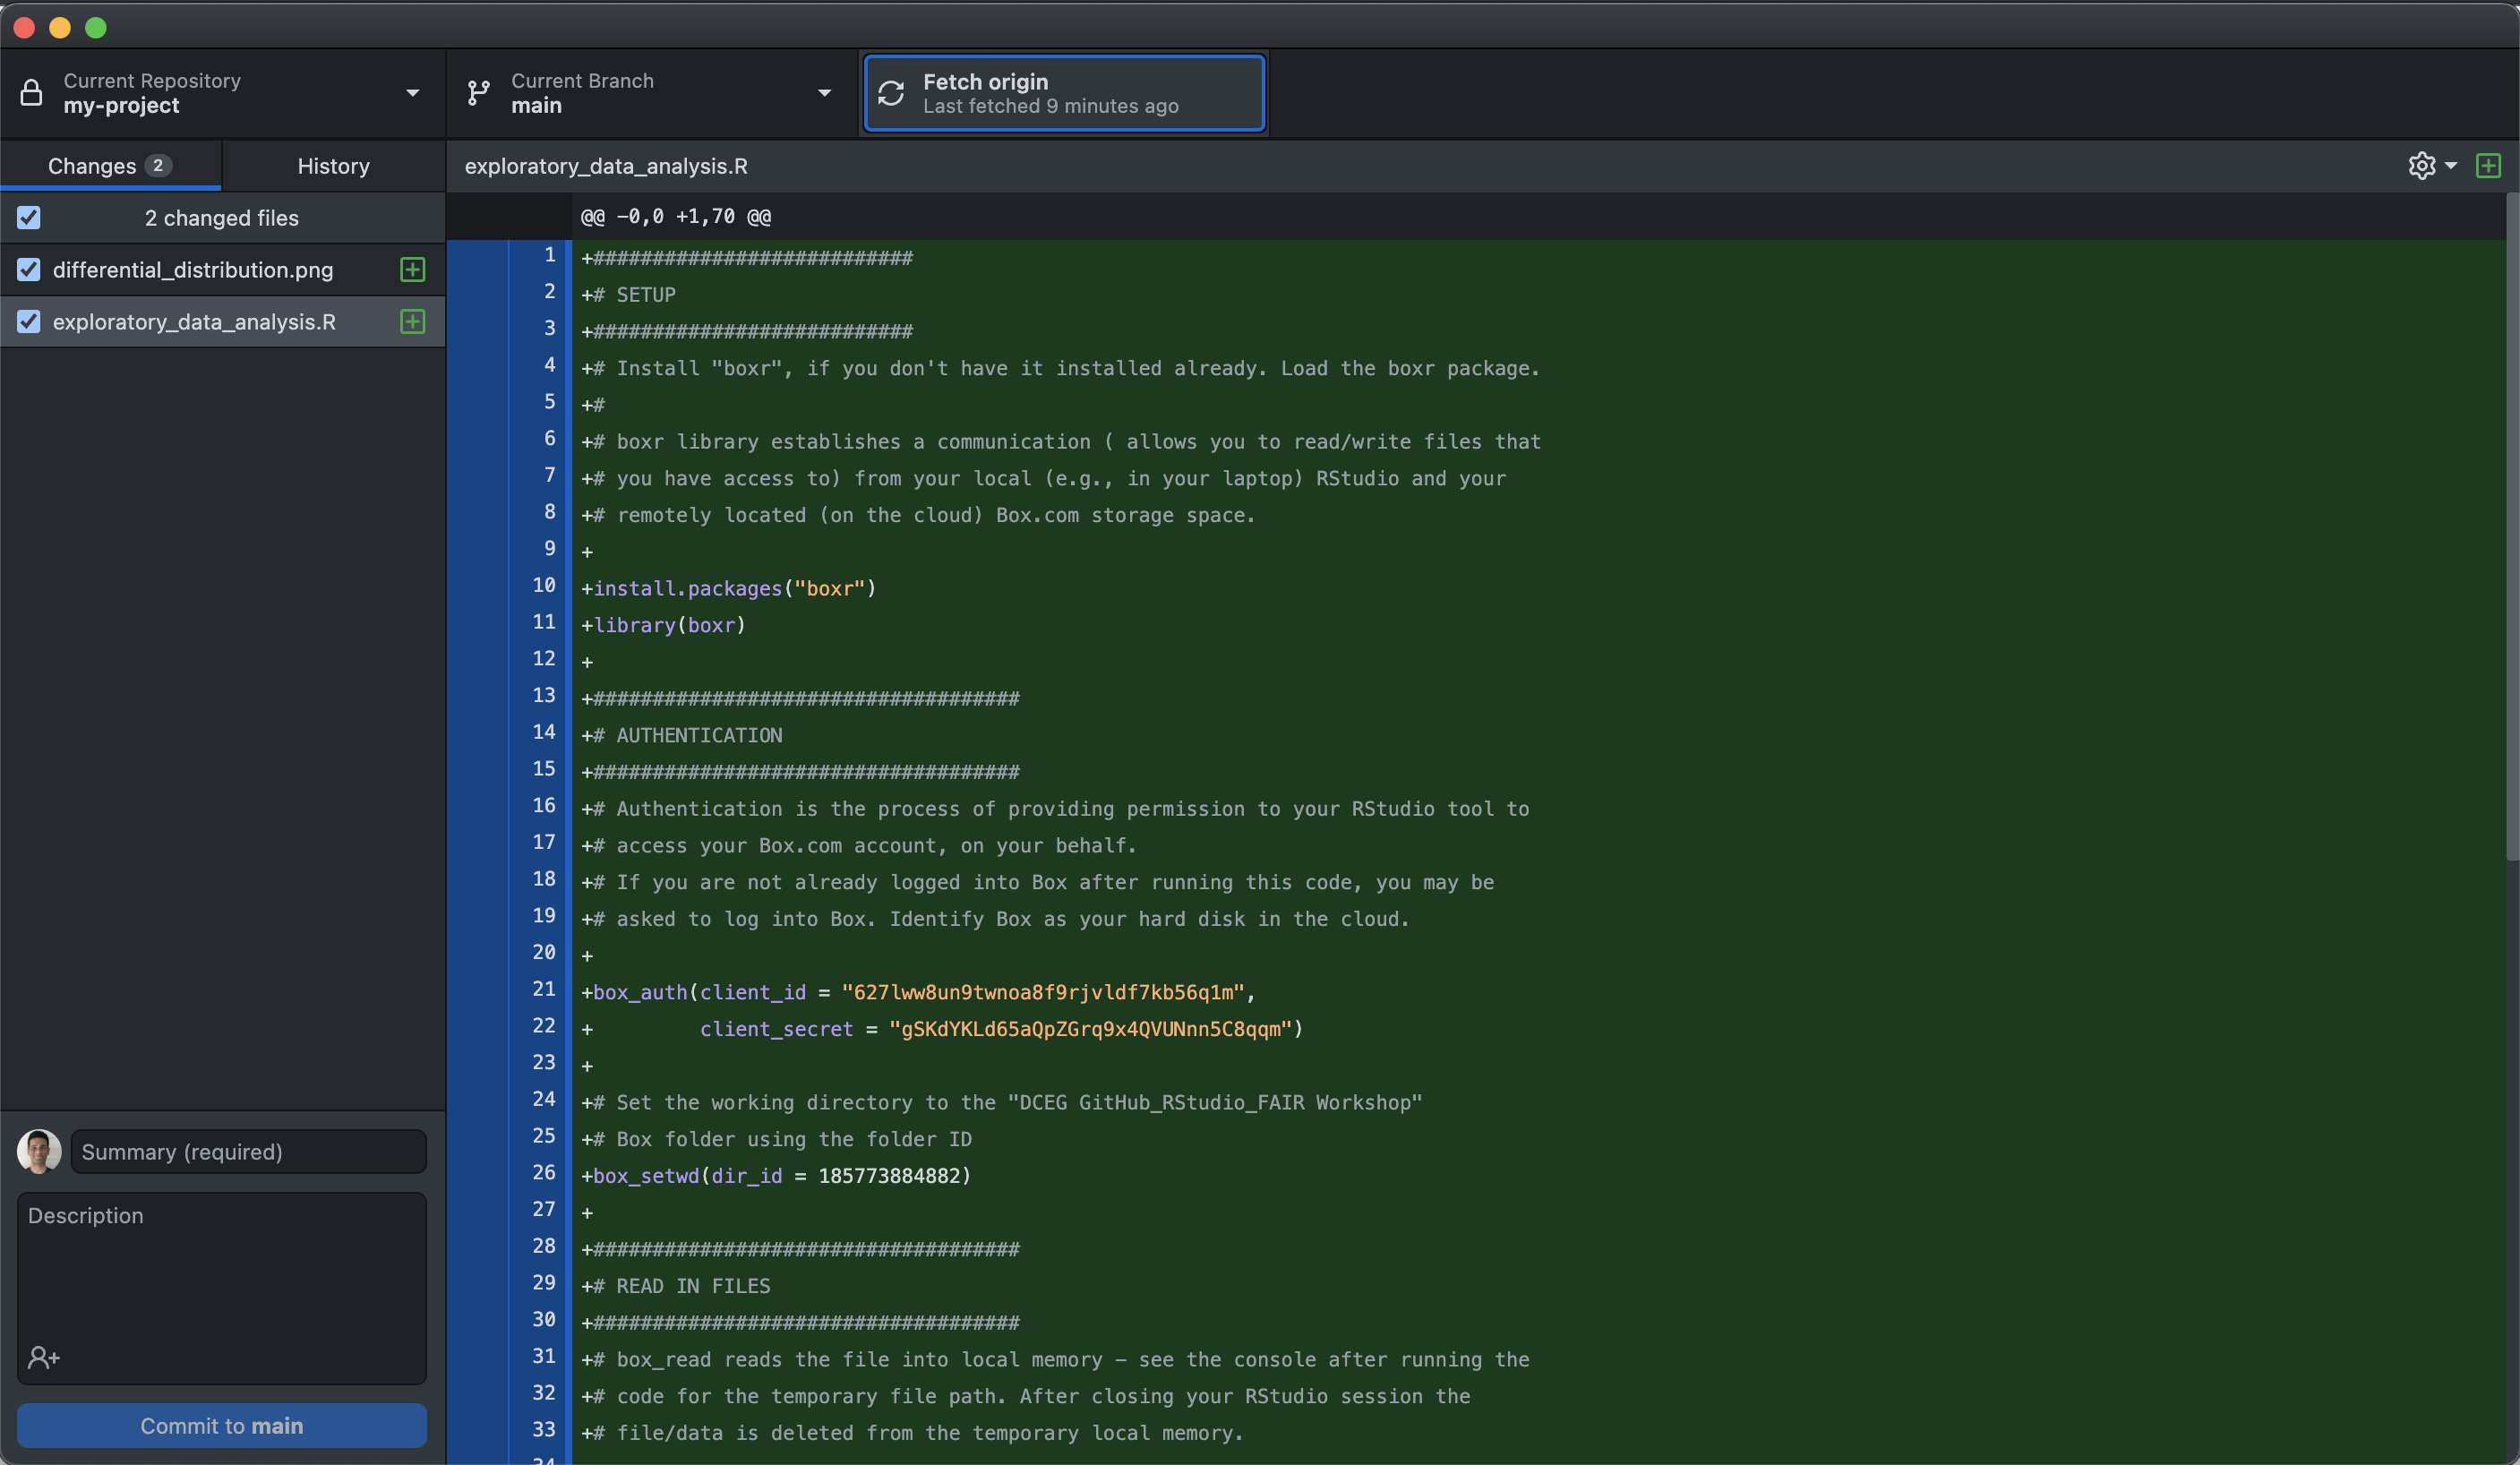
Let’s take a look at what all this data analysis has done to our project directory. Go to GitHub Desktop and take a look at the Changes tab. You should see something like this—
Let us complete the Git workflow. We have made our edits. Let us commit the changes locally, then push the changes to the remote repository. You know what to do!
You have now mastered git workflow, which allows you to make changes to your project directory, and then push those changes to the remote repository. This is the essence of version control. You can now go back to any previous version of your project directory. You can also share your project directory with others. This is the essence of FAIR collaboration.
Consumer workflow
When playing the role of a consumer, researchers consume other people’s code to either reproduce or replicate their findings.
Specifically, we will learn about—
- Cloning a repository.
- Asking for help or reporting bugs in a project.
source: an R function to directly run code from a file (local or remote).
Clone a remote Git repository
To run someone else’s code, we must first clone their remote Git repository on GitHub. This is similar to downloading a file from the internet. The difference is that you are downloading a project directory, which is a collection of files and folders. Additionally, this project directory is version controlled, which means that you can go back to any previous version of the project directory. This is important for reproducibility because you can always go back to the specific version of the project directory that was used to generate the results in the paper that you are trying to reproduce.
To clone a remote Git repository, you must first find the URL of the remote repository. For the practice exercise, we will use the following toy repository— https://github.com/DCEG-workshops/replication-demo.
Go to the above URL using your web browser. You should see something like this—

Click on the green Code button on the GitHub repository page, highlighted in red, in the image above. You should see a drop-down menu as shown below—
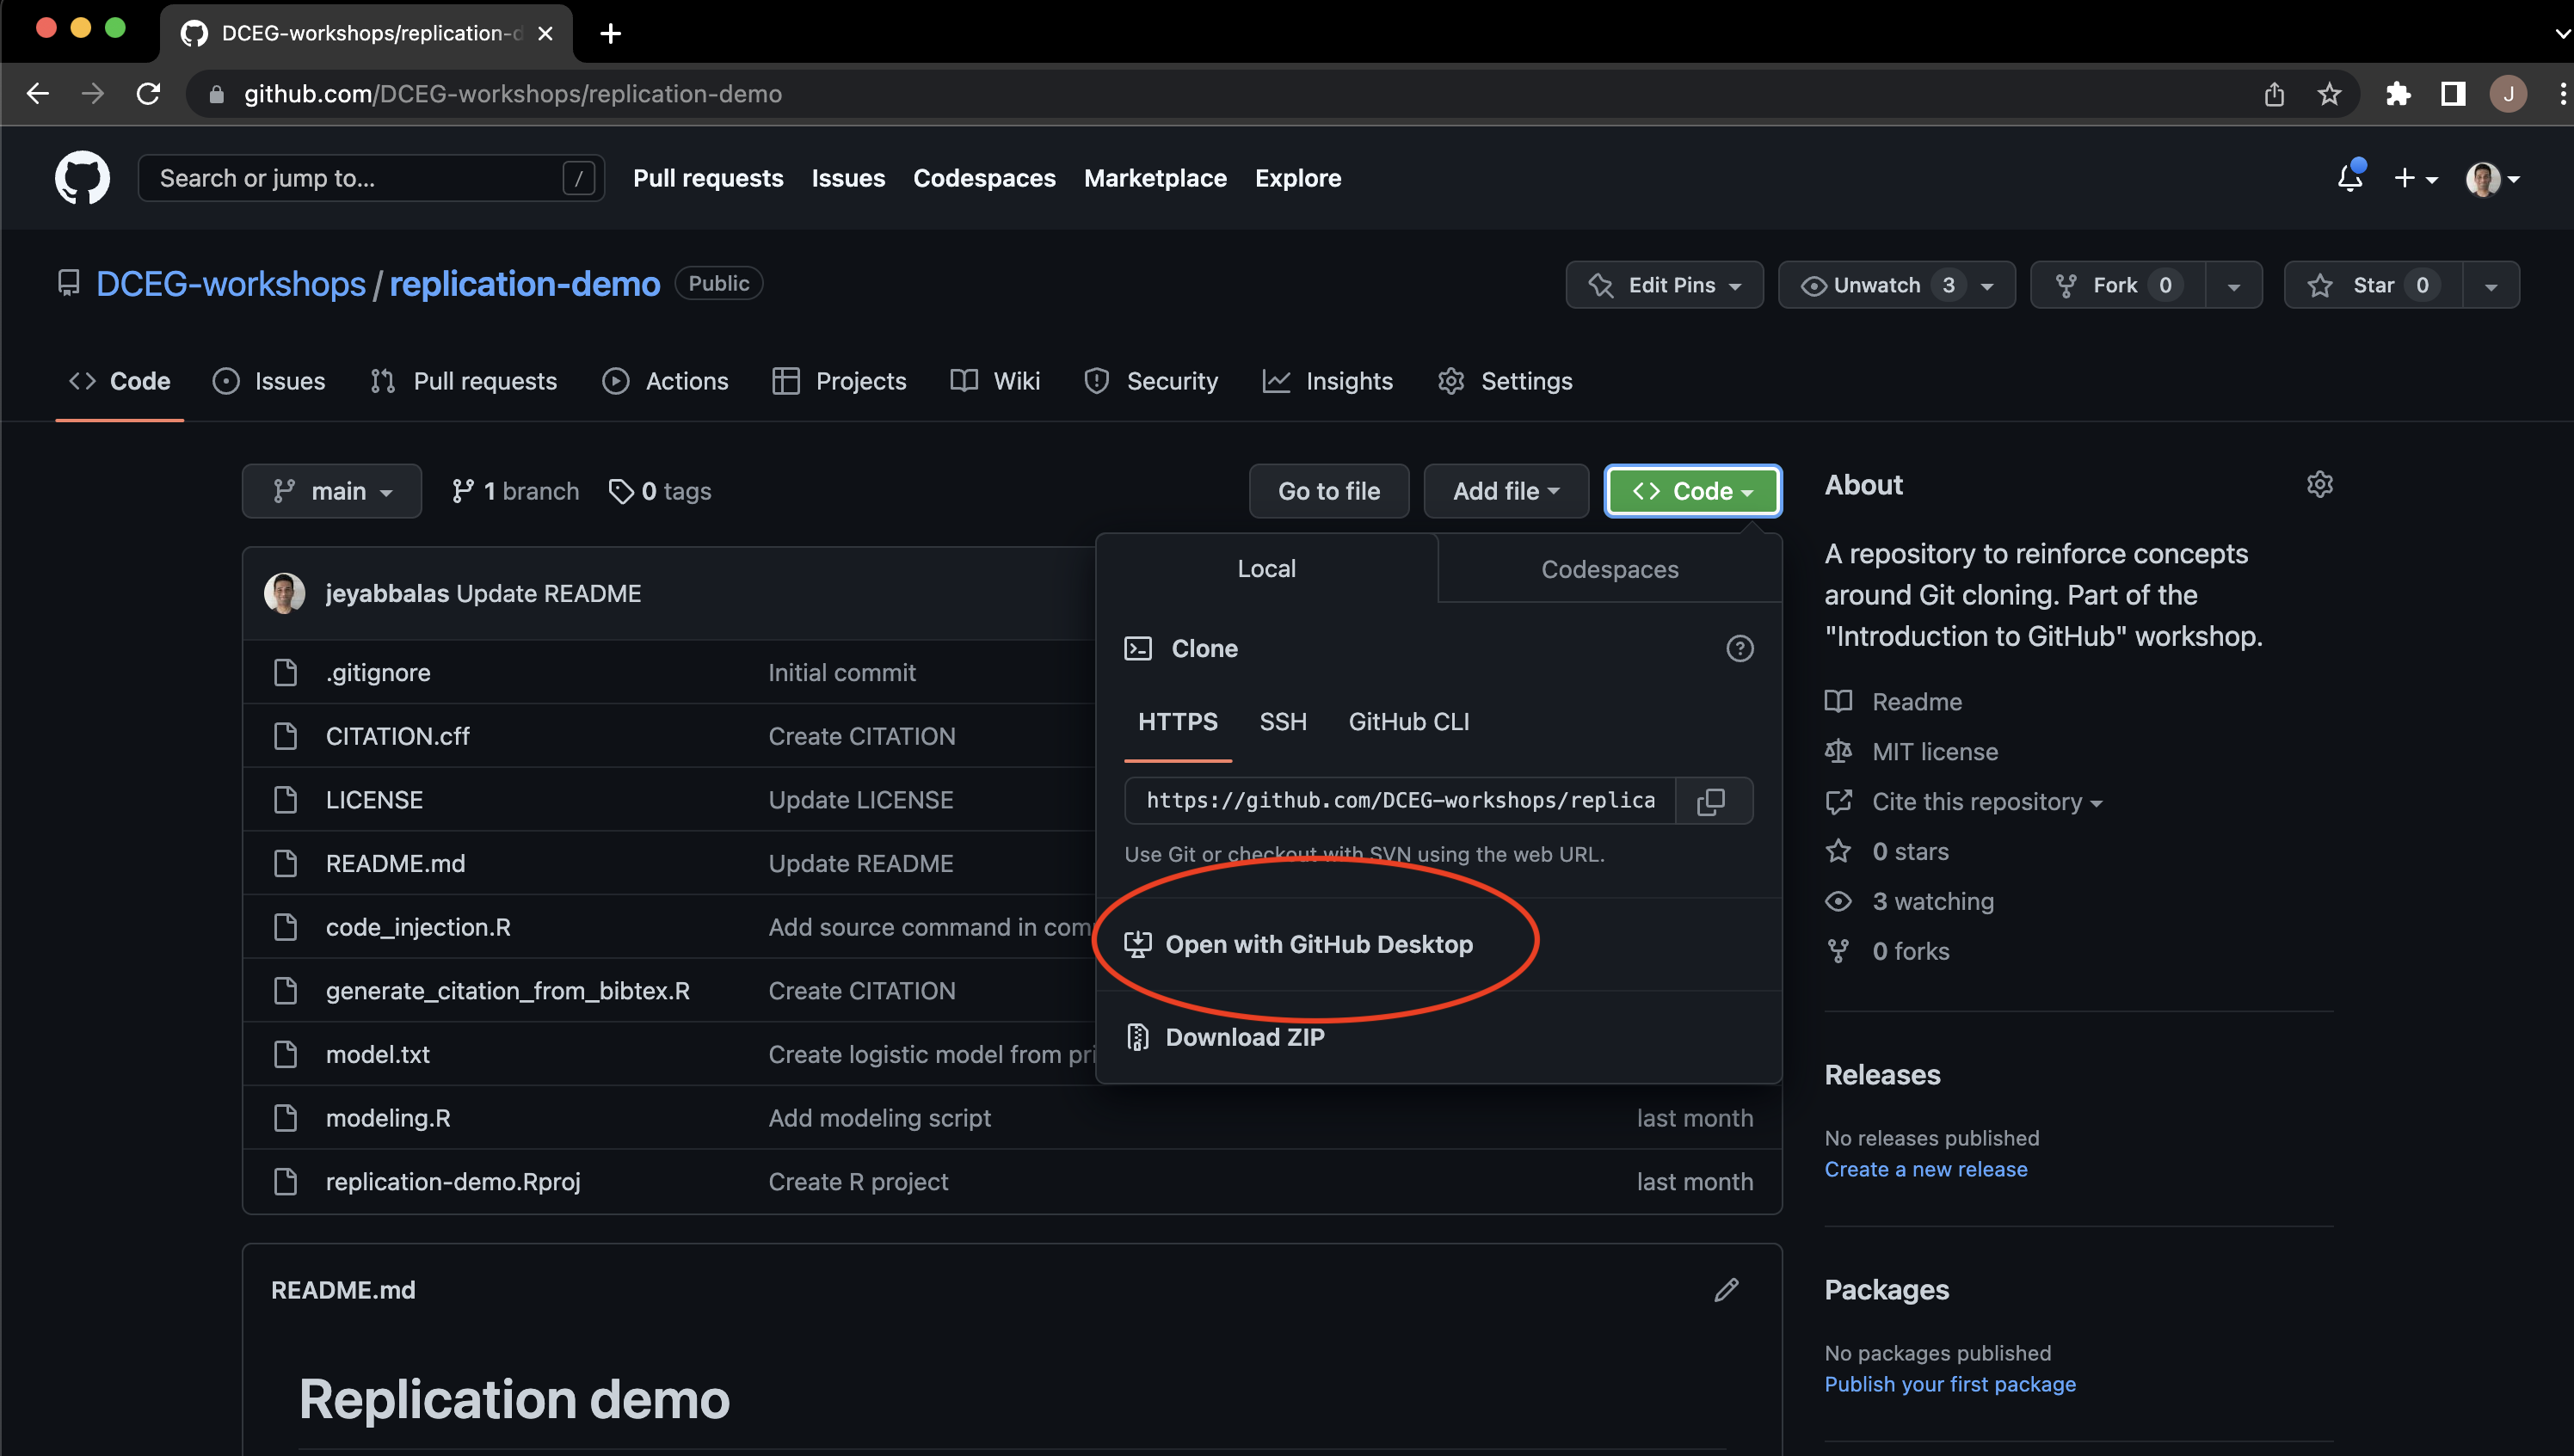
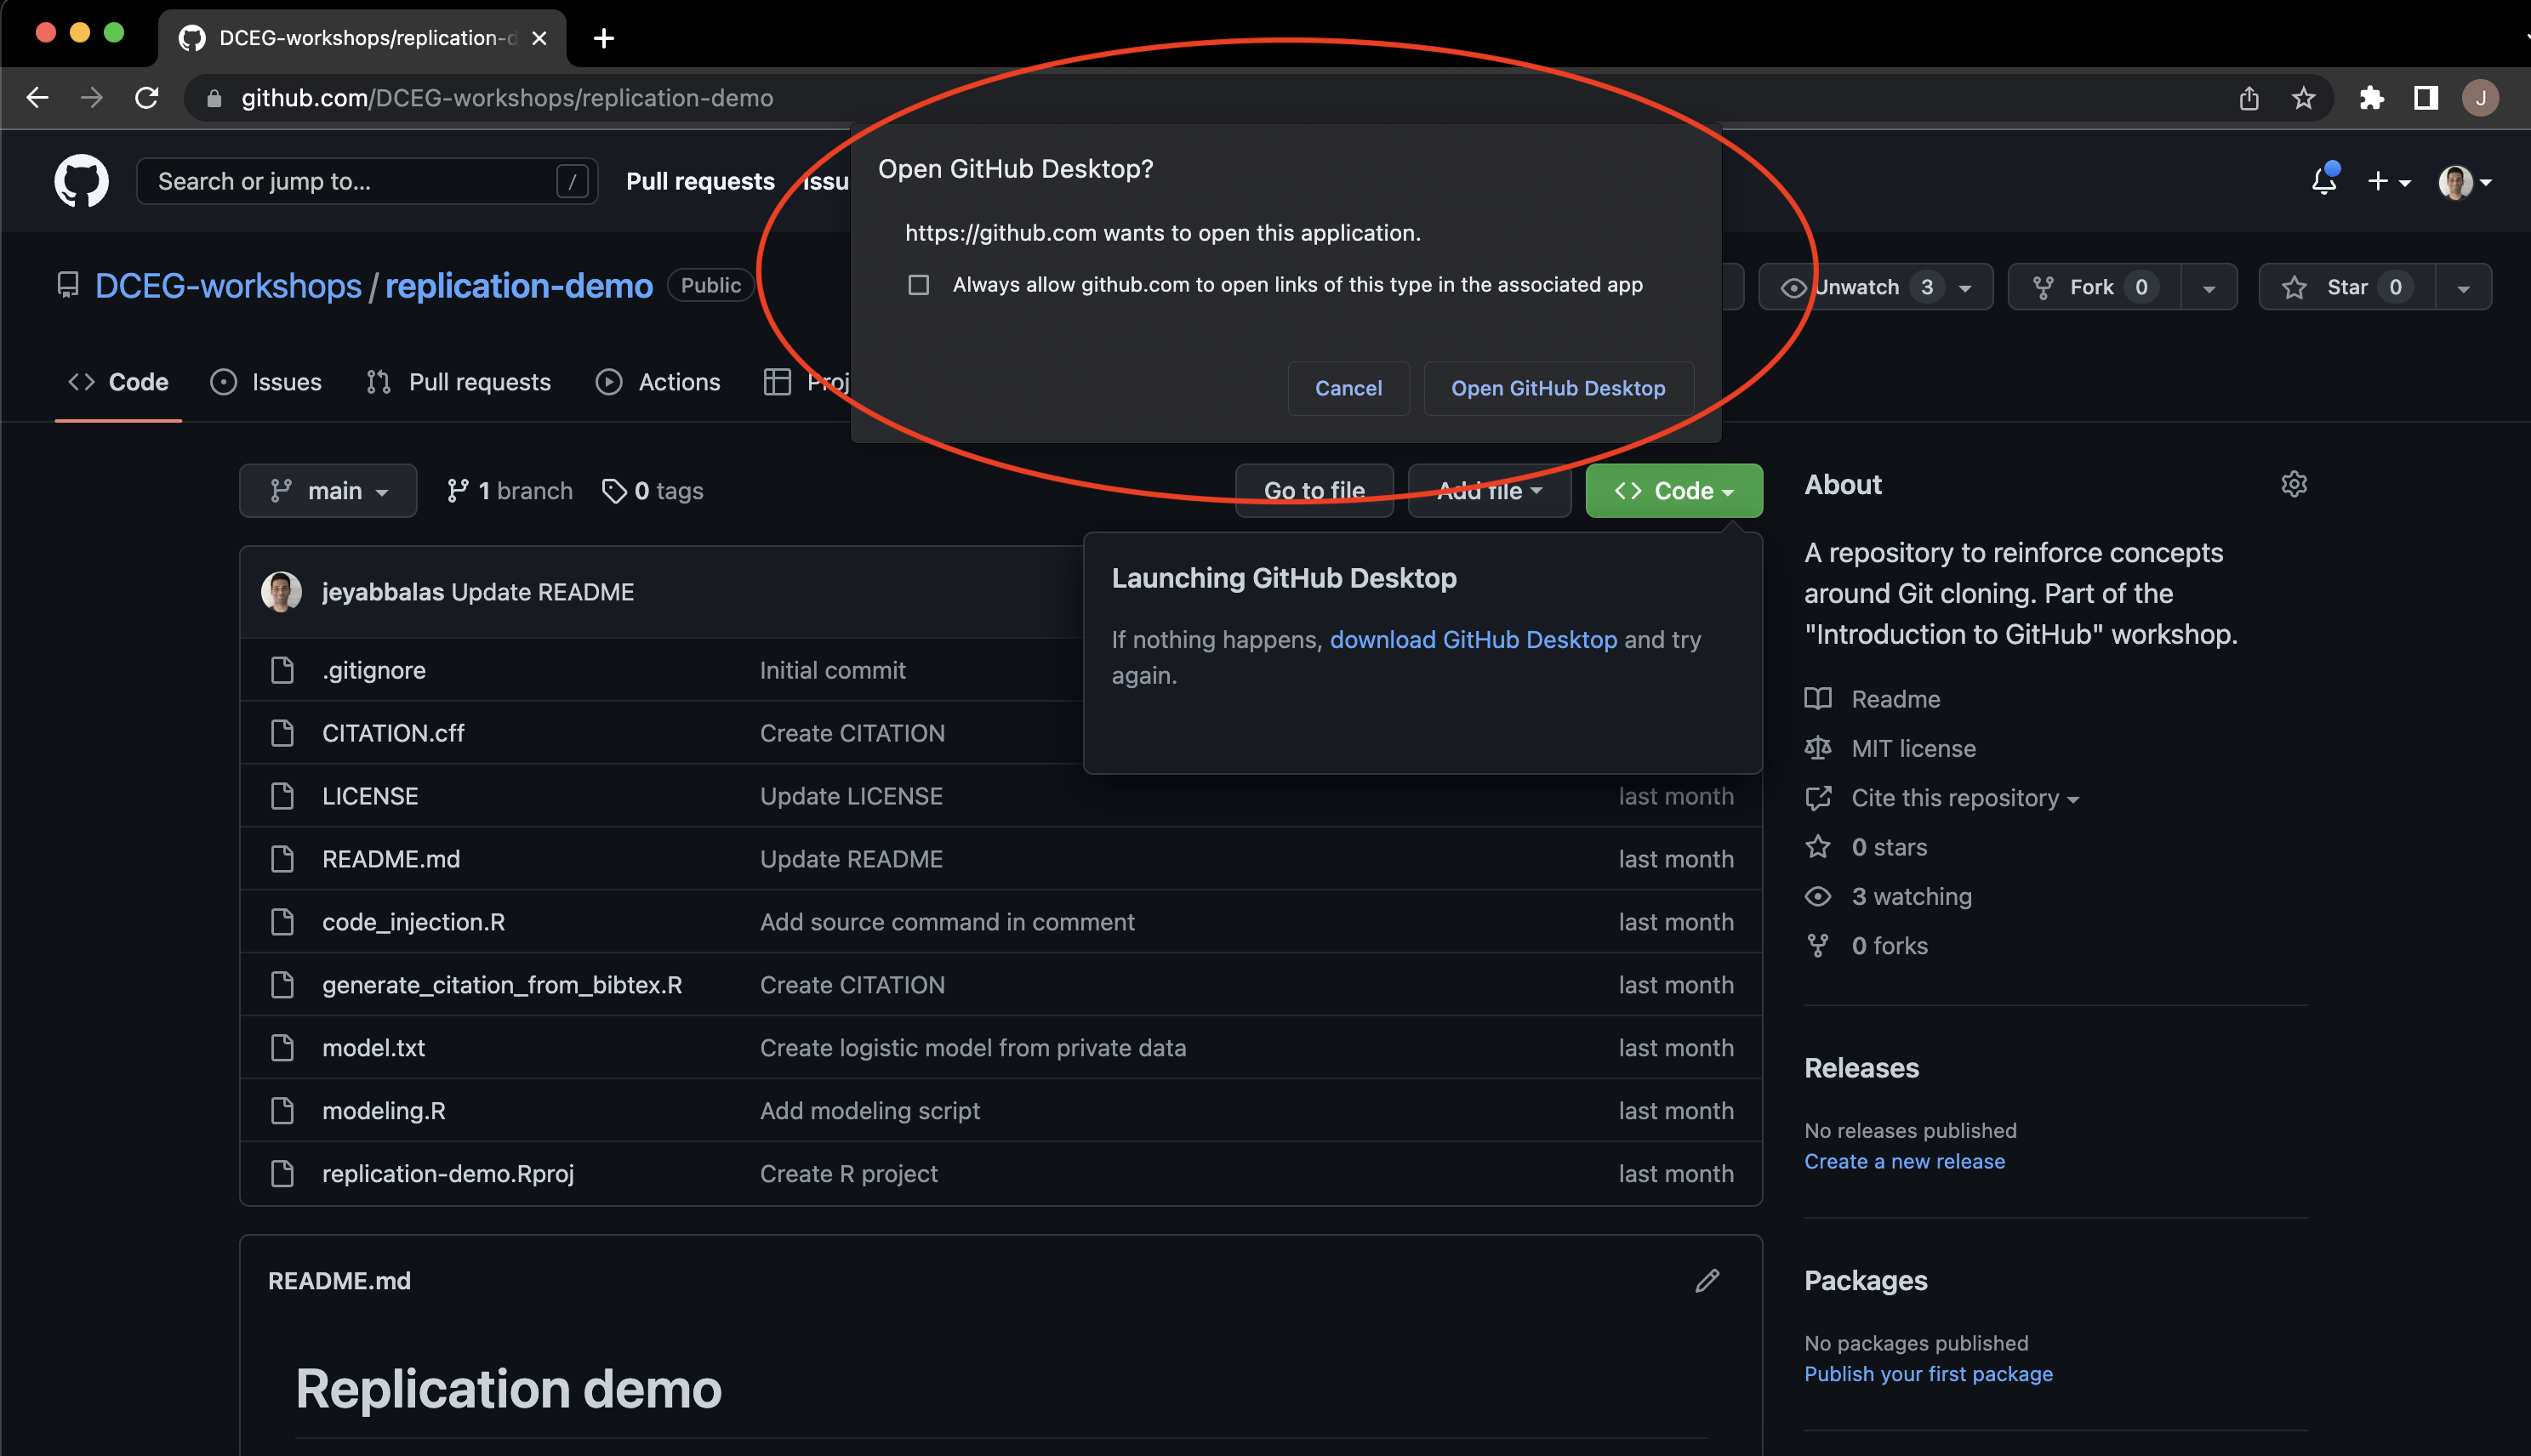
Under the HTTPS tab in the drop-down box, you will see an option to Open with GitHub Desktop. Please click on this option. You will likely get a pop-up saying “Open GitHub Desktop?”. Please click on Open GitHub Desktop. This pop-up is shown below—
This should open GitHub Desktop on your computer and offer you to clone the remote repository on your local machine. The GitHub Desktop window is shown below—
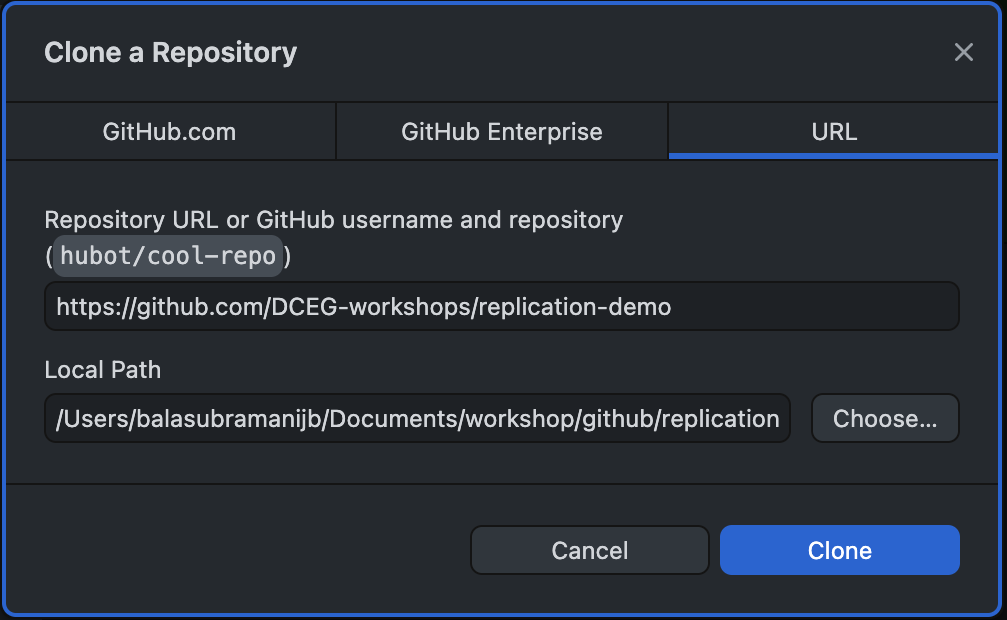
Please edit the Local Path and set it to the directory, where you would like the cloned project to be located in your computer. Then, click on the Clone button. This will clone the remote repository on your local machine. The GitHub Desktop window, now would look something like this—
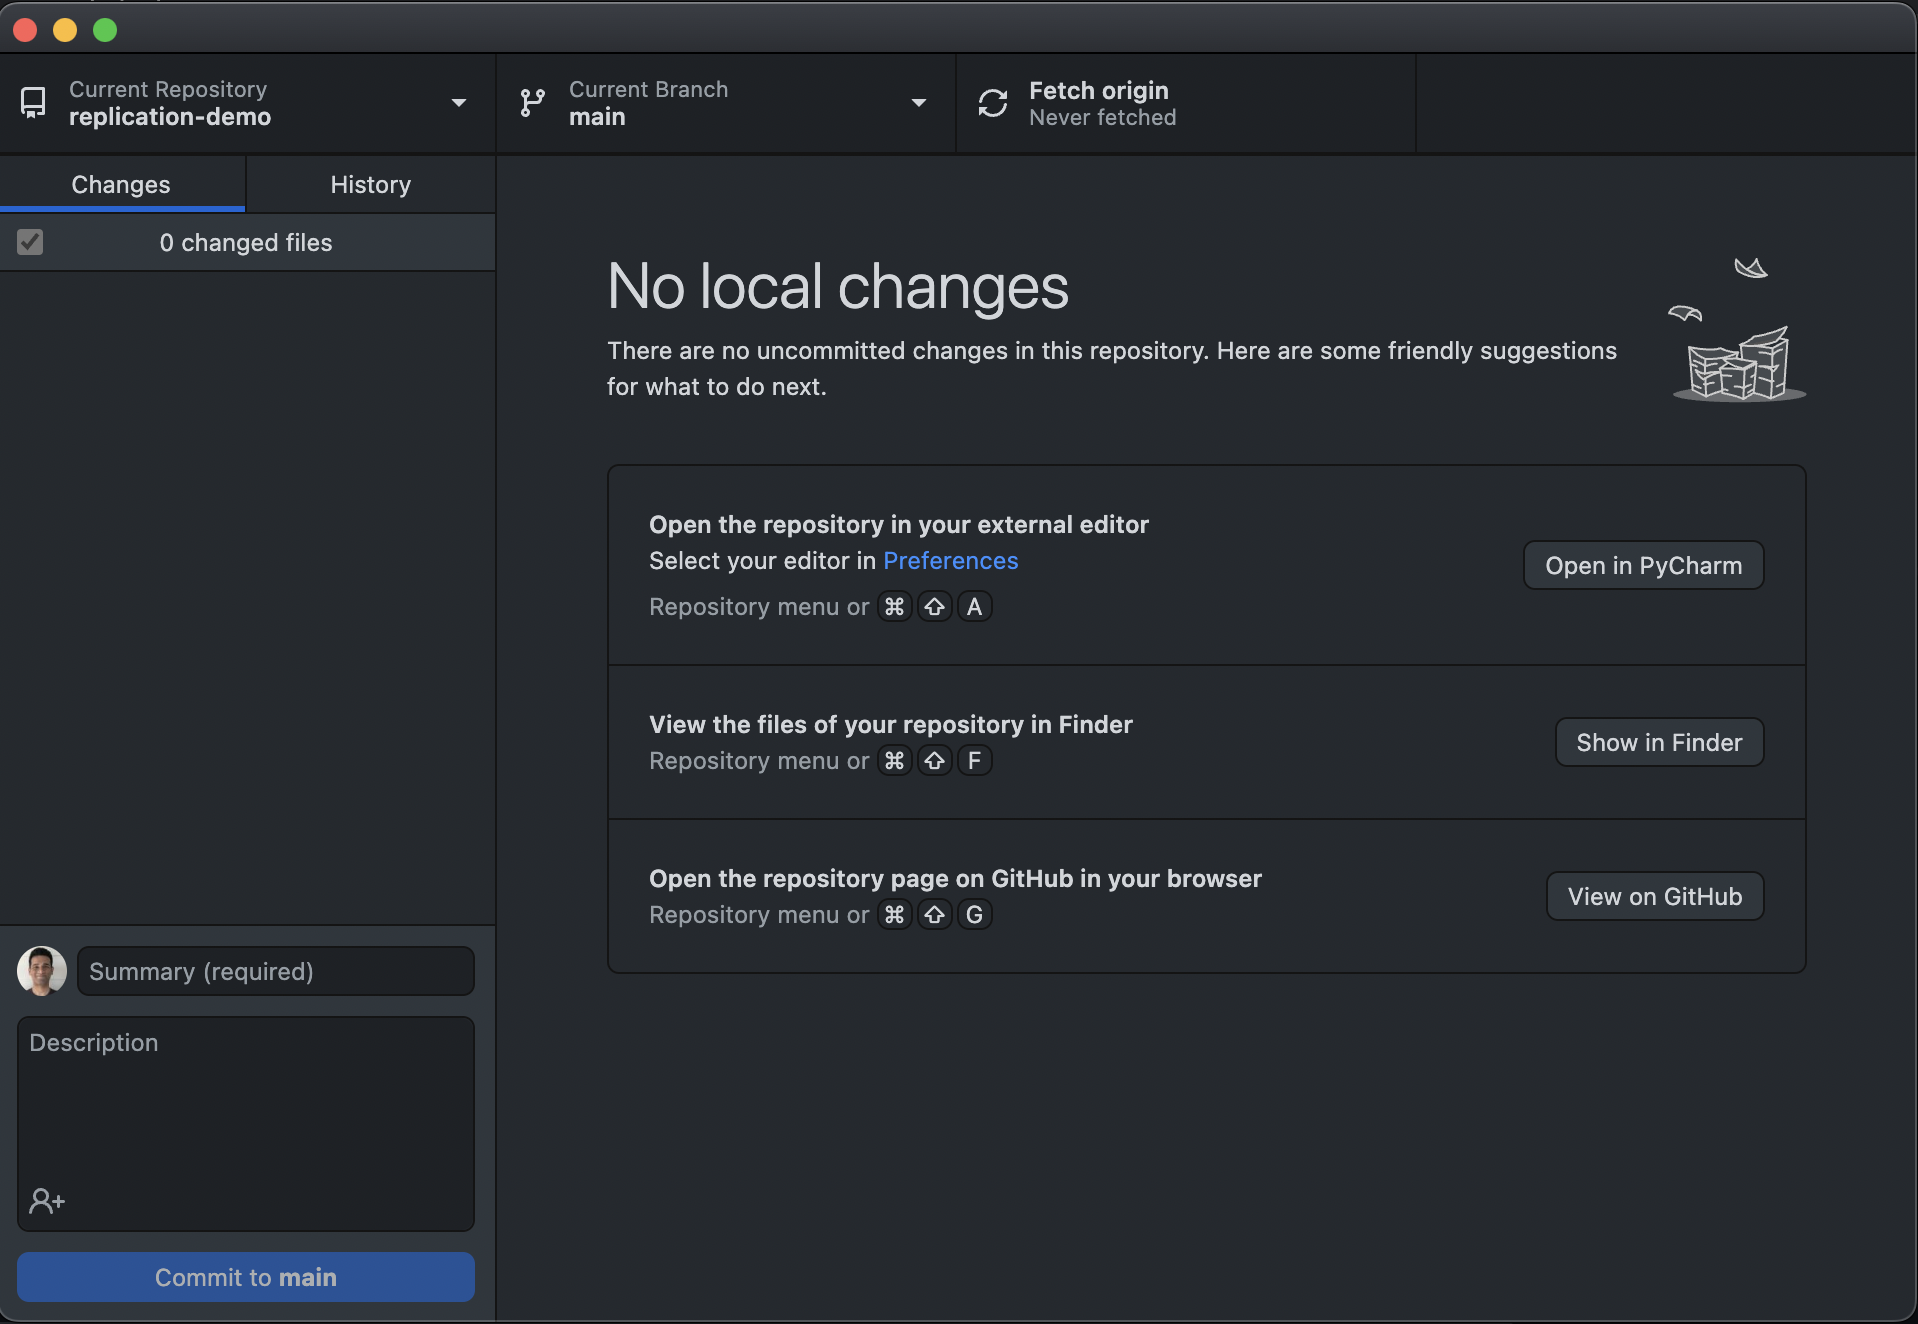
If you navigate to the directory that you specified in the Local Path field, you should see the cloned project directory. Not only did GitHub Desktop download this project for you, but it also downloaded the entire version-controlled history of this project. To check, please go to the History tab in GitHub Desktop.
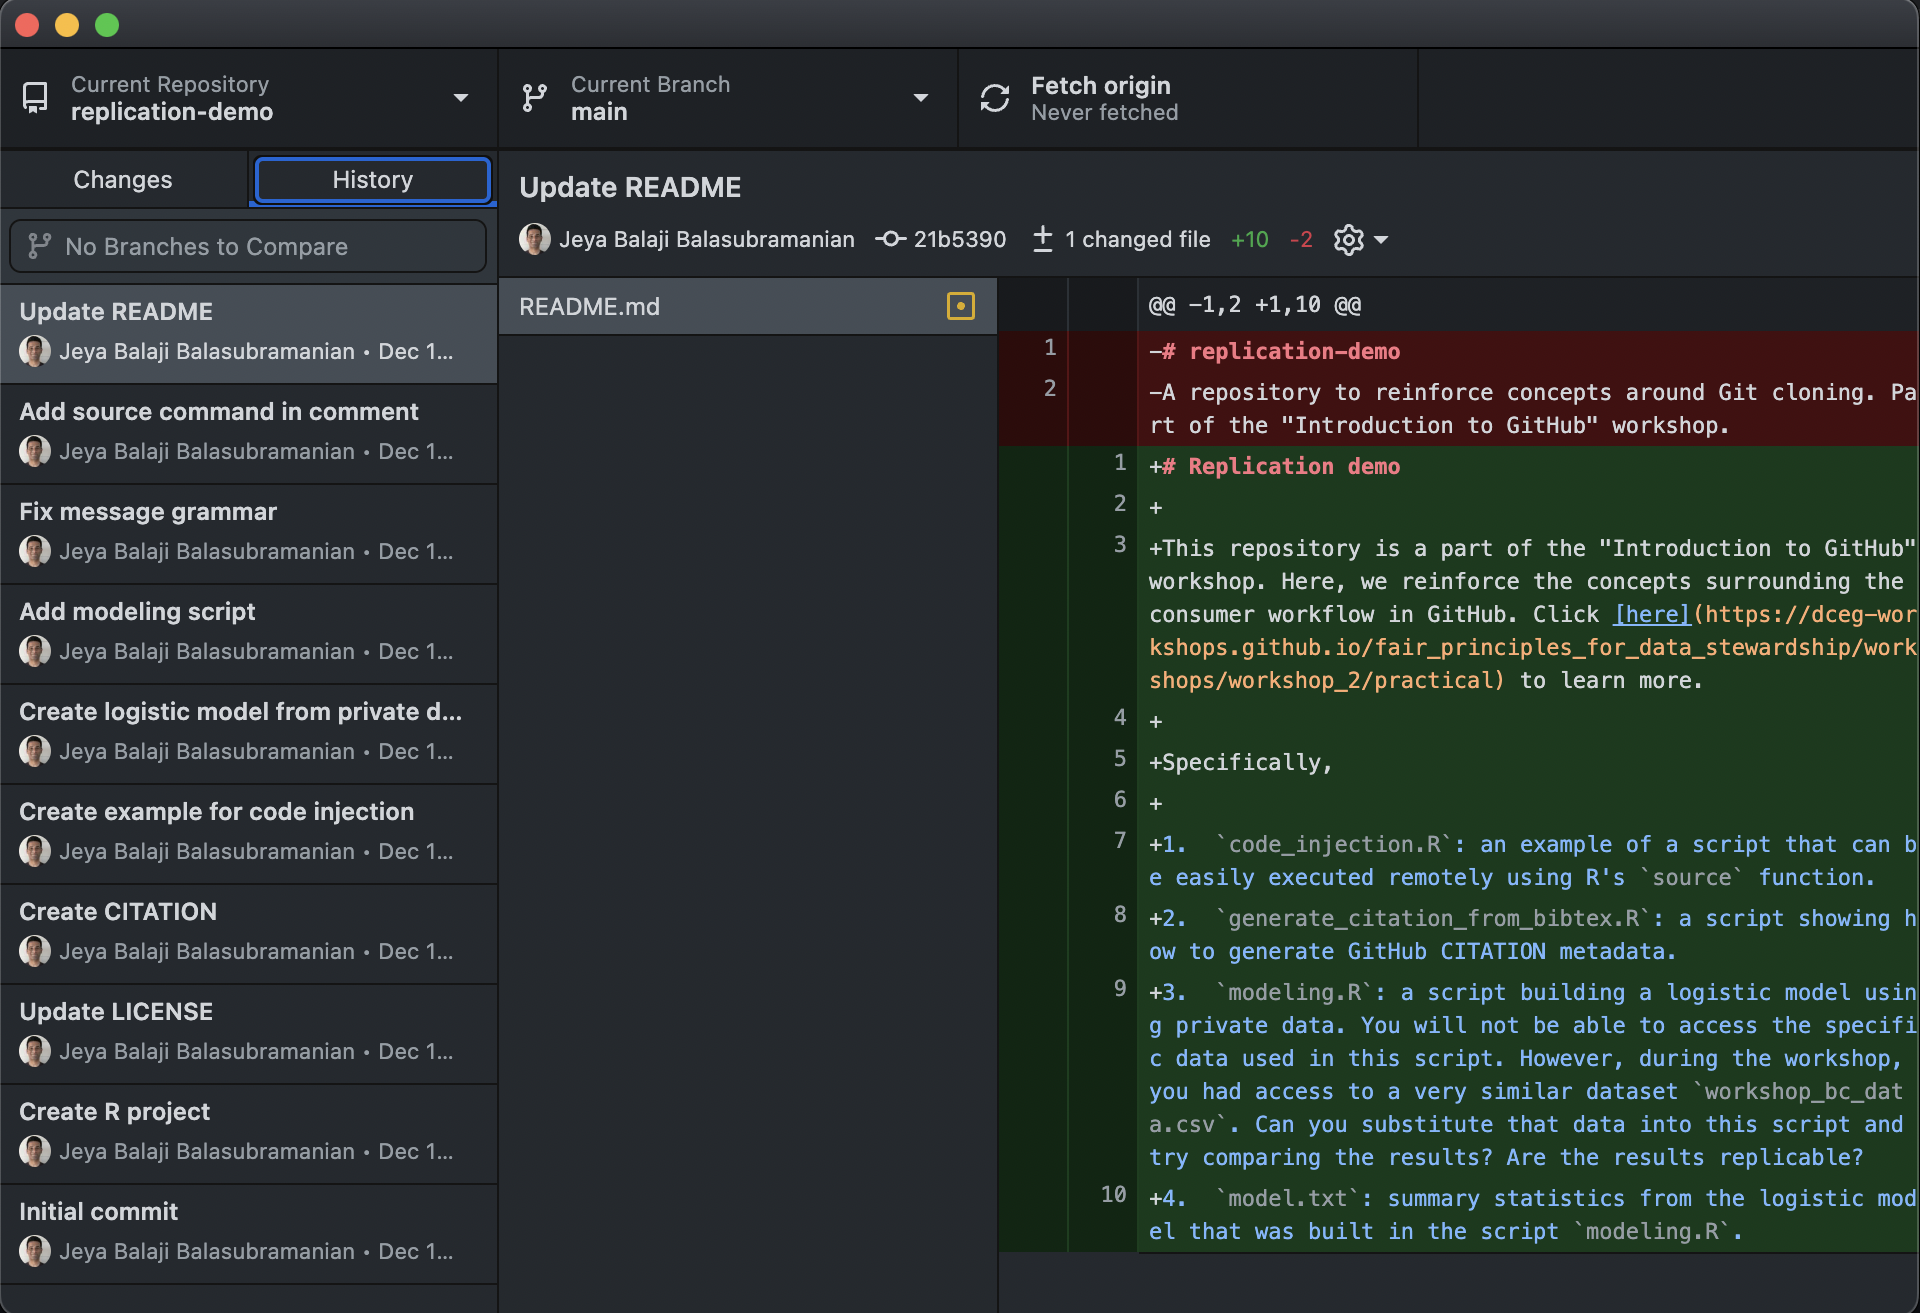
You have now cloned a remote Git repository on your local machine. You can now run the code in this project directory.

Replication exercise
For a concrete exercise in performing a replication study, please take a look at the modeling.R R script in the cloned repository.
You will already be familiar with the first half of the script. It is the same code that we used in the Creator workflow. It simply locates and ingests a file from Box. Except, the data that was used to perform the analysis in the second-half of the script is not made available to you in Box. However, the data is very similar to the one you practiced with in the Creator workflow. Can you run the code in modeling.R but replace the directory and file ID with the data you used in the Creator workflow?
Specifically, you will need to replace the following lines of code in modeling.R—
1) Replace the directory ID with the one you used in the Creator workflow.
box_setwd(dir_id = 185780841823)
2) Replace the file ID with the one you used in the Creator workflow.
bc_data = box_read(file_id = 1091187602667)
The rest of the code in modeling.R build a logistic regression model with the data and stores the model parameters in a file named model.txt. You may want to change this line as well.
sink("model.txt")
Change the file name to something else for e.g. model_replicated.txt. Go ahead and compare the two files. Are they identical? are they similar? or are they completely different?
GitHub issues
GitHub issues are a way to ask questions or report bugs in a project. It is also a place to request new features or suggest improvements to the project. This shows the social networking aspect of GitHub.
What sets GitHub issues apart from forums like Biostars and StackOverflow is that the issues are attached to the project. This means that the issues are visible to the project maintainers and active users. The project maintainers or active users can then respond to the issues. This is a great way to get help from the project’s community. The audience in Biostars and StackOverflow is much more generic and may not be familiar with the project.
To create a new issue, click on the Issues tab on the GitHub repository page. See below—

Click on the New issue button to create a new issue. When reporting a bug, please provide as much information as possible (e.g., the OS you are working on, your virtual environment set up, etc.). This will help the project maintainers to reproduce the bug exactly.
Feel free to practice this on our toy repository. You can file your made-up issue here: https://github.com/DCEG-workshops/replication-demo/issues.
For a more practical example, if you would like to suggest concrete changes to this workshop website, please make a formal request here: https://github.com/DCEG-workshops/fair_principles_for_data_stewardship/issues.
To learn more about GitHub issues, please see this documentation.
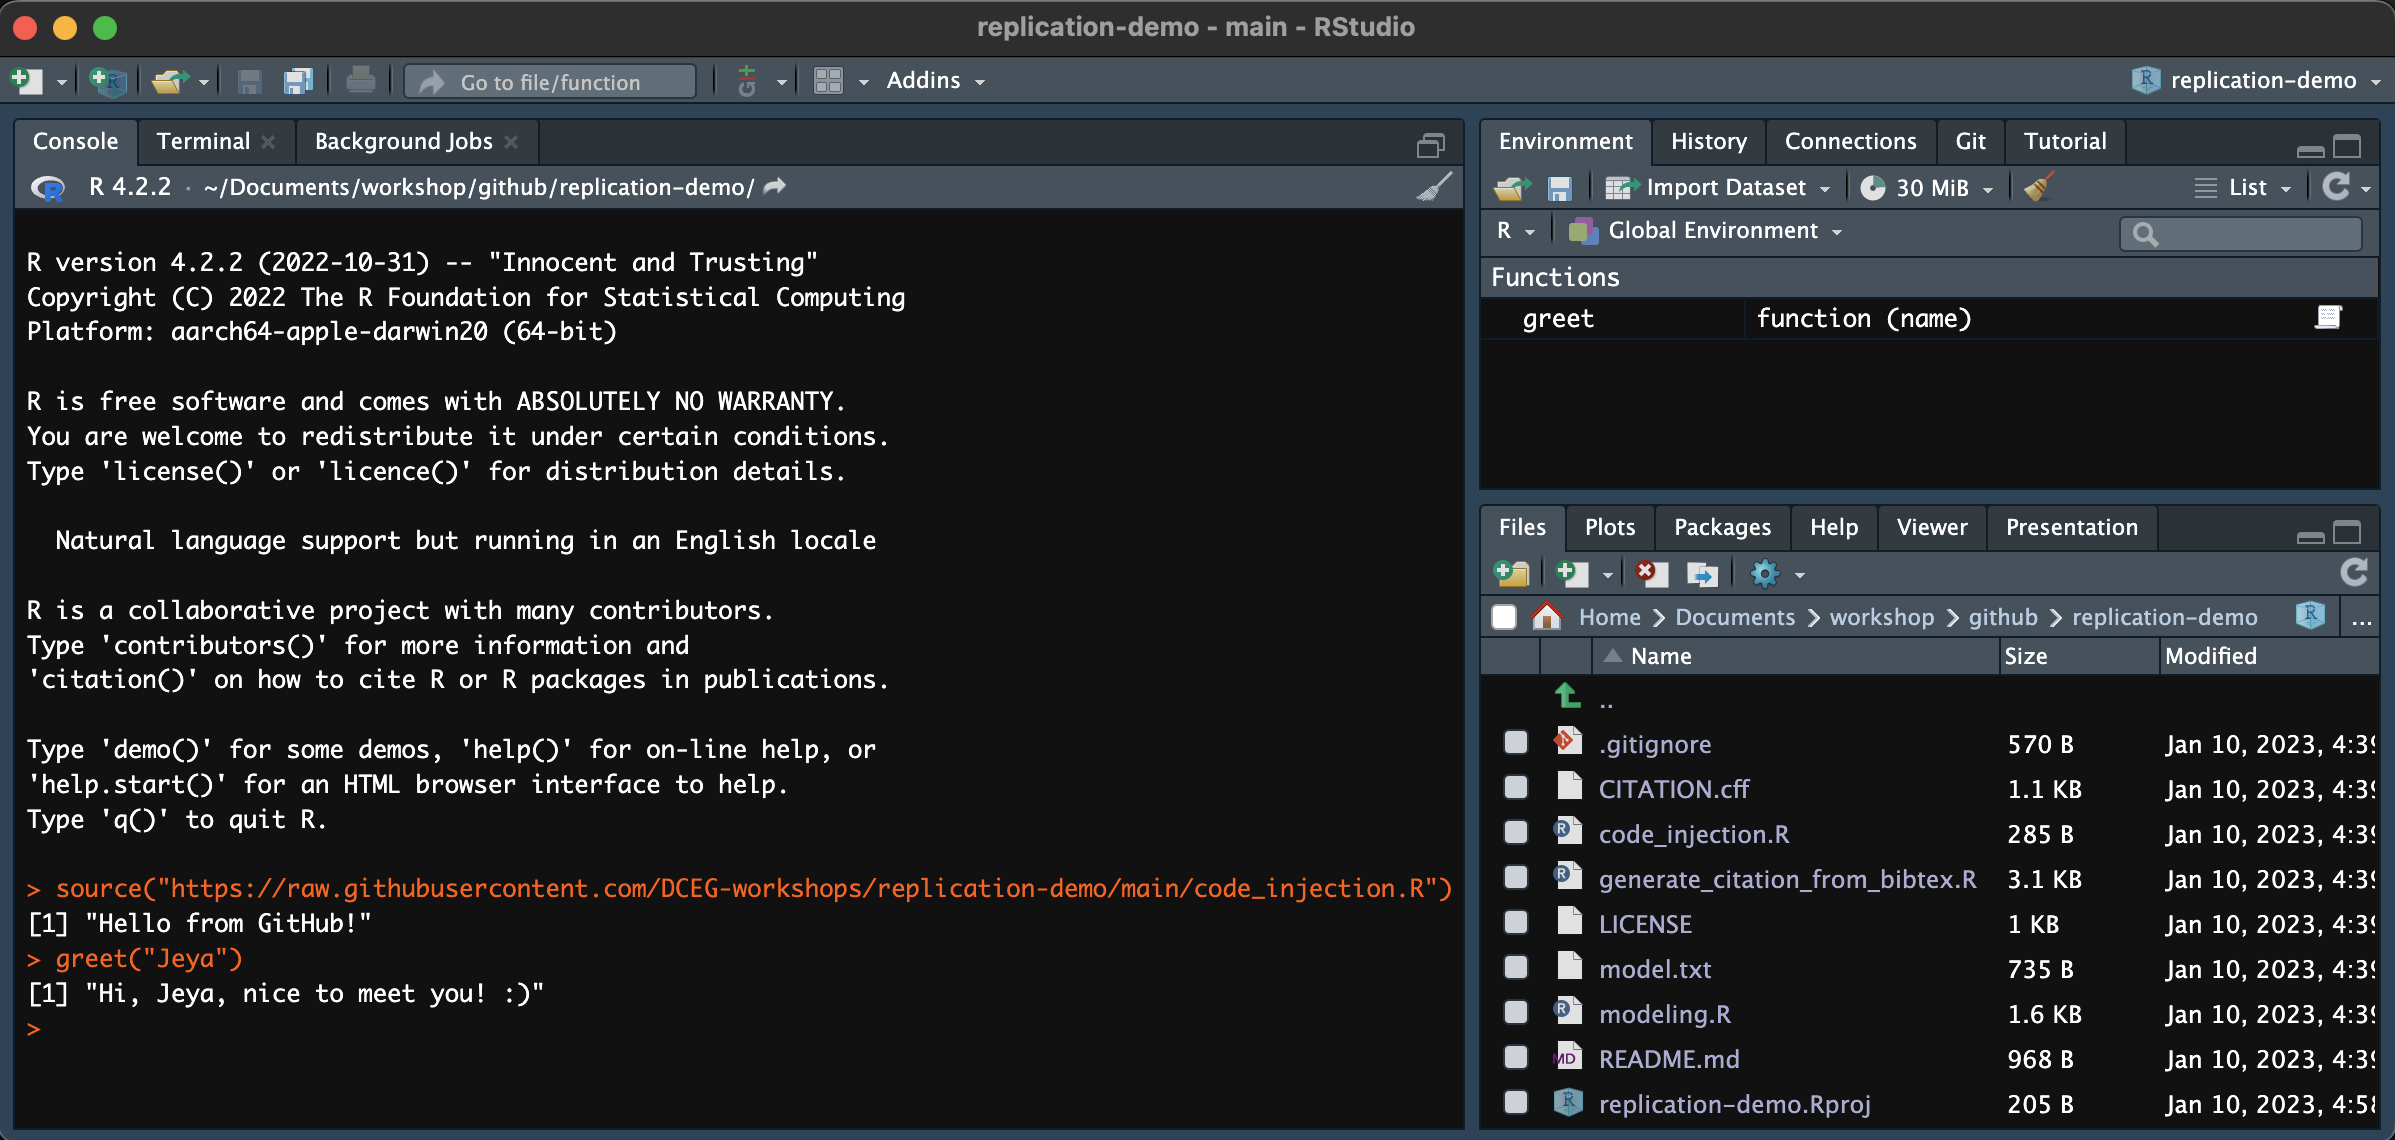
source: an R function to directly run code from a file (local or remote)
The source function is a special function from the base library in R that allows you to directly run code from a file, URL, connection, or expression. This is useful when you want to run a single R script from someone’s code. Since the method supports a URL, you can read the file located remotely on GitHub and run it locally.
To practice code injection, take a look athe the repository we just cloned. It contains a file called code_injection.R. You can source this file by running the following code in RStudio’s Console—
source("https://raw.githubusercontent.com/DCEG-workshops/replication-demo/main/code_injection.R")
The RStudio window sourcing this file is shown below—
Advanced concepts in GitHub
At the workshop, we learned of some basic GitHub features. We focussed on the features relevant to the creator and the consumer workflows. In this section, we will learn about some advanced features in GitHub. These features are relevant if you want to collaborate with others on a project or contribute to open source projects. Specifically, we will learn about—
- Contributor workflow
- Project manager workflow
That is to say that our workflow, now does not end as a consumer but continues on as a contributor. This way we give back to the community. We improve upon other people’s project with our time and expertise. We will also learn about the project manager workflow, which is relevant for project managers who are responsible for managing contributions made by others to their project. The overall workflow is shown below—
Contributor workflow
When playing the role of a contributor, researchers contribute to the code of others by adding new features, fixing bugs, or improving their documentation.
Adding collaborators
The first feature to know about is adding collaborators. Collaborators are people who have both read and write access to the repository. That is they can download your code, run it, and make changes to it. This is useful if you want to collaborate with others on a project. You can add collaborators by going to the Settings tab of the repository that you own. On the left-panel, select Collaborators. You can then add collaborators by entering their GitHub username. You can also remove collaborators at any time. To learn more, see this documentation.
Pull
In the Creator workflow, we performed a Git workflow. There we made changes to our project, committed them, and pushed them to the remote repository. However, we were working alone. In reality, there is one more command in the git workflow when working with multiple people on the same project— the pull command. Pull is used to update the local repository with the changes made to the remote repository. This is useful if you want your local copy of the repository to reflect the changes made by others to the remote repository. You can do this from GitHub Desktop, please see this documentation.
You should always pull before you push. This is to avoid conflicts between your local and remote repositories. If you do not pull before you push, you may end up overwriting the changes made by others to the remote repository. This is a common mistake that beginners make. To learn more about this, please see this documentation.
Steps to contributing to a project
If you have identified a project that you would like to contribute to, and you are not added as a collaborator there, you can still contribute to the project. The steps to take are as follows—
- Step 1: Fork a remote repository
- Forking a repository is a way to create a copy of the remote repository on your GitHub account (which itself is remote but under your name). This is useful if you want to make changes to the project without affecting the original project. You can fork a repository by clicking on the
Forkbutton in the top-right corner of the repository page. Link to GitHub documentation on forking a repository.
- Forking a repository is a way to create a copy of the remote repository on your GitHub account (which itself is remote but under your name). This is useful if you want to make changes to the project without affecting the original project. You can fork a repository by clicking on the
- Step 2: Clone a remote repository
- Cloning a repository is a way to download the remote repository to your local machine. This is useful if you want to make changes to the project on your local machine. You can clone a repository by clicking on the
Codebutton in the top-right corner of the repository page. We did this in theConsumerworkflow. Except, we are not directly cloning the repository of our interest. Instead, we forked the repository into our account and are not cloning the repository from our own account. Link to GitHub Desktop documentation on cloning a repository.
- Cloning a repository is a way to download the remote repository to your local machine. This is useful if you want to make changes to the project on your local machine. You can clone a repository by clicking on the
- Step 3: Create a new branch
- Branching is a way to create a new branch of the repository. This is good practice because it allows you to make changes to the project without affecting the main branch. This is similar to
Track changesis MS Word. It allows you to suggest changes without affecting the original document. You can create a new branch in the repository by going to GitHub Desktop, click on theCurrent branchon the ribbon menu on the top. In the fieldFiltertype a name for your branch. Name should reflect what you are planning to implement. Then click onNew branch. Link to GitHub Desktop documentation on branching.
- Branching is a way to create a new branch of the repository. This is good practice because it allows you to make changes to the project without affecting the main branch. This is similar to
- Step 4: the Git workflow
- Continue working as in the git workflow in the
Contributorworkflow above. That is, make changes to the project, commit them, and push them to the forked remote repository.
- Continue working as in the git workflow in the
- Step 5: Create a pull request
- A pull request is a way to suggest changes to the original project. You can create a pull request by going to the forked repository on your GitHub account. Then click on the
Pull requeststab. Then click on theNew pull requestbutton. Then click on theCreate pull requestbutton. Link to GitHub documentation on creating a pull request.
- A pull request is a way to suggest changes to the original project. You can create a pull request by going to the forked repository on your GitHub account. Then click on the
Project manager workflow
When playing the role of a project manager, researchers manage the development of a software project that includes your own code, and the code from others (your team, your collaborators, and open source contributors from the public).
The main task here is to manage the pull requests made by others. You decide which pull requests to merge into the main branch of the project. When multiple pull requests are made to the same part of the code, you must decide which pull request to merge. This step is called merging. It involves resolving conflicts between the pull requests.
Merging (conflict resolution)
To see a list of pull requests that have been made by others, click on the Pull requests tab on the GitHub repository page. You can then review the pull requests and decide which ones to merge. If you decide to merge a pull request, you must first resolve any conflicts that may arise. This is because the pull request may have made changes to the same part of the code as another pull request. To learn more about this, please see this documentation.
You have now completed the arcs of a creator, consumer, contributor, and project manager. You are now ready to start your own project. Practice makes perfect. If you force a habit, you will soon find all these concepts second nature to you. It would create less of an overhead for you to achieve FAIRness in all your future projects.